It’s done — whoopee!! — get ready for the reveal!!! Welcome back to the One Room Challenge: Berrybrier Master Bathroom Edition. I finally have a place to get ready that doesn’t make me concerned for my personal health and it looks so good! First, let’s remind you where we all started here.
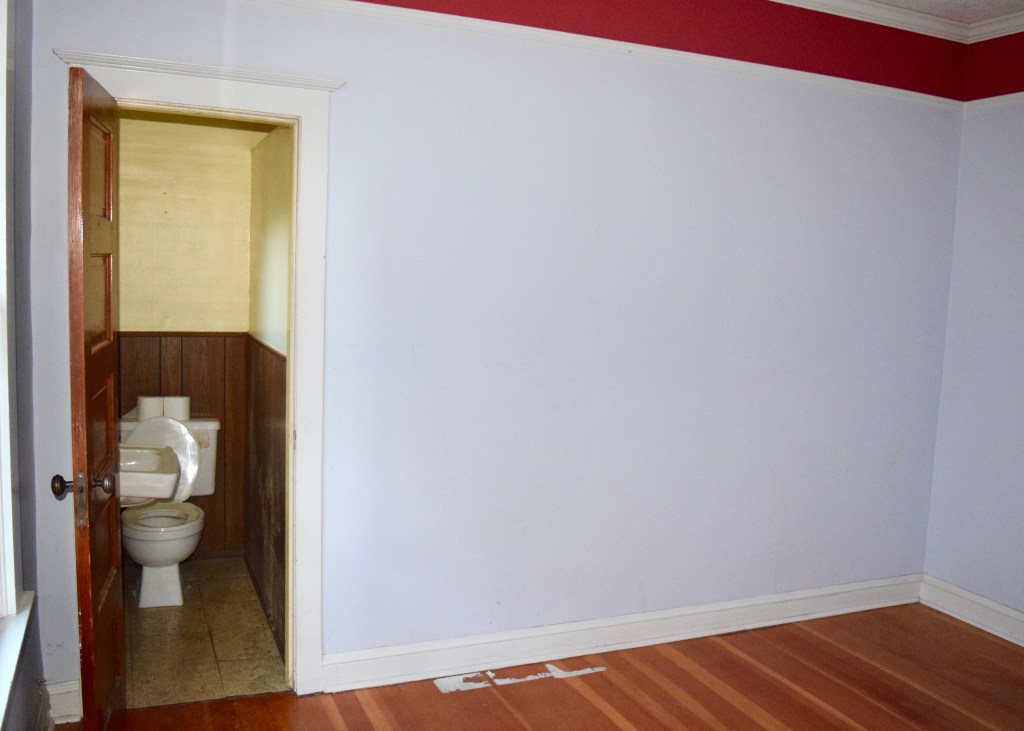
The Master Bathroom at Berrybrier is — like most Master Bathrooms — right off the Master Bedroom. It’s an awesome addition that is so great to have, even if it is only a half bathroom. When I bought the house, it was right there, peeking out into the periwinkle and red Master Bedroom.
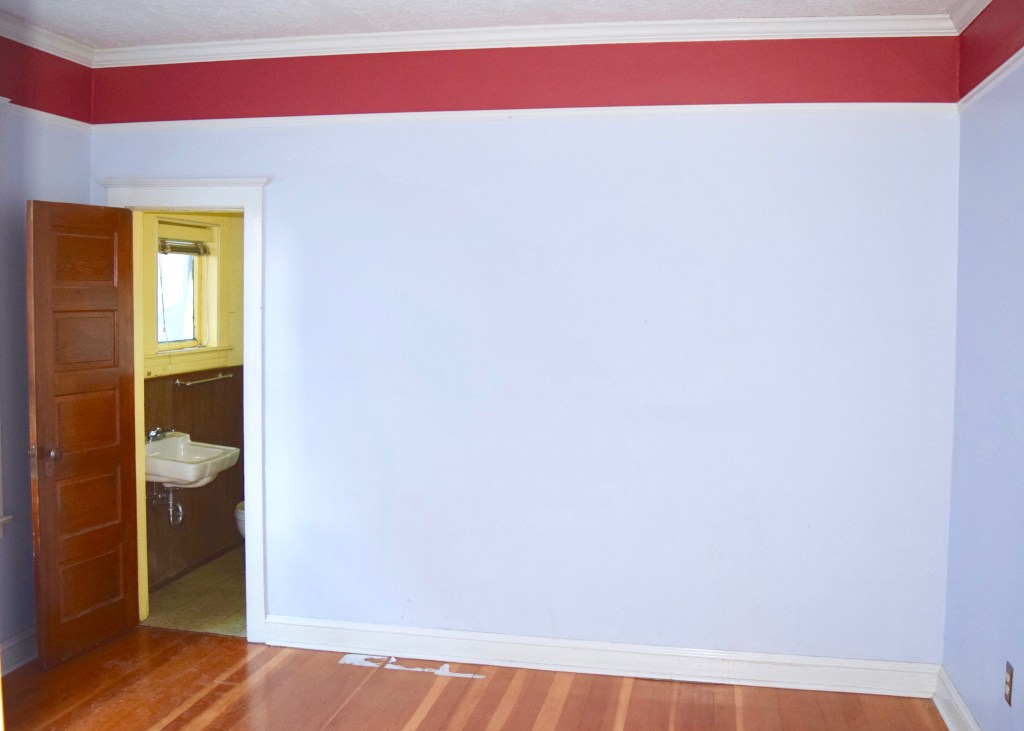
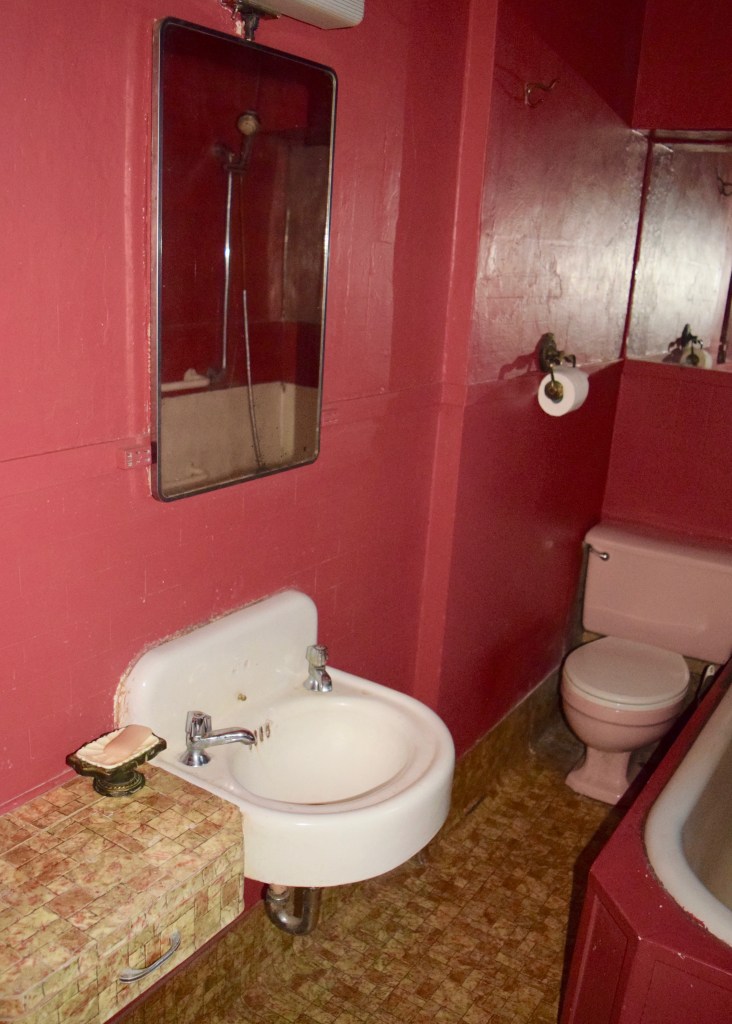
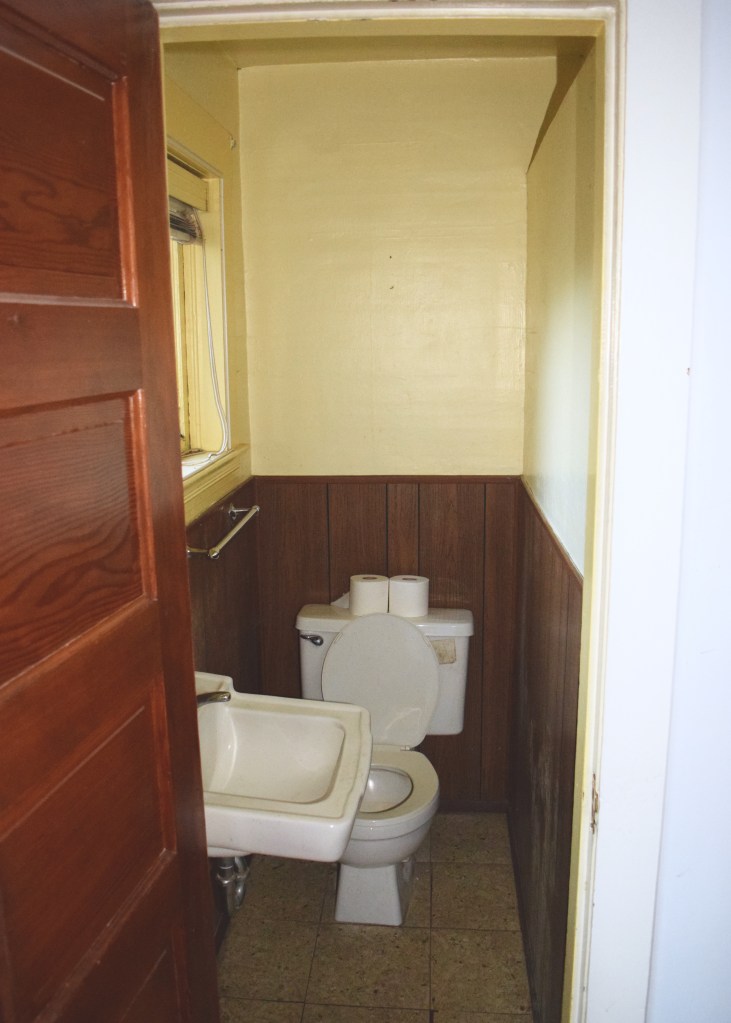
When I moved in, the bathroom had yellow walls, faux wood wainscotting, loose peel & stick vinyl tile floors, a sink falling off the wall, and a deep and desperate layer of grime. It was a teensy little room (only 54″ deep by 30″ wide!) off my Master Bedroom and hardly big enough to use! The sink stuck way out into the space and you could easily brush your teeth while on the toilet.

Even though the space was small, I knew that with two roommates, any additional toilet and room to get ready for the day in would be an asset! Plus, it’s super great to wash your hands while still sitting on the toilet, right? Right?!
With my moodboard in hand and the One Room Challenge deadline, I got to work demo’ing this little room down to the studs and completely rebuilding it!
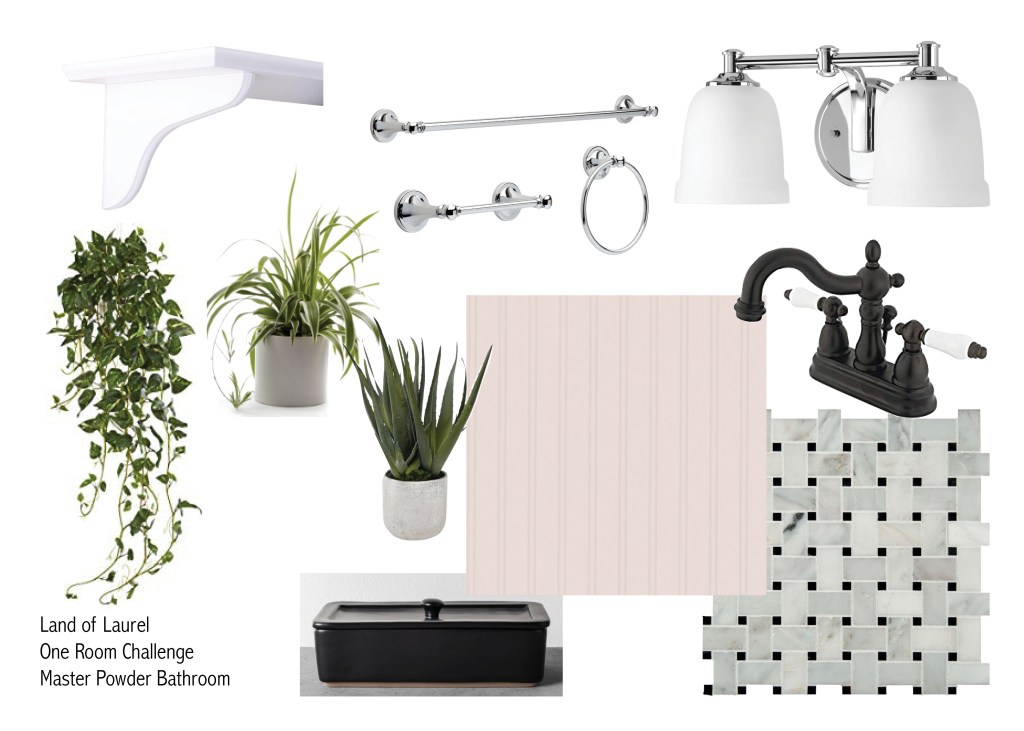
Bath Accessories | Sink | Tile | Beadboard | Lighting (Similar) | Paint | Bracket | Faucet
At the end of last week’s post you saw this little sneak peek of how the room was chugging along after all the fixtures were installed and before I worked on final styling. It was a far cry difference from where this space started!

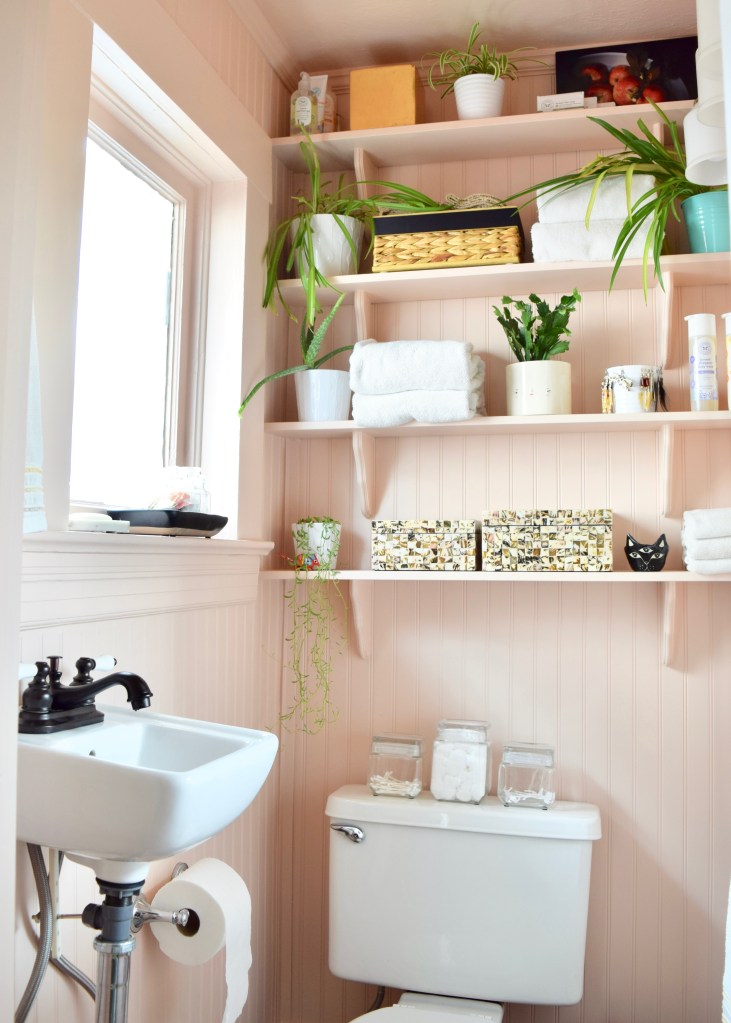
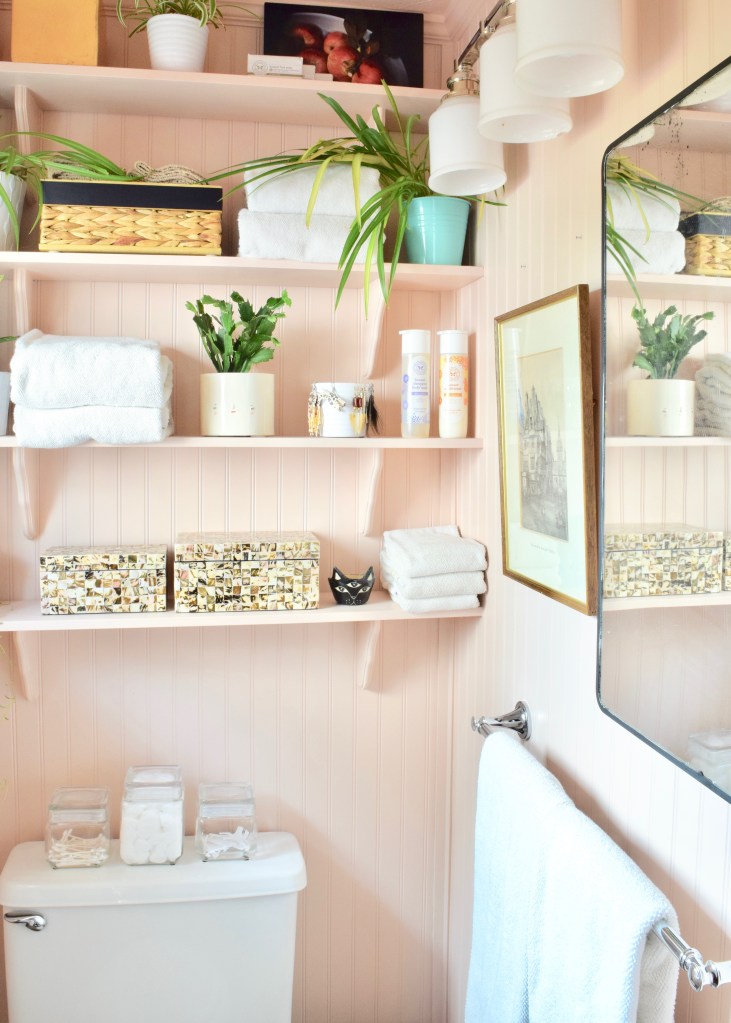
Well, look at her now in all her styled glory! I am just so excited, y’all! This little bathroom was one of the worst rooms in this house when I bought it, and now it’s bright, light, and oh so happy!
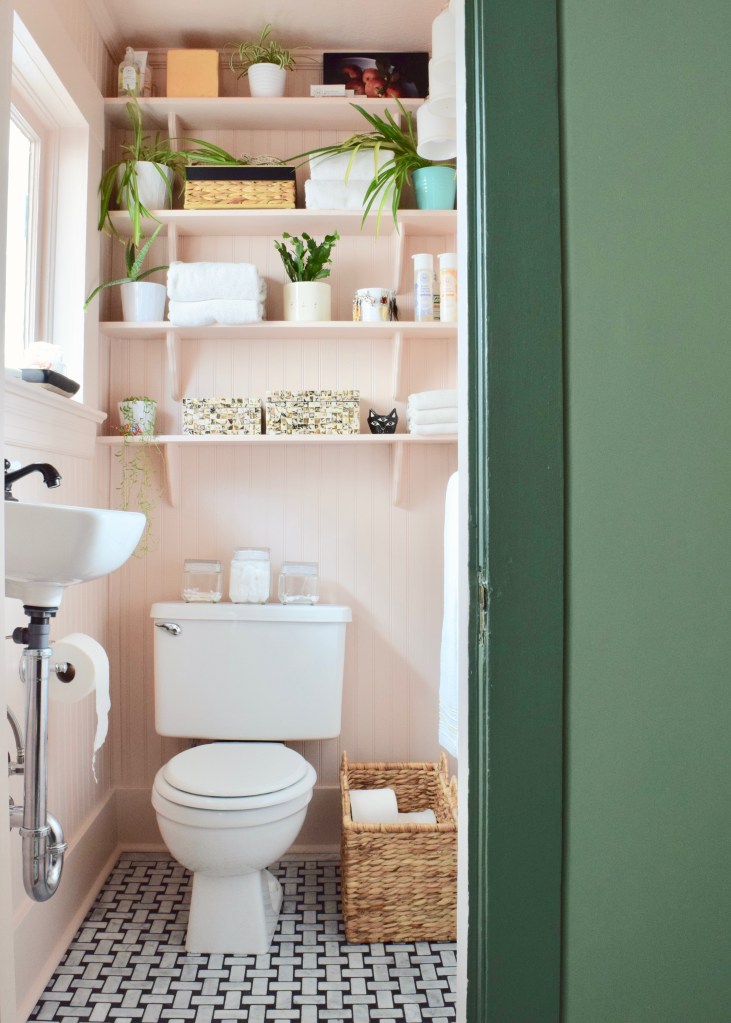
I had fun styling out all the shelves in this space, because designers just looove open shelving! I know it’s not for everyone, but if you can style shelves and maintain that look, it becomes such a fun thing to play around with. In this room, a heavy cabinet over the toilet would have felt like too much, so open shelving was really the only option. I’m so glad I went with it though!
Because the room is still tiny, adding inches when I reset the side wall to it’s original location only brought it to 40″W x 54″D! So yes, you can still reach out and turn on the water to brush your teeth while sitting on the toilet, and no, there’s not room for two in here, but it’s just SO MUCH BETTER than before!
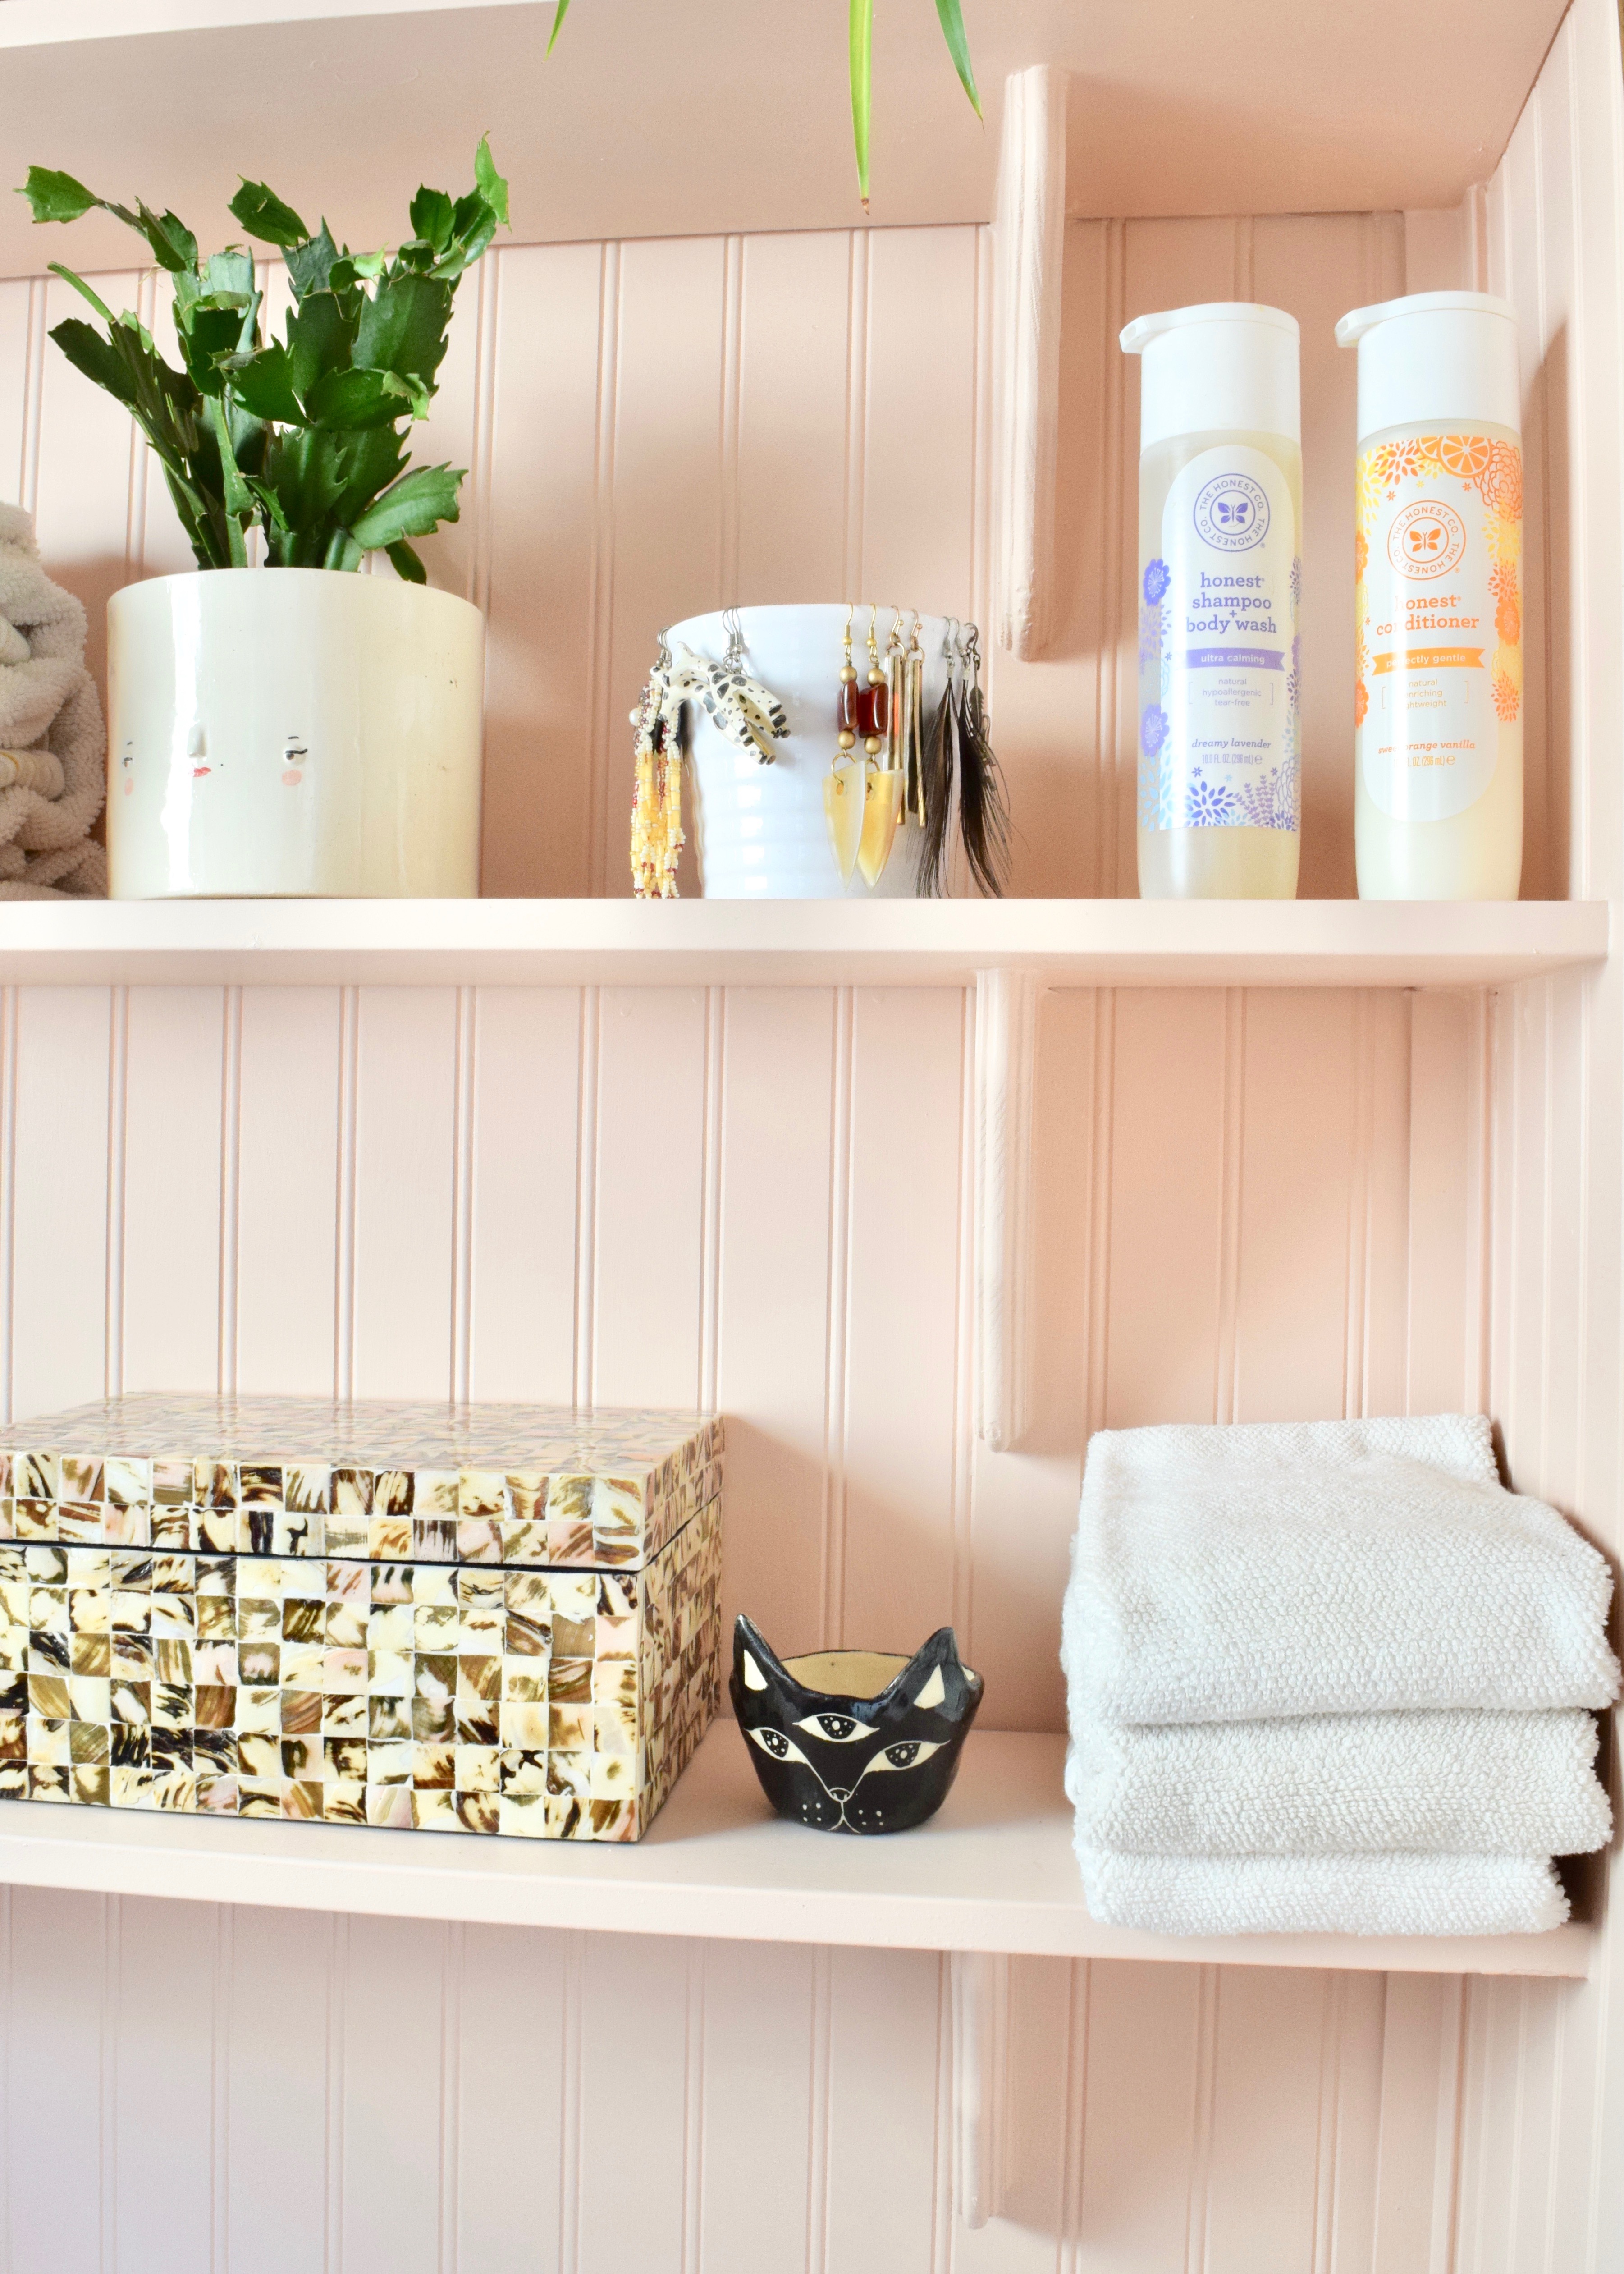
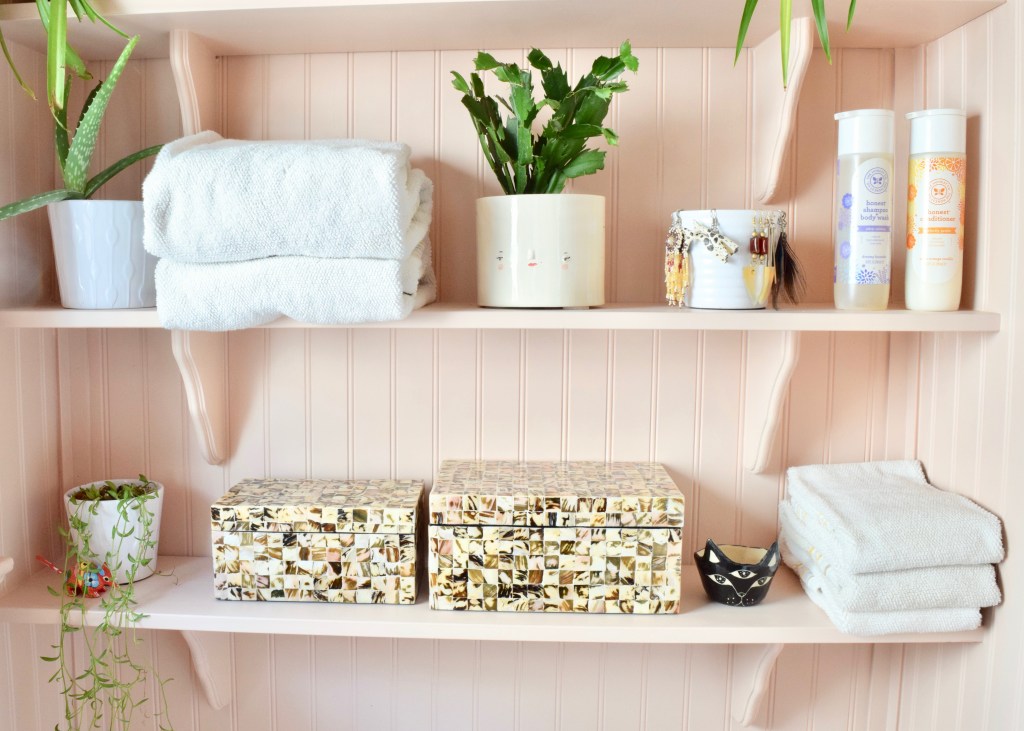
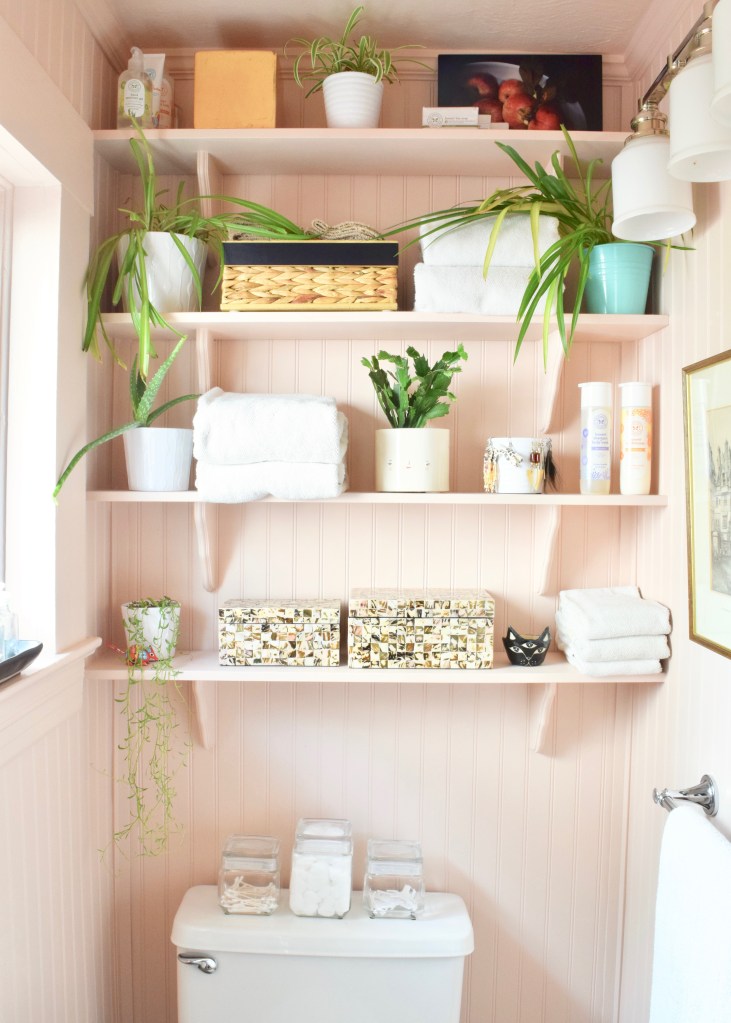
I’ve added tons of plants to the shelves, because even though the window faces north and is only about 20 feet from the neighbor’s house, it still gets decent light. Plus, it’s one of the few rooms I can hide spider plants in without fearing that my devil cat will bite off the leaves to play with! I had fun styling it out and just adore the face planter and how the little aardvark I got in New Mexico 11 years ago hides in the string of bananas plant!
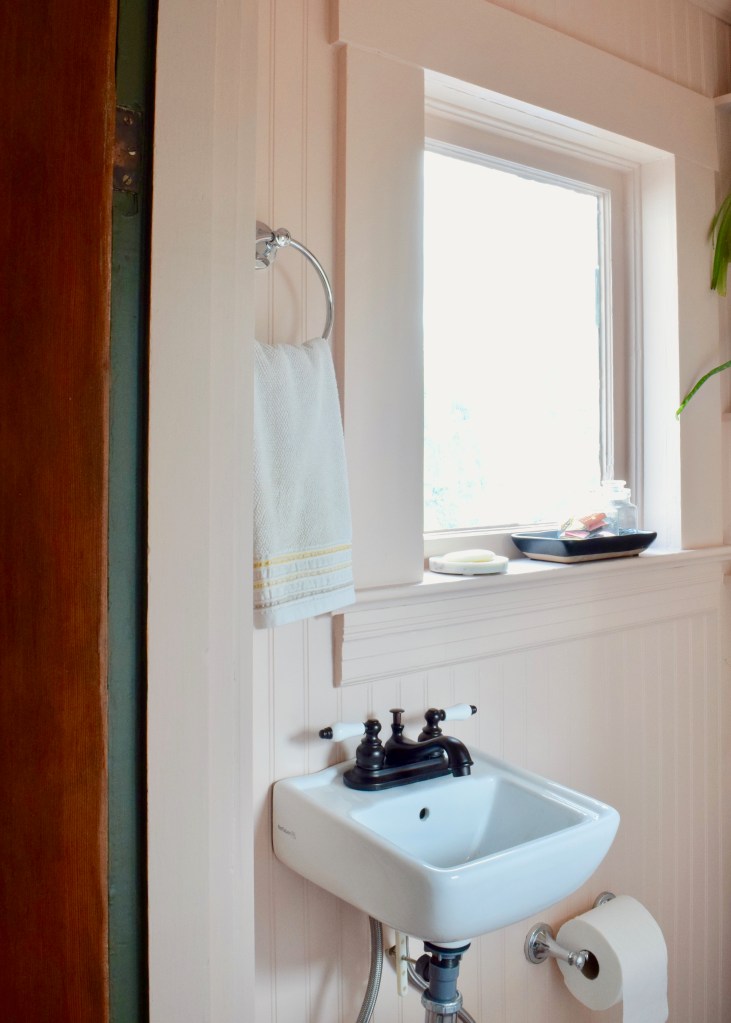
On the wall with the sink is the ring for the hand towel and the toilet paper hook. Because this room needs to pack in all my bathroom storage, I also utilize the deep window sill. I keep a black Target tray here with little glass jars holding my incense matches (if you haven’t tried these you need too!) and bobby pins as well as a tiny bowl that I use for the incense. The incense matches are my fave, because I can light one in the mornings when I’m getting ready and enjoy the scent and by the time I’m done with my routine, the incense is out, so I don’t have to worry about it.
My tiny sink is just perfect for quick mornings and I love the accent the black and ceramic faucet brings in as well. I’ve tied in the black faucet with other black accents throughout the room, so it feels purposefully mixed in with all the chrome fixtures.
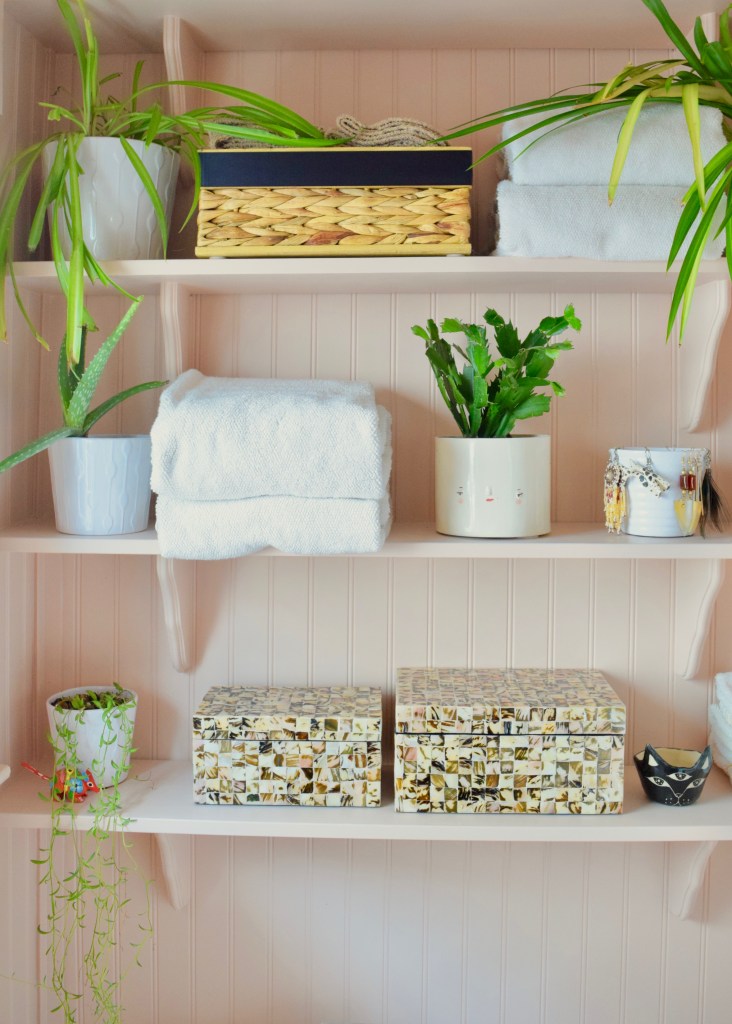
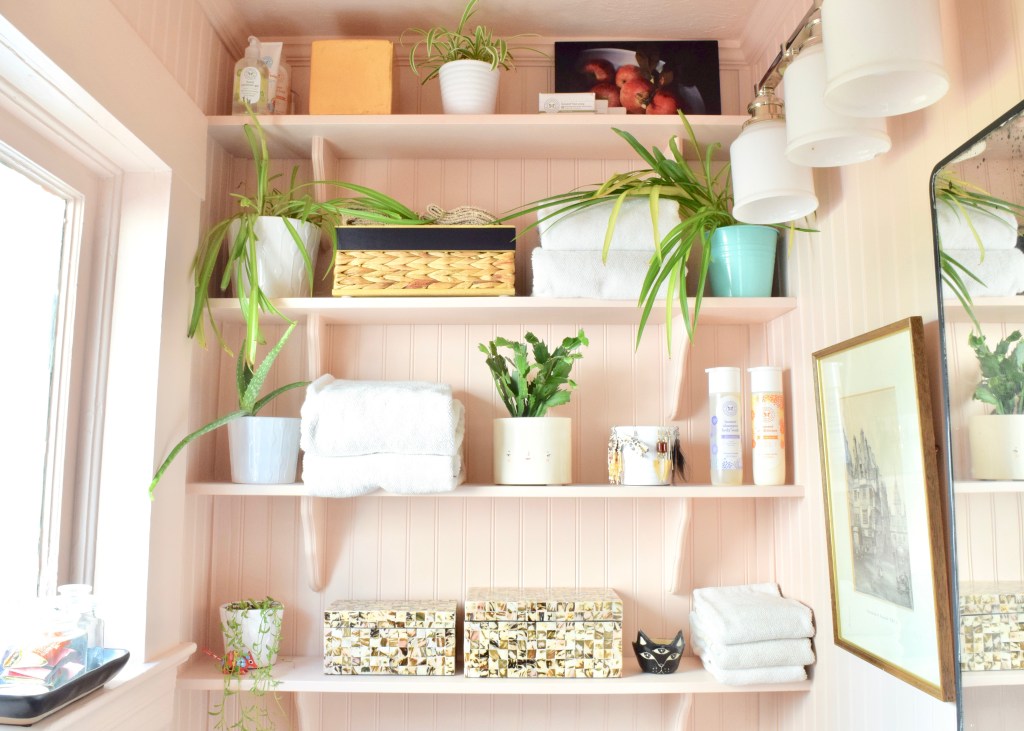
As for the shelves, they pack in the bulk of my storage! The top shelf holds some extras of hand sanitizer (back stock for one I keep on my desk at work), magic balm, bubble bath (just in case!), etc. The gold container holds tampons, and next to the plant are three bars of soap in front of the art. Yes, I am the only millennial still using bar soap, but I love it and have no plans to stop!
The next shelf holds a basket chock full of the tan Target wash clothes I use to take off my make up and wash my face, as well as some tightly folded bath towels.
The second from the bottom shelf contains more towels, the pot I hang all my earrings from (inside the pot are earrings that don’t hang!) as well as my extra shampoos and conditioners. Since I always buy the same brand, I stock up, and some times there are more or less bottles.
The bottom shelf has two capiz shell boxes that contain all of my make up, my three-eyed cat bowl (which I use for quickly dumping earrings or whatever when I’m feeling lazy), and my stash of extra hand towels.
On the toilet, I’ve squeezed in even more storage, stacking a row of jars that hold q-tips, cotton balls, and flossing tooth picks.

I love that a quick glance at my shelves lets me know if I’m low on shampoo or if I need to wash a load of towels, because I’m getting low. It’s nice to have it all within sight, but organized and contained. All of this used to be stored behind a closed door in an old IKEA wall hung unit that came with the house. It looked terrible inside there! Having it all styled on shelves forced me to not only take a hard look at what I have and pare down, but also store it in a way that is pleasing to look at and very organized.
On the right wall I decided to add a medicine cabinet beneath the light fixtures. Although it’s not right over the sink, it’s still practical. In here I keep my contacts and solution, my jar of make-up brushes, my tooth brush and paste, face creams, sunscreen, moisturizer, and deodorant.
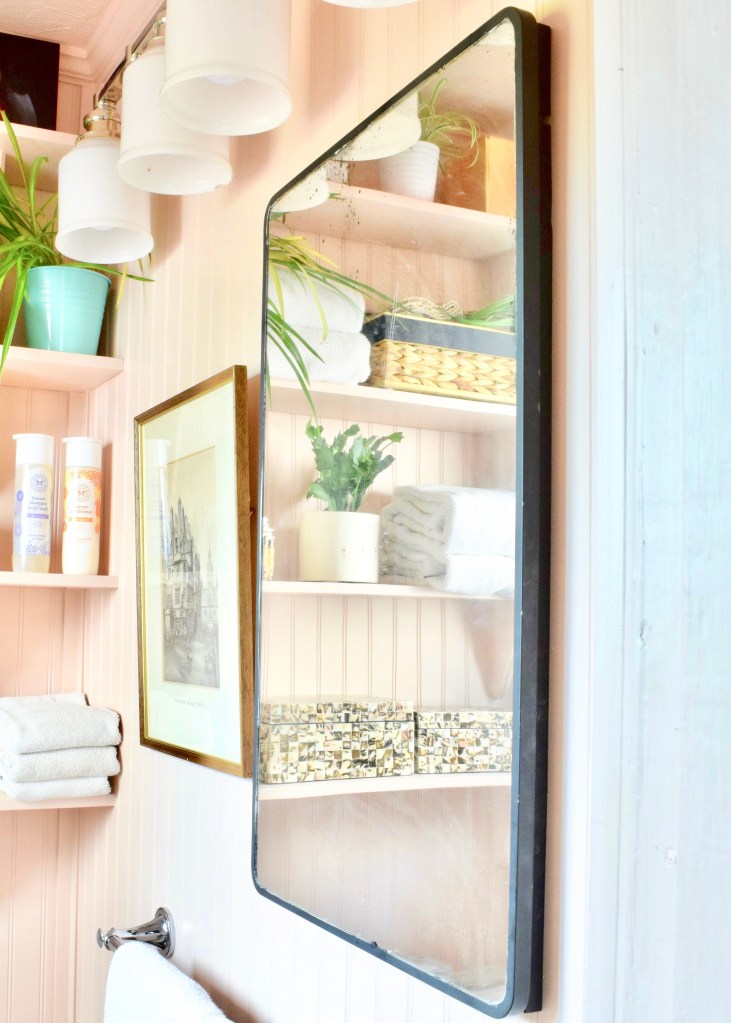
Can you believe that medicine cabinet used to be in the Main Bathroom off the kitchen?! I kept it after I demo’ed that room and a quick coat of paint made it better than new! It’s hard to believe it’s the same storage unit.
Now, it sits on the wall underneath one of the scones I got from my Aunt Steph, next to a picture I found at Goodwill. I love that I was able to reuse the mirror that came with the house, even if it wasn’t exactly original to the house (which probably had an out house when it was built!). The towel bar is centered between the two light fixtures below it.
Undoubtably, the shelves are FULL. They are packed with storage, yet there’s still room for more if I did need it. Most of the items I keep, I’ll have a couple on hand and even if I doubled those things (like shampoo), I wouldn’t need to restyle or move anything.
These photos really show the paint color true to life. It’s Benjamin Moore’s Pink Beach and it’s the most perfect, subtle shade of pink! It really does look like calamine lotion. I actually took the lid of one of the boxes I store my make-up in (bottom shelf) to the Benjamin Moore store and picked a paint color that matched the one on the box then and there without even swatching it on the wall! It was a bit crazy, but I knew what I wanted and I knew the color was greyed out enough to look good in any space. It worked out just as I’d thought! I really couldn’t be any happier. I love how the little room just glows pink in the morning light and how the color is flattering, so I even look good in this space on my most exhausted mornings!
So did I meet my spending goal of less than $650? Let’s see…
- Drywall = $15 (one sheet, plus left over pieces)
- Electrical Box + Wire = $50 (I bought extra wire, so I’ll have some for the next project)
- Sconces = $0 (free from my Aunt Stephanie)
- Tile + grout + mastic = $20 (tile was left over excess from my parents’ bathroom reno and I had left over mastic and grout from my Main Bathroom tiling, but I did pick up more grout in the end.)
- Beadboard + Crown/Baseboards/Shelves = $250
- Shelf Brackets = $32
- New Sink + Plumbing Pipes = $100
- Faucet = $75
- Bathroom Accessories = $40
- Styling Accessories = $0 (I had all of these already!)
TOTAL SPENT: $582
Now, that’s certainly not free. It’s actually quite a lot to spend on a bathroom I don’t even feel will be permanent (I eventually want to knock down the right wall and steal the shower from the main bathroom to create a true master bath), but for a down to the studs bathroom renovation, that’s pretty damn good! The space is a million times better now and even if I had spend a little on things like tile and lighting, I still would have stayed under $1000.
I think it’s great to consider something like this for your own bathroom renovations. If you have a space that’s just making you unhappy, if you can get pretty thrifty, you can still completely transform it!
How’s this for a before and after!? Can you spot all the big and the little differences? Can you guess what else I’ve been working on? Can you believe it’s the same space, same toilet, same configuration? I can barely fathom how far this little room has come!
Now that’s a real transformation! I’m so glad it’s complete and I’m just absolutely loving getting ready in this new space! What do you think of how it’s turned out? Would you be able to keep all your bathroom and make-up items in open storage like this?
Have you followed along with any of the other One Room Challenge transformations? There are some impressive ones out there!


Laurel! This is SOOOO amazing! Can you come do my bathroom next??
Thank you!! I love this little space! I’d happily help with yours too!
i LOVE this! the color and style are fab!
Thank you! It was a fun process!
This was so fun to look and to read about. I like your vibe and your taste. Plan to follow you for sure. Fantastic job!
Aww thank you!
Hey there Laurel, how you doing!? I just went through your blog and its totally fab with such great ideas , keep up this effort love and have a nice day! ❤
Looking forward to reading from your blog more 🙂
You have a new follower 😉
Thank you! I’m so glad you enjoy it and can’t wait to share more!
And I can’t wait to read more 😉
Great success! Its so beautiful now. What did you do with the door?
The door is still there! I guess it got cut out of the final photo shots, whoops!
This is fabulous! You got every penny out of your budget AND a great bathroom! Well done! 🙂
Thanks so much Angela!
Oh my gosh!!! What a beautiful bathroom! I have always been biased against half baths attached to bedrooms and I completely take it back. This is fabulous! The pink beadboard walls are an absolute dream and I love the salvaged medicine cabinet. You really worked with what the space had and it’s amazing because of it!
Aww thank you so much! Ive been super grateful to have it all transformed. I totally get you though a half bath off the bedroom is definitely not ideal. I’d love to eventually steal the shower from the main bathroom for this room.
Oh my gosh!!! What a beautiful bathroom! I have always been biased against half baths attached to bedrooms and I completely take it back. This is fabulous! The pink beadboard walls are an absolute dream and I love the salvaged medicine cabinet. You really worked with what the space had and it’s amazing because of it!
This was so entertaining to read. Plus, your results are fabulous. I like your taste and creativity. I’ll follow you for sure.! Great job.👏👏👏
I appreciate that! It was such an amazing transformation to watch come to life.