The landscape lighting featured in this post was gifted to me by Kichler, all opinions and installation suggestions are my own. Please read your instruction manuals and consult an electrician if you are unaccustomed to working with electrical!
If you saw my One Room Challenge reveal, then you know my front garden underwent a major transformation this spring! It has evolved from sad and weedy to a magical space that brings me so much joy. I now go out to wander through the garden a few times a day! While I love plucking through the yard in the daytime, the garden in the evening is definitely my favorite. It is so soothing to sit out on the bench and read a book, or watch the sunset, or chat with a friend. The garden feels utterly magical as the sun turns the sky pink and a big part of that magic is the addition of Kichler’s landscape lighting!
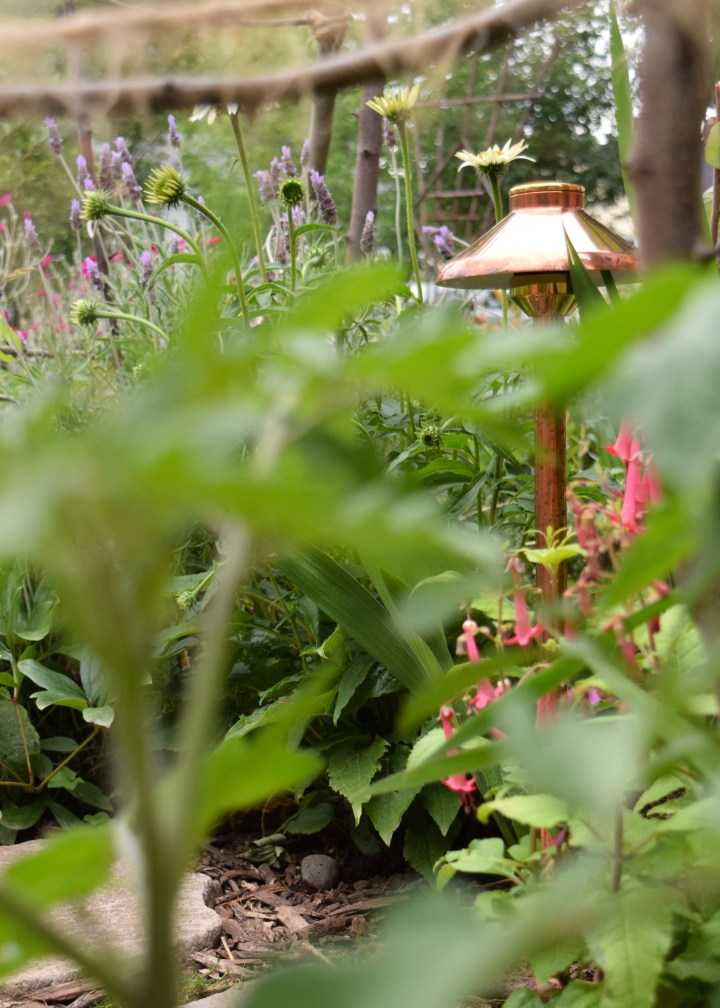
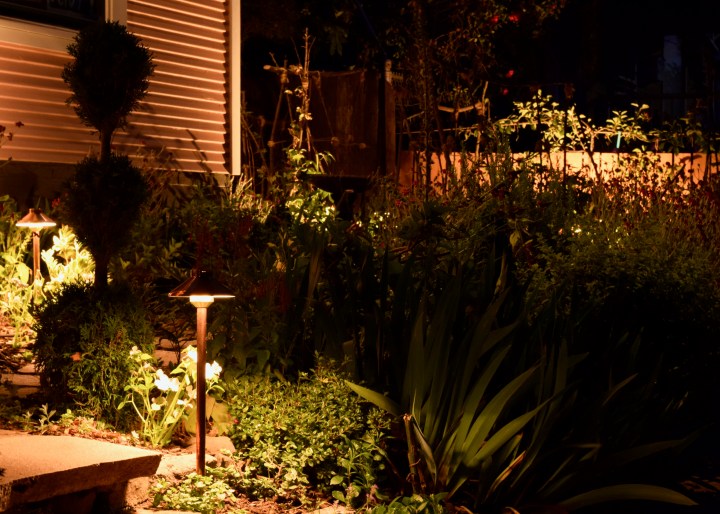
Kichler kindly gifted me landscape lighting to really knock the garden transformation out of the park! I fell hard for Kichler’s Copper Stepped Dome Path Lights. Not only are they gorgeous, but the copper accent among the greenery of the garden felt like the perfect way to add jewelry to the garden. Black lights are beautiful, but copper — I mean — that’s just the right amount of glam for this girl!
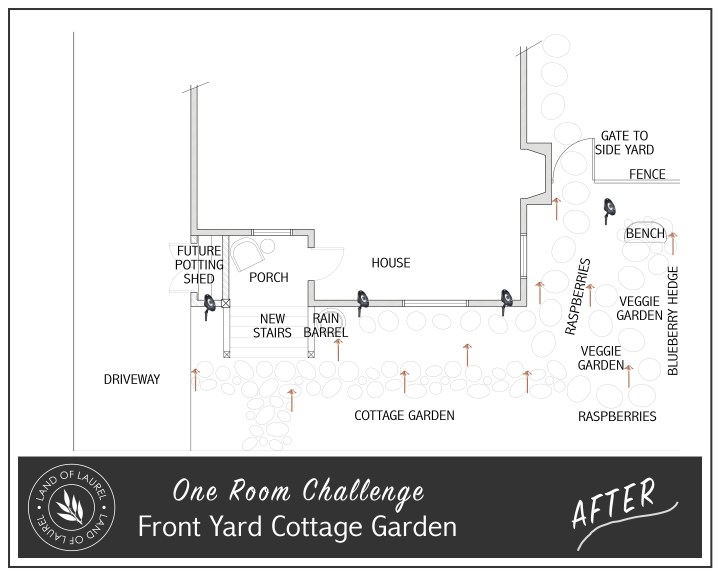
When I first started speaking with Kichler, I imagined the garden paths lit by the Copper Stepped Dome lights and maybe a few wall washers on the house. I sent over this plan documenting my idea.
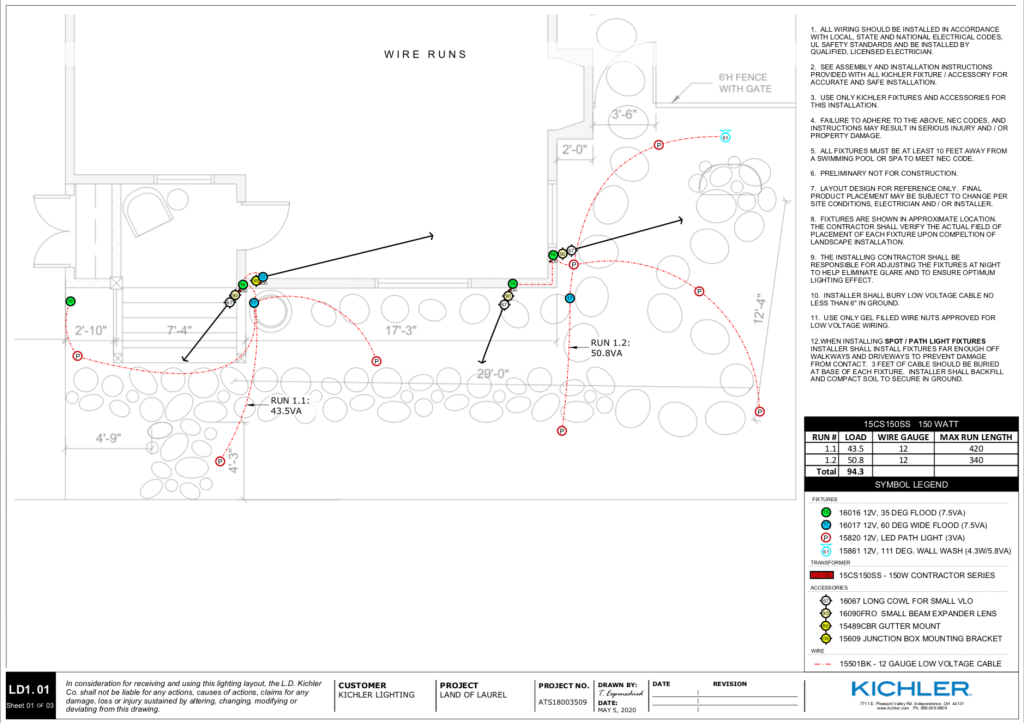
While I often design exterior color palettes and enjoyed designing my own garden landscape, I am by no means a lighting designer! While Kichler doesn’t offer design service directly to the consumer (there are so many awesome landscape lighting professionals who do that!), I am lucky that Kichler’s team took a look at my plan and revised it to make the house look even more impressive. They sent back this plan which added up and down lighting in place of wallwashers and spread out the lighting to showcase the garden better. They also broke the electrical into two runs for me, so I didn’t have to do any of those calculations. This page became my guideline as I started assembling and installing the fixtures too.
The second page of the document Kichler sent was this one, which took one of the shots of my house from last summer and highlighted the lighting placement! This was such a great visual for someone like me, who isn’t experienced in landscape lighting design. The mock-up image shows where the lights will highlight the house. When I saw this I realized how much more of a full picture this design encompassed. My plan didn’t light the upper gable of the house at all! How funny would that have looked at night?!

After the design was completed, I waited a couple weeks as boxes began to arrive. Unboxing the first Stepped Dome light was so exciting. It was even more fabulous than I expected. It really does look like jewelry! I’d known the Kichler brand for years –having specified their lighting on many interior design jobs throughout my career — so I knew to expect quality product. Still, I was blown away by the weight of these path lights! They are built to last, y’all!
Once the garden was ready for the lighting, I spent a couple hours with my sister one evening, unboxing all the lighting components, assembling the fixtures, and labeling them with their location based on Kichler’s plan. This allowed the actual installation process to go much quicker. I admit, the living room did look quite crazy the next morning though!
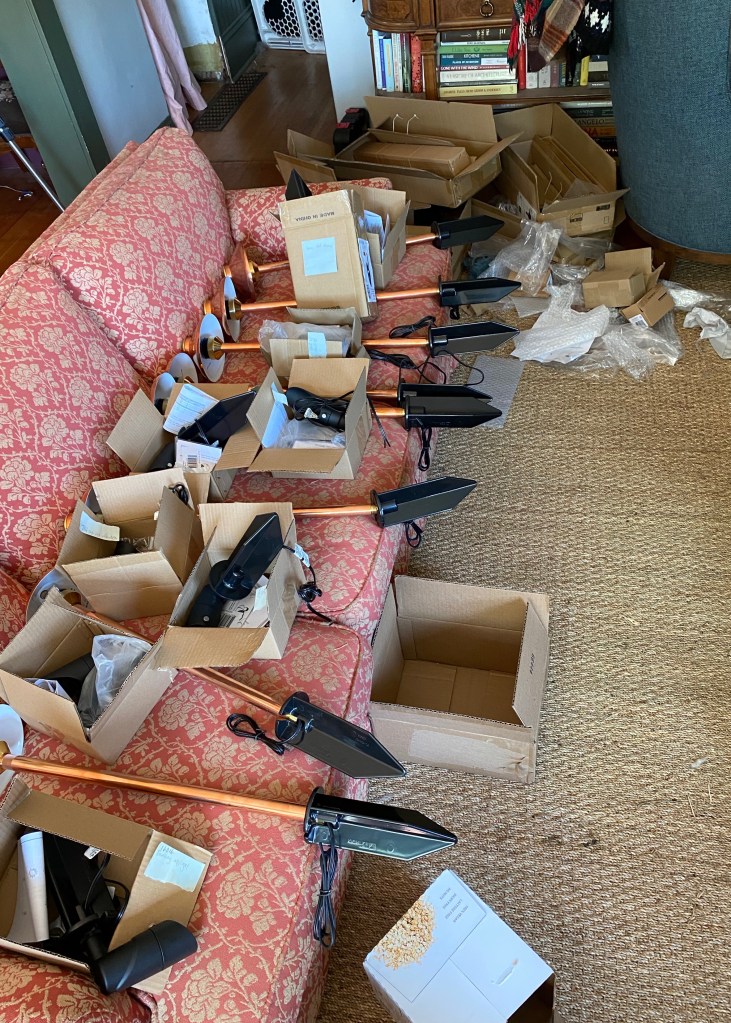
The ground lighting comes with a heavy duty plastic stake (see them above!) that the light fixtures just screw right into; it’s super easy to install! I used a rubber mallet to pound in my stakes where I wanted them, carefully ensuring the stakes were perpendicular to the ground and level vertically. Then I screwed in each fixture. Easy as pie. The lighting installed onto the eaves was not much more difficult, though it resulted in a lot of time spent at the top of a ladder. Of course, my sister, Bronwyn, who was my assistant for the day took lots of pictures of my butt during this process!

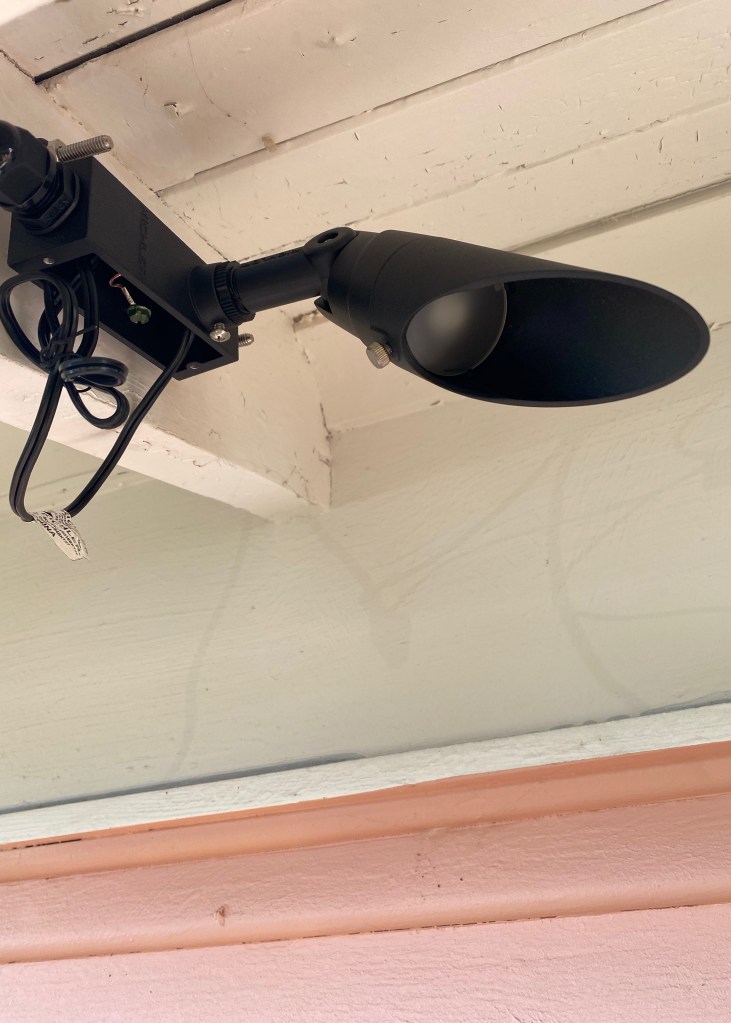
Kichler recommended 35° Flood Lights and 60° Flood Lights for the house. The 35° fixtures were mainly used to light the ground from the eaves while the wider 60° floor lights were mounted in the ground to light the house. The flood lighting comes with a ground mount and then you add the Junction Box Mounting Brackets to install them off the ground. The brackets are pretty cool, because they’re able to install onto a house or a tree and thus they’re designed to allow for a tree’s growth! The flood lights screw right into the junction boxes and then the boxes are installed to the house (or tree) with a couple of woodscrew bolts. I drilled pilot holes for the bolts with a drill bit slightly smaller than the screw threads. After installing the first light, I learned to screw the nut onto the bolt and use pilers on the nut to screw the wood screw part into the rafters under my eaves. On a tree you’d be able to move the nuts up the bolt to allow for the tree’s growth each year, or simply unscrew the wood screw a bit to allow more space. Then it is a matter of slipping the fixture box onto the bolt and adding nuts on the other side. The junction box sits away from the tree or house a bit and you can adjust it accordingly. This was actually super helpful for guiding wires too!
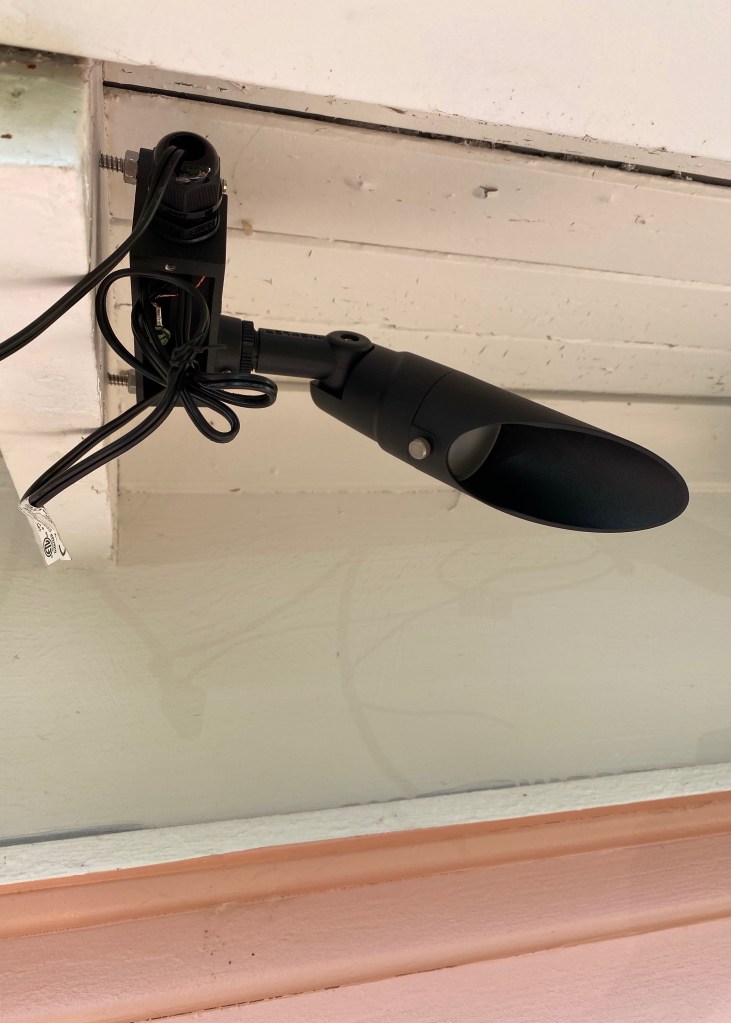
The first two flood lights took over 1.5 hours to get to the wiring part and I was so tired from holding my hands above my head the whole time! I learned so much though and then next 2 fixtures mounted much more quickly. The fixtures can be adjusted where they enter the junction box, where the head comes off the stem, and on the hood itself which really allows you to focus the light on a specific destination.
Once you have the fixtures mounted to the house and in the ground, you run low voltage wire cable between the lights and connect them with the sealant filled outdoor electrical connectors that come with the landscape fixtures. These help water proof your connections!
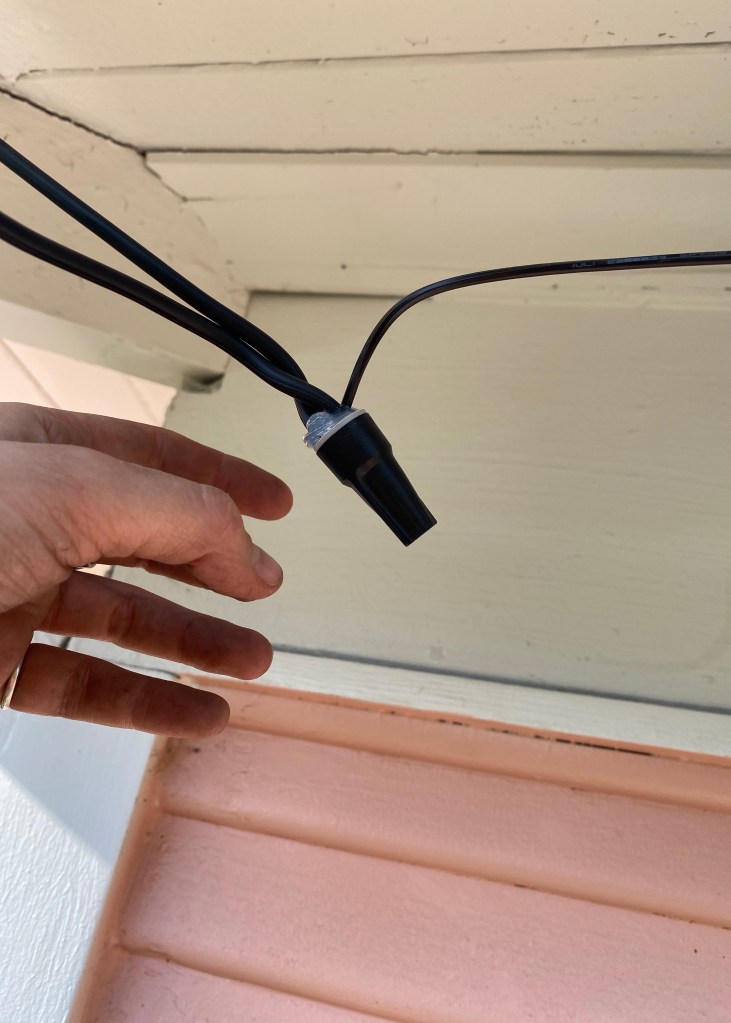
You will end up connecting each fixture to the light before and after it in the electrical daisy chain. If you scroll up to the Kichler diagram it shows how the fixtures connect to each other (for all my visual learners out there, holla!). The last light in the electrical daisy chain connects only to the fixture before it, and the first light connects all the way back to the transformer! The transformer is what coverts the high-voltage electricity throughout your home to a safer low-voltage electricity for the landscape lighting. I installed it on my house, right next to the exterior outlet. It just needs two screws to mount, so it took only a minute to install! I documented the installation process of the lights in Instastories today as well, so check that out on Instagram when you’re done reading this post! I’ll definitely be saving them to a highlight for future reference too.

The transformer has an outlet specifically for a Digital Timer which allows you to program when the lighting turns on and off. Then I added Kichler’s Transformer Plug In Photocell. This piece is really cool, because it’s basically a light sensing override. If it detects that it is still daylight, it overrides the transformer and timer so the lighting doesn’t come on unnecessarily. This is particularly awesome, because it allows you to set your timer to the lowest light conditions of the winter and the photocell overrides the setting in the summer so the fixtures don’t come on until dark. Since it’s dark here in Portland, OR at 4:00pm in the winter and not until 9:00pm in the summer, the addition of the photocell means I’m not constantly adjusting the lighting timer!
I programmed my lighting to come on at 6:00am in the morning and go off at 7:00am. This way in the winter if I leave my house early for work or if neighbors are walking to the bus they can see more easily. In the summer, the photocell will override this and the lighting won’t come on at all in the mornings, since it’s already light out by then! In the evenings, I set the timer to turn on at 4:00pm when it first gets dark and go off at 11:30pm on weekdays and 12:30am on weekends. In the summer the photocell prevents the lights from turning on until it’s really dusk around 8:30pm.
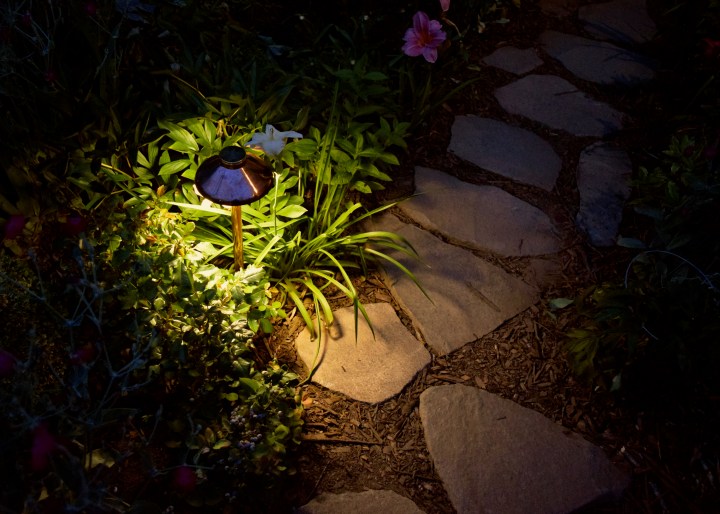
Okay, enough about the installation process though, let’s look at the pretty finished results! The lights are absolutely perfect. The copper of the Stepped Dome Path Lights catches the eye through the greenery and flowers of the garden. Even neighbors have mention noticing the path lights when riding their bike by the house!
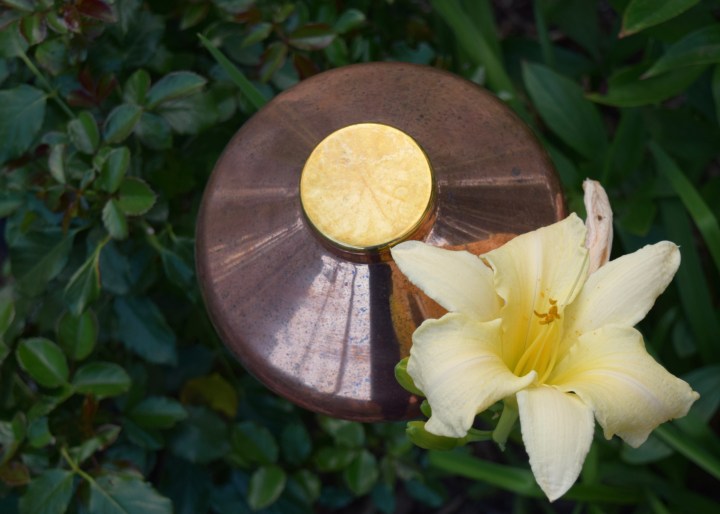
The fixtures have a lovely unlacquered brass top cap on them, which was a slightly unexpected, but happy surprise. If you’ve followed me for a while, you know I love to mix copper and brass! My whole kitchen renovation focused on highlighting those two metals afterall. Both of these finishes patina over time. If that’s not your thing, definitely choose another finish. I adore a good patina, though. The fixtures are already aging in the Portland mist and rain (seriously, it’s July and still not really feeling like summer here!) and I love each and every spot.
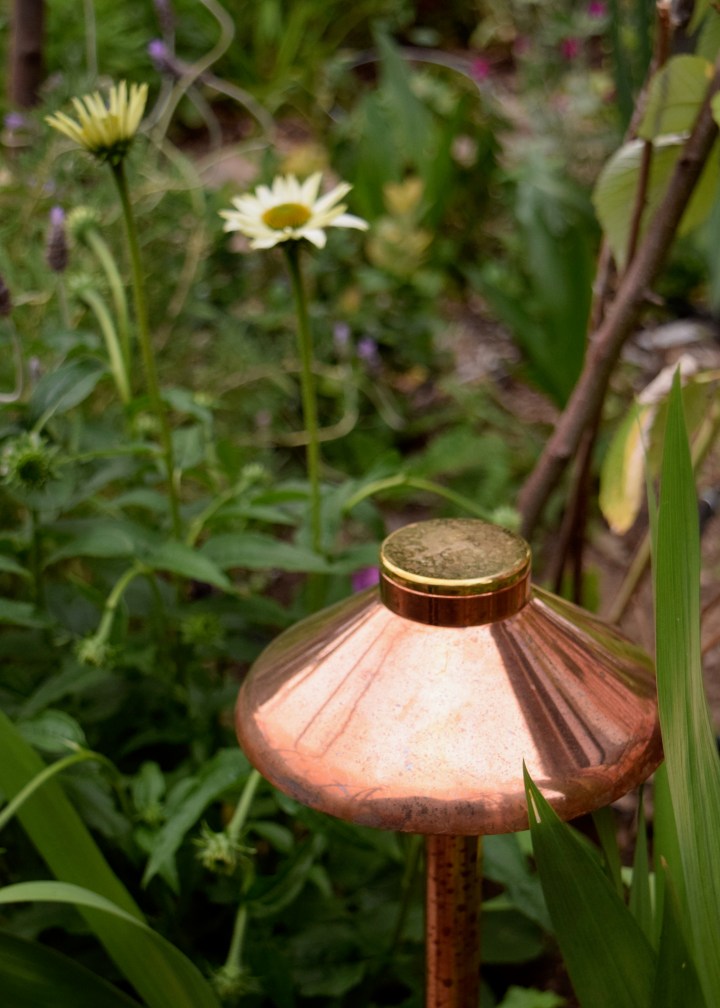
These copper lights are only going to continue to get better as they brown and eventually turn that beautiful teal-green of aged copper!

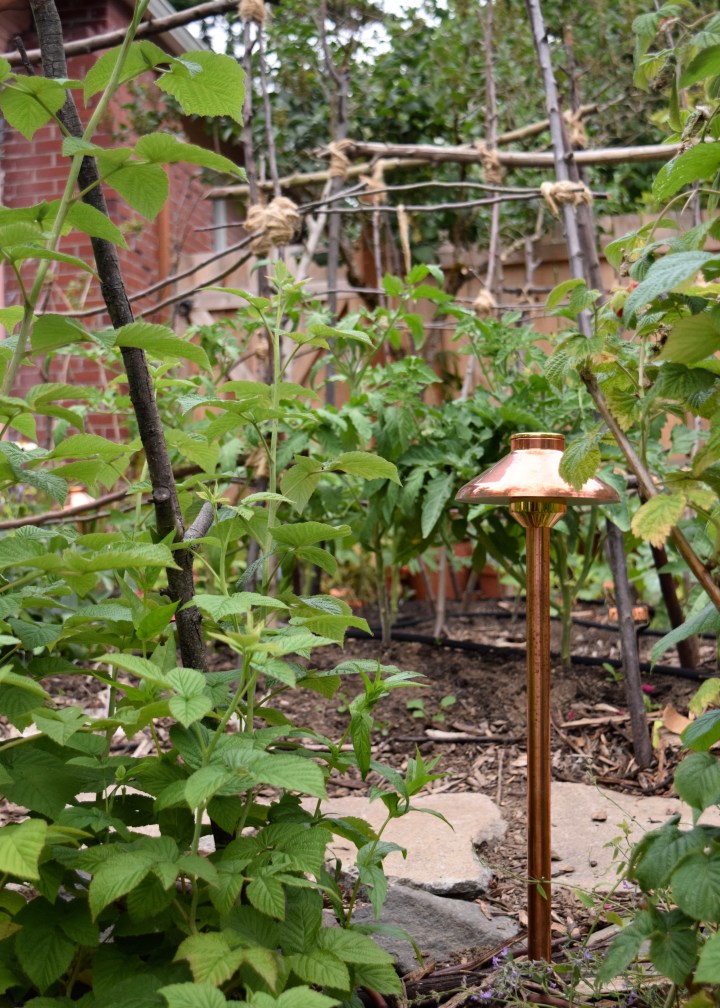
I love how this shot ties in the other copper elements of the garden in the background too. Can you spot my copper plant labels in amongst the tomato trellises?
When it gets dusky out and the lights turn on, the magic really starts.
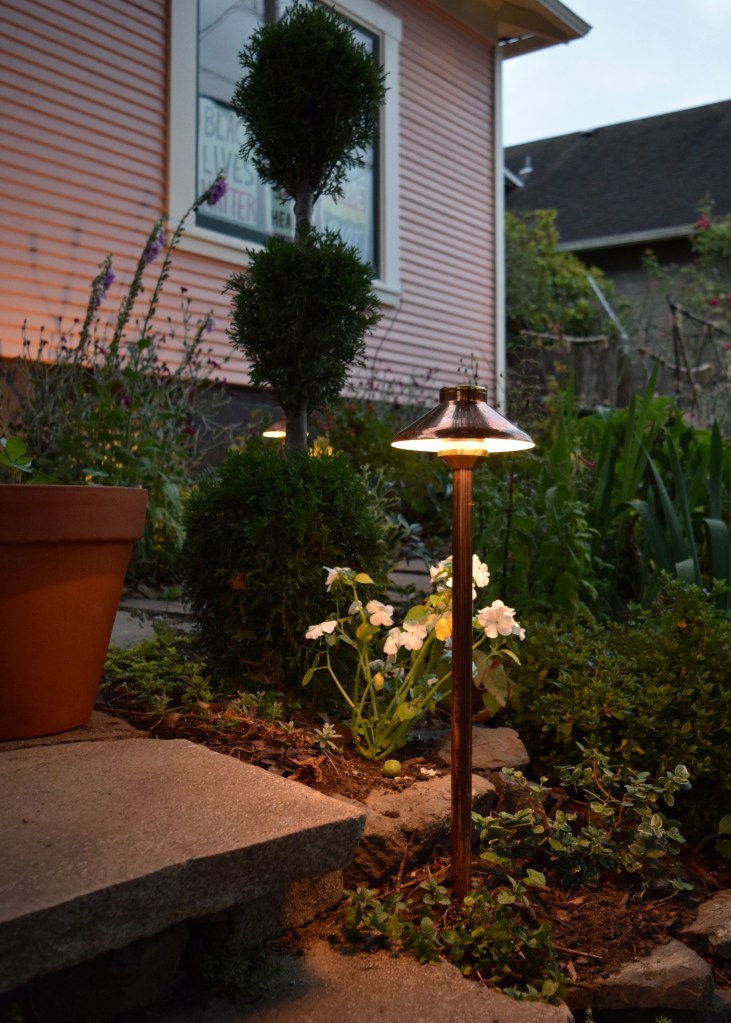
It only gets better! The garden just glows, y’all! The path is lit up perfectly, you can see your footing well, but it’s not blindingly bright either. The mix of path lights and down lights creates a natural rhythm as you walk down the path.
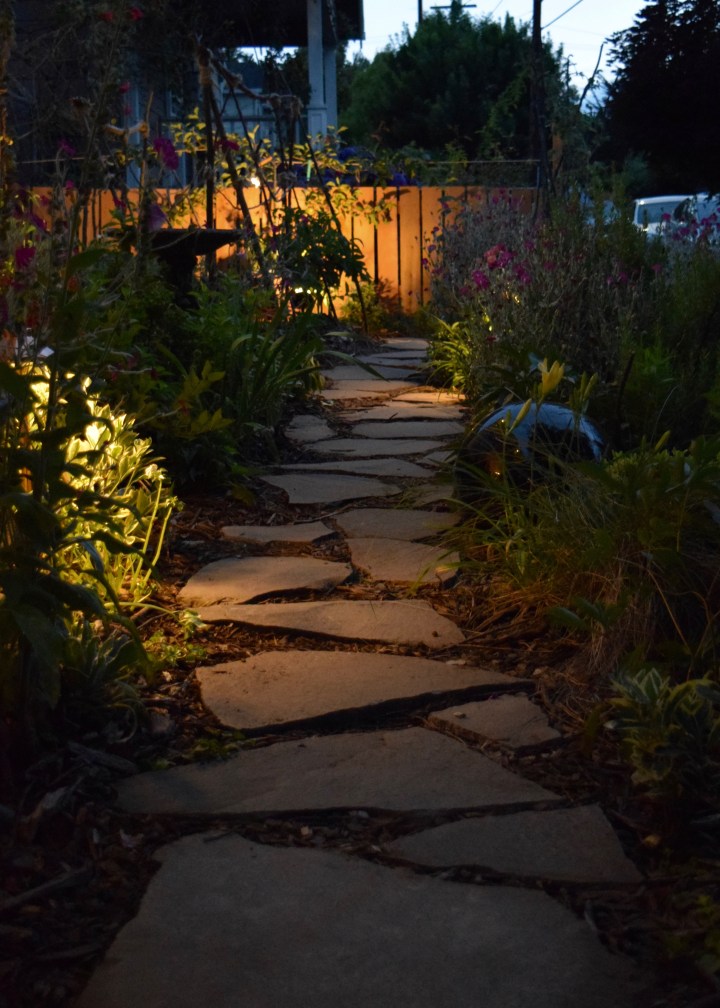
It’s so inviting and draws me into the garden in the evenings when I’d normally be huddled on the couch! Now I sit out on the garden bench with a cocktail and just relax into the night. It’s fun to watch the passersby admiring the garden and the new landscape lighting too!

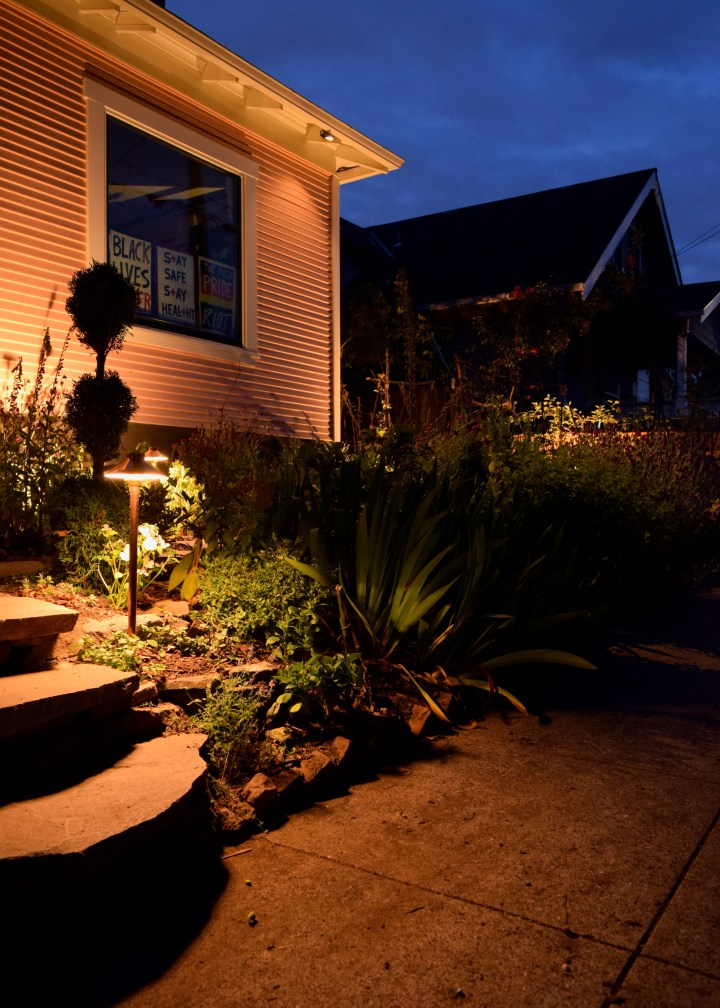
I love the uplighting more than I could have ever imagined! It highlights the architecture of the house and the garden and casts the most amazing shadows! The coral color of the house (Sherwin William’s Mellow Coral) looks amazing under the 2700K LED lighting. It’s so warm, I can’t wait to see how cozy it all looks in the winter!
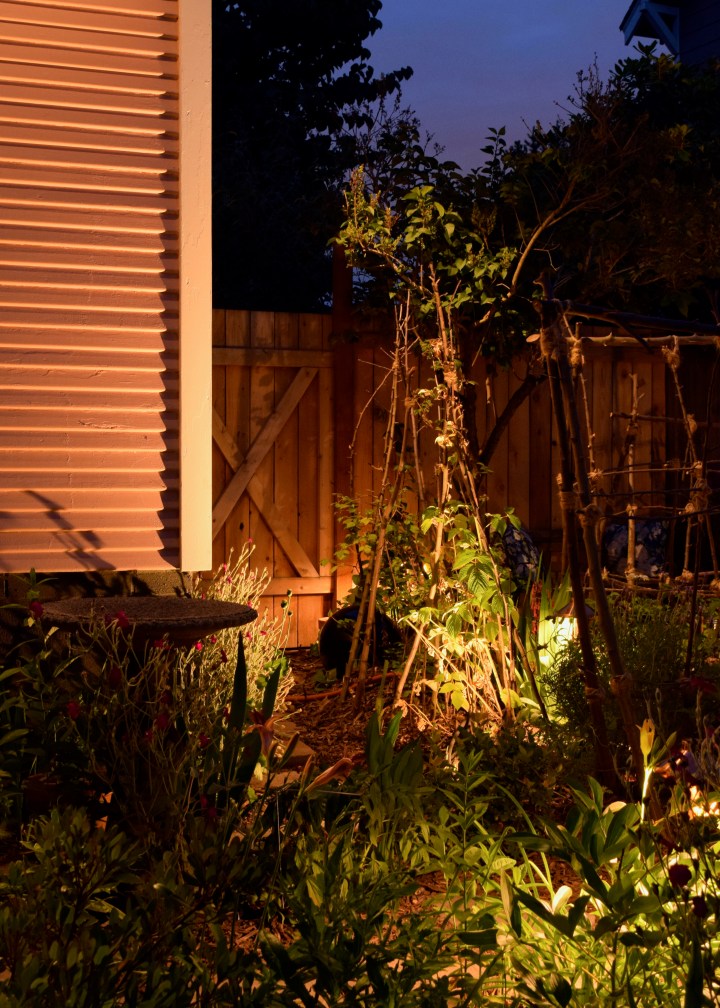
When I ended up adding an espaliered apple tree to the fence at the end of the main path, I decided to switch the location of the wall washer as well. Rather than lighting the back fence (which you can see in the photo above already gets a decent amount of light reflecting off the house and from a path light), I moved it into the vegetable bed to highlight the tree. The bench area is a little moody, but the tree is one of my favorite lighting features now! As the espaliered apple tree grows, the soft lighting is only going to showcase it more. I. CANNOT. WAIT!
Another benefit of the down lighting mounted to the eaves, is that it casts a wide enough beam of light to capture some of the sidewalk. My neighborhood has very minimal street lighting, so this feels like a great way to help out my neighbors too. The pathlight next to the steps highlights that specific area, but the downlight casts a soft glow over a larger area.
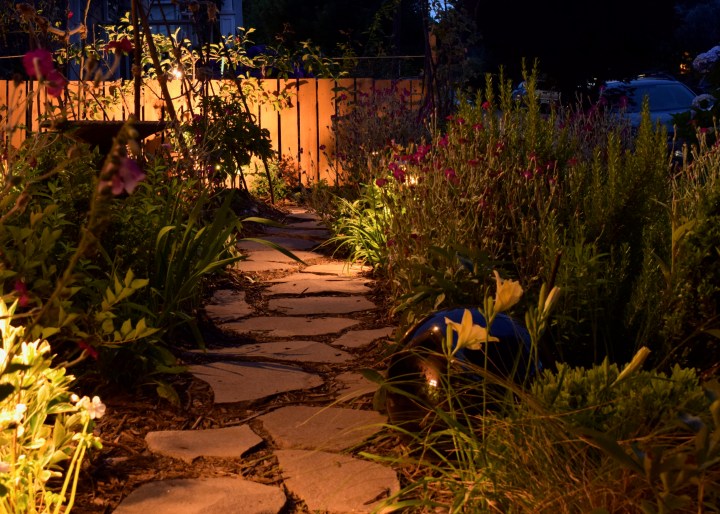
And how amazing is that copper glow with the coral house and the surrounding greenery? It makes my heart flutter.
I couldn’t be more excited to have collaborated with Kichler on this project. Adding landscape lighting to the garden completely transformed the space and will extend the outdoor season further into the fall. The lighting makes the garden feel truly enchanting, making all my fairy tale dreams come true! My house now looks like the fanciest home on the block.

Last summer, I snapped this picture of the house all aglow in the sunset. The lighting from the house lit the garden, but also exposed all of us inside!
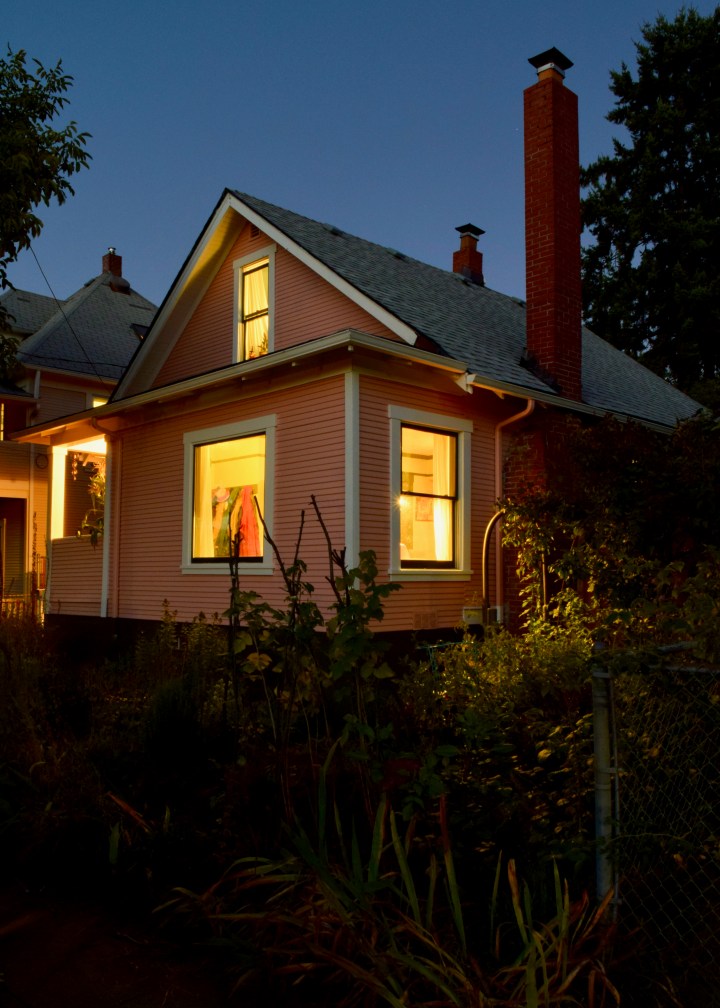
Now, even with all the lights in the house off, the garden glows! It feels so special and inviting this way and I feel so lucky to live here!
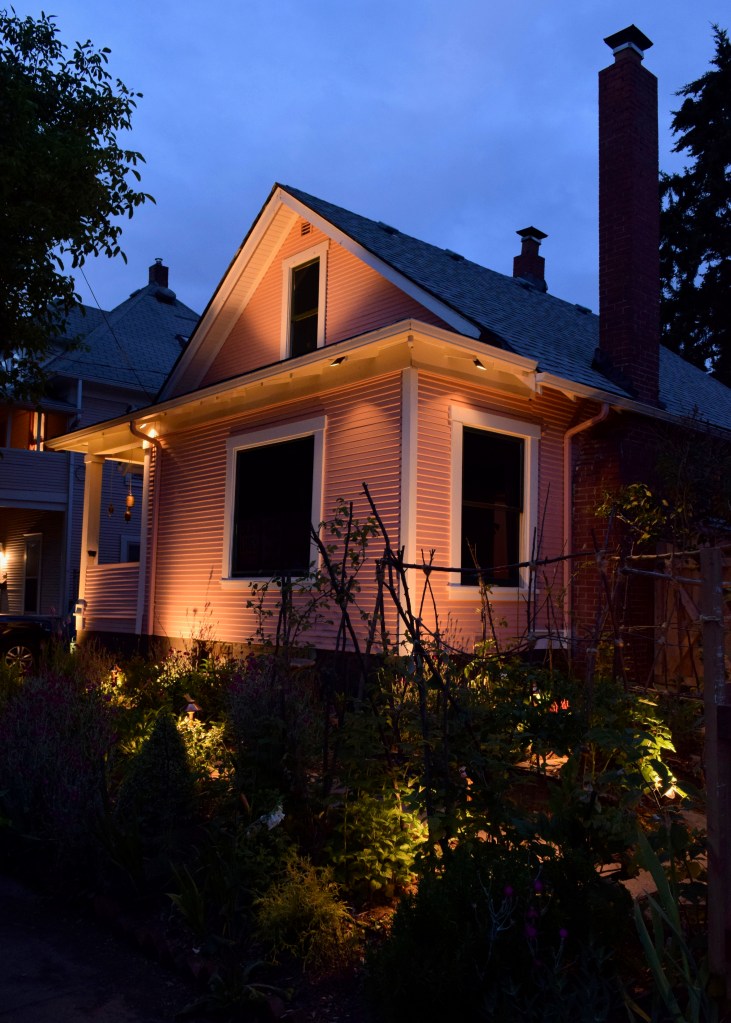
Here’s a side by side so y’all don’t need to scroll. See how the lighting from the garden highlights the architecture of the house rather than what we’re doing inside? I love that even though it’s slightly darker out in the post-landscape lighting photo, the effect is just as lit up. It simply is magical!
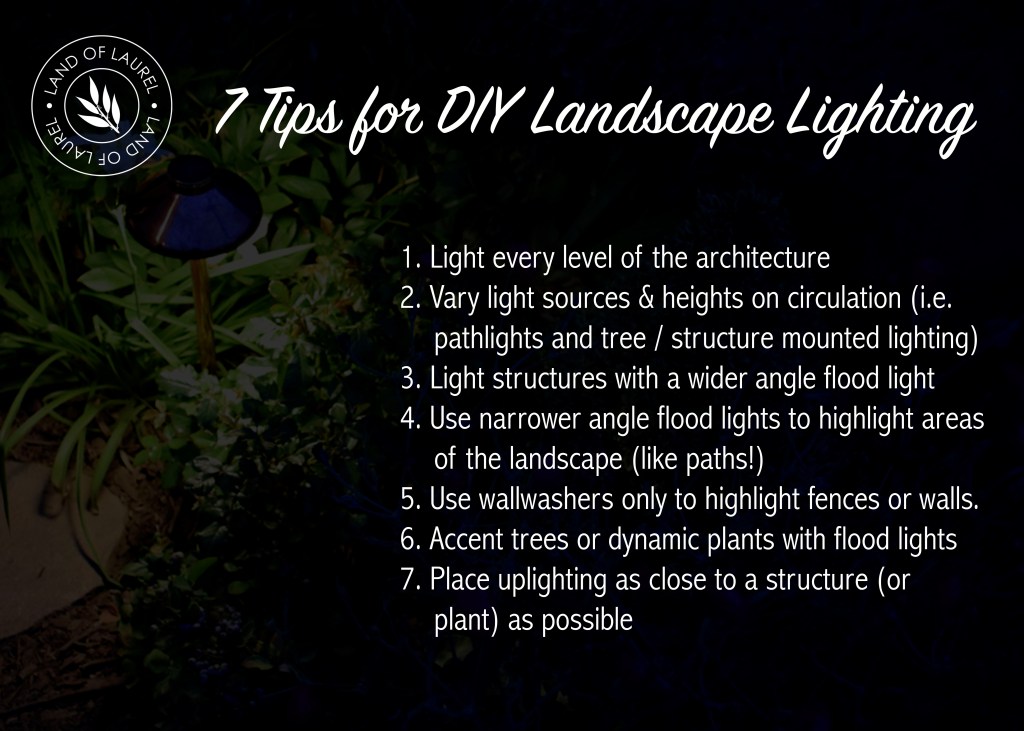
Now that the garden landscape lighting is installed, I have a much better idea of the effects of lighting on a structure. Comparing my original plan to Kichler’s, I was able to learn a lot about how to make landscape lighting seem like a natural part of the landscape design too. Here are some tips to consider if you’re thinking of DIY’ing your own landscape lighting! These are by no means hard and fast rules, but if you’re like me and just starting this adventure these guidelines are a good place to start!
Have you ever installed landscape lighting? How impressed were you by the transformation? If you’re thinking about adding lighting (magic!) to your garden landscape, doesn’t this make you want to start yesterday? It adds so much to the space!

It looks like a magical fairy wonderland!
I love the copper lighting, it adds so much warmth. Beautiful!
Can’t wait for the copper to age!!!! 💚
Beautifully done! The lighting on the house is lovely. So often we forget that the house is one of the main garden elements.
Totally agree! Lighting the garden and highlighting the house draws me out into the garden way more than I ever could have anticipated!
Inspirational, Laurel. We’re getting a design done now on our front yard, so I read this with interest. I’ll be curious to know how the solar powering works out. I’ve been skeptical.
Jennie – this is all electrical hardwired in low voltage lighting. It’s not solar powered. While I’d consider solar, I’ve disliked a lot of the design of it and haven’t heard great things about longevity.
Wow, Laurel – this looks so amazing! It’s like a fairytale. Such a wild transformation just in the past weeks. You’re giving me major backyard envy 🙂
Awww thank you Claudia!! It’s been months of hard labor but totally worth it in the end!
Laurel!!! You are so talented. I am obsessed with this warm, copper light. It is so inviting and magical!!!
Isn’t the copper so exciting? I love it so much!!
The lighting looks awesome, Laurel! What a difference it makes. Seeing (and hearing) how you did it yourself is so inspiring.
Thank you! It’s a pretty easy process for such a high reward!
Beautiful! The lighting makes it look so warm and inviting
Love the copper 😍
I am so impressed with your tenacity to finish this project with all your obstacles. It is stunning.
Opa would be so impressed and happy to see his “decorating gene” taken to the next level.
Ha, just like a sister to photo your bad side. So sweet of her to help install the lights. Can’t wait to see a picture of your house with a big snow.
As someone who saw the house before you bought it and to see it now, I’m over whelmed. You have so muc energy and talent. Love it! Makes me think about lighting for our back yard.
Even better from the bench!
Thank you for bringing such topic into light, I really loved the concept of your article. Thanks for sharing this information. It’s a great source of knowledge; I think it will be helpful for lot of people who are looking for learning more about adding landscape lighting a magic to the cottage garden with kichler.
This is a very informative blog, thanks for sharing about adding the landscape lighting magic to the cottage garden with kichler. I liked and it is wonderful to know about so many things that are useful for all of us! Thanks a lot for this amazing blog!!
Thanks to the author for sharing such a great post. The article was very well written and providing great info about adding landscape lighting a k a magic to the cottage garden with kichler!! It can be really great for people like me who are looking to get such kind of more knowledge about it.
It is a wonderful article stating about the adding landscape lighting the magic to the cottage garden with kichler. I am really happy to come across this exceptionally well written content. I agree with all your points that you have stated here, love this blog. Thanks for sharing and look for more in future!!
Aww thank you!
Hey thanks for posting this useful content on the everything you need to know about the landscape lighting aka magic of the cottage garden with kichler. I really hope it will be helpful to many. I hope you keep update us with such great tips and information in future too. This is a great post; I will share as much as I can. Appreciative content!!This Yardscape.co.nz is very useful and its related to what you have actually mentioned here.
I am really impressed by this impressive post. In my view Brass Path Lights are a great way to add elegance and functionality to your outdoor space. The warm glow they emit creates a welcoming atmosphere for guests and enhances the overall beauty of your landscape.
I have read your post, it’s very informative and helpful too for readers, I am going to share it with my friends. I Got the latest collection of outdoor landscape lights of best quality at the lowest price this month. Landscape Lighting enhanced the appearance, safety and security of my home and garden
I have read your post, it’s very informative and helpful too for readers, I am going to share it with my friends. I Got the latest collection of outdoor landscape lights of best quality at the lowest price this month. Landscape Lighting enhanced the appearance, safety and security of my home and garden.
Great! Landscape lighting may assist to increase the security of your house by illuminating paths, brightening outdoor living spaces, and complementing the overall landscaping. Solar-powered landscape lighting may achieve all of this while also saving money on electricity bills and without requiring an electrical connection. https://riverviewlandscapelighting.com/
Hi, What an impressive post! The way you sum-up this topic briefly, shows your professionalism.Low voltage landscape lighting effortlessly transforms outdoor spaces into enchanting havens. Subtle illumination adds a touch of magic, creating a cozy ambiance for evening enjoyment. Energy-efficient and versatile, it’s the perfect blend of beauty and practicality.
Hi, What an impressive post! Your blog brilliantly illuminates the artistry and functionality of outdoor lighting, inspiring us to create captivating outdoor spaces Outdoor lighting can truly transform a space, creating a magical ambiance that enhances both aesthetics and safety!