Wooden Crates are So Great!

Happy Tuesday! Happy March 1st!  Did you have a good weekend? Enjoy the Oscars? Outraged by the winners or happily agreed with the votes? I didn’t watch! Just read about it and enjoyed the dresses online. I went with my family to eat at Gather here in Berkeley instead. So yummy! I had a very chill weekend overall and got many things done, so I got to prep some blog posts for y’all! Yay!


Remember my living room? Those glass coffee and side tables always make me cringe. As I am among the World’s Clumsiest People, glass in places I can easily fall/trip over makes me… nervous, to say least. Because the tables are pretty perfectly sized for the space and I don’t have the budget to invest in new ones (plus, where would I put my roommates if I did?), I wanted to make them a bit more visually prominent in hopes I wouldn’t break them and time soon. Or, ever, really. Yes, let’s concentrate on not breaking them ever; that sounds much better, really. My attempts to make the table more prominent involved holiday displays, trays, and plants. It helped, but it didn’t quite add the visual weight I hoped for…


Living Spaces | Land of Laurel


A while ago, while driving down Highway 101 on the way home from a job site, my co-worker and I stopped for sustenance at a fruit stand. We were so hungry! Among the piles of various fruits and nuts they had piled old wooden cherry crates and were selling them for only $5! I see crates like these all the time at the Alameda Flea Market but always priced more than $30! I could have played it safe and bought one or two, but do I ever play it safe? Hell no! I hopped on that deal like a monkey on a banana! I bought eight cherry boxes for a total of $40. Worth it! Then I stuffed them into our already full (of chair samples!) van and called it a #colddeadfingers find worthy of Mandi! Here’s the pic from the overly excited text I sent to my two best friends, my mom, my sister, my aunt, my next-door-neighbor, and my next-door-neighbor’s dog. Let’s just say, I was pretty freakin’ excited about this!


Great Crate! | Land of Laurel


They were a little dirty, but I knew they’d clean up quick! At first, I had no idea what I’d do with them, but I knew I’d figure it out quickly. Produce crates aren’t hard to come by, but at that price, I felt so overly joyed. I was ready to celebrate! When I got them home, I wiped them down with a sponge and some Honest Multi-Purpose Spray. They were pretty clean by the time I was done, but I think in the future I’d like to try some furniture wax or polish to bring out the wood tones even more. For now, they’re just fine!


Because we had two side tables and the coffee table, I went and stuck four of the crates in the living room. The X-support under the glass of the coffee table ended up being absolutely perfect for the crates! They fit perfectly and we nice and stably balanced. More importantly? The coffee table went from barely there to having actual visual weight! Here it is before; see how your eye just glances over it? Not great for someone who needs many visual queues in order to not trip into things!


Glass Coffee Table | Land of Laurel


Then, look with the cherry crates stacked neatly on the bars! Boom! You can actually see the thing!


Cherry Crates Under Coffee Table | Land of Laurel


Not only were the crates very stable on the X-support, they actually extended the perfect amount, just a couple inches less than the width of the table. That meant, your eye could distinguish the edges of the glass and my brain could tell my body to avoid falling into it. Yay!


At first I just stacked the boxes under the glass of the tables, but then, as you can see above, I got a better idea! I filled the boxes with the design magazine I have lying around all over my house. Not only does this clear out the stacks I had lined up against the wall in my bedroom, but it provides reading material for any guests. Many of our visitors glance through them while we’re in the kitchen or chatting around. It’s nice to see the magazines in use and not gathering dust!


Magazine Storage | Land of Laurel


And there, my friends, is a ten minute fix to a small problem that will hopefully prevent me from dying a glassy death. I’ve definitely noticed that I bump into the table far less frequently now! Plus, I have four more cherry crates sitting in the attic waiting for another project to come by. Hmmm… any ideas for how I should repurpose them? Do you like glass tables inside? Do you notice the visual weight of items in your home?

Slow Roasted Bell Pepper Salad

Hello everyone! Guess what? Working crazy long hours is not conducive to blogging. Like, at all. I’d apologize, but my time card at work says it all. Plus, women apologize too much. I’m trying to break the habit. What’s everyone been up to? Ready for the Oscars? I’ve watched several of the movies this year, but didn’t quite make it to all of them. Room blew me away, though. It’s an emotional rollercoaster of a movie, but so fantastic and heartbreaking. The acting is phenomenal. I want it to win… everything! The Revenant’s been getting quite a bit of publicity, but I was sorely disappointed. I found it boring and very ridiculous. It was mostly a movie of someone walking and then every ten minutes something insane would happen, like he’d be thrown off a cliff or a bear would attack or something would be on fire. It just got to be a bit much…


Moving on from the Oscars, I recently read a fantastic book! It’s called My Berlin Kitchen by Luisa Weiss the author of the Wednesday Chef blog.  I hadn’t read her blog before and simply liked the idea of a book about Berlin when I saw it at a used bookstore. The book ended up being quite wonderful! Luisa grew up in Berlin and Boston. Since I went to college in Boston (Tufts, the same school Luisa’s father worked at!) and studied abroad in Berlin, I felt a connection with many of the places and foods she mentions. Her sweet story about finding love and where one belongs in the world really struck with me. Afterall, she basically lives my dream: travel the world, speak many languages, find amazing German man, marry him, live together in Berlin, raise German-speaking babies. Ahh… if only! Plus, the many recipes she includes are incredibly inspiring!


She mentions a Slow Roasted Bell Pepper Salad she learned to make from her mother and had me craving it right then and there. I had next to none of the ingredients she included in her recipe, but I did have bell peppers. Always one for innovation, I decided to plug forward on my own and give the Slow Roasted Bell Pepper Salad my own little spin. It was so incredibly easy and delicious! Peeling the bell peppers does take some time, but over all, it’s so quick. It may still be winter, but this recipe has me dreaming of hot summer days, barbecues, and long, hot hikes. The mix of sweet bell pepper and salty olives is invigorating. Topped with feta cheese, the whole thing is just perfect for a summer picnic… or a cold February day! I’ve made this three time in two weeks! It’s just that good!


Slow Roasted Bell Pepper Salad | Land of Laurel


Slow Roasted Bell Pepper Salad

3 large, organic red bell peppers (or several small ones)

1/2 cup organic, pitted kalamata olives

1/4 cup artichoke hearts

2 teaspoons olive oil (truffle olive oil is particularly good)

1 clove organic garlic

Organic feta cheese in brine

Breadcrumbs (I used a piece of German Steinerbrot that I toasted and crumbed myself the first time I made this, and whole wheat panko crumbs from Berkeley Bowl the second time. Both were delicious, so use whatever you have on hand!)

salt and pepper


Slow Roasted Bell Pepper Salad with Feta Cheese | Land of Laurel


First pre-heat your oven to 375 degrees Fahrenheit. Wash your bell peppers well and place on oven safe cookie sheet (lining this cookie sheet with compostable parchment paper will making cleaning up easier). Place the cookie sheet in oven and roast the bell peppers for 45-60 mins. Turn bell peppers (I just use my fingers on the stems) every 10-15 mins as they roast. Slow roasting this way (as opposed to quickly over open flame) makes the bell peppers sweeter and more delicious. While they roast in the oven, chop up your artichoke hearts, olives, and garlic in to fine pieces no larger than 1/4 inch. Place these into a medium sized bowl and stir well together. This won’t take long, so you’ll have time to clean up, before moving on to the roasted bell peppers.

When the bell peppers are well roasted (black in a few little spots with crumbly skins), remove them from the oven and let cool until you can handle them easily. Then begin peeling their skins off. Rubbing with a clean dish towel may help with this. Drying your hands frequently will help you peel more easily too. As you peel them, shred the bell peppers into thin strips with your fingers. Place peeled, shredded bell pepper into the same bowl as the olives, garlic, and artichoke hearts. Add olive oil, salt, and pepper. Toss together and serve sprinkled with feta cheese (I like quite a bit!) and bread crumbs.


Slow Roasted Bell Pepper Salad with Feta Cheese and Bread Crumbs | Land of Laurel


Hope you find this as delicious as I did! Look for My Berlin Kitchen if you want to try the original recipe. Have a great Oscars night, y’all!

Counting Sheep

I’ve been a vegetarian since I was eight years old. Both my parents eat meat, so my eating habits were my own decision. I’ve never slipped up and eaten that need-it-now hamburger or anything. Most people learn about this quickly once we become acquainted. People are always stunned to learn, however, that I have a leather jacket and leather shoes or admire a pair of deer antlers. Those people will probably be surprised about today’s post.


One of my favorite design elements growing up were the sheep skin rugs my parents kept in their family room. They usually were laid out on the sandstone hearth near the fireplace. I loved their texture and warmth. I would often sit on them or just stroke them. They were so soft, yet slightly scratchy. I adored them. When my grandmother passed away, a single sheep skin rug was left in the same pile of items I pulled my good friend Fred and many of my plants out of.  For a long time that sheepskin rug has laid by my side of the bed, creating a cozy place for me to put my feet when I finally drag myself out of bed in the mornings. You can see it peeking out in front of the rightstand here.


Garden Trellis Bedding | Land of Laurel


You may have noticed in this picture from my lamps post last week I added a couple more!


Gold Bedroom Lamps | Land of Laurel


At work, we spec a lot of Design Within Reach consoles and chairs. If you follow me on instagram you may have even seen some shots from an event DWR through for local designers celebrating the opening of their new Berkeley showroom. As a thank you for spec’ing many of their products, DWR sent our office a gift card for $250. As the most junior staff member of the interiors team, I was the last person who deserved the gift card, but I am lucky to have very kind co-workers! Plus, I live closest to DWR. I went in to the showroom in January to see what I could find. Now, DWR is not cheap. In fact, they are kind of crazy expensive. $250 wouldn’t get me any furniture item. But one thing they did have? Sheep skins. Really nice, luxurious sheep skins. I ended up throwing some cash of my own into the mix and getting three new sheepskins for my room. Now wherever I walk, it’s soft and cozy!


Sheepskin Rug | Land of Laurel


It really is like walking on a cloud! I placed the softest shaggiest one on my side of the bed, another on the opposite side, and one at the foot of the bed in front of my trunk. I’m a bit of a sucker of symmetry!


Sheepskin and Trunk in Bedroom | Land of Laurel


You guys, it is SO FLUFFY!! I love it. LOVE it! They make me want to lay on the ground and read a book. Or just pet them. Actually, I just want to rub my face on them. Is that weird? They are much more fluffy and larger than my hand-me-down rug. I was surprised by how soft they were. It’s really fantastic. I feel like my room is a little viking-esque now, but I’m okay with that. Warriors are always cool in my book. Plus I like helmets. The viking-decor is a quick little update, but it makes my room feel so cozy this winter. I mean, sure, yesterday it was 73 degrees in the Bay Area, but who doesn’t want to snuggle up to some animal fur in that kind of weather? That’s right, you want it! Does anyone else have a sheepskin rug they love? Or any non-Madonna-inspired viking gear?

Happy Holiday Garland

Happy Monday everyone! I wanted to share this fun garland I made with all of you. I worked on this before Christmas actually and finished it about two weeks before hand. I never showed our holiday decorations though, because I was too busy celebrating! This garland is just so fun though, I think it deserves a shout out.


On the Sunday after Thanksgiving, my mother and her three sisters got together to make holiday crafts. This isn’t a family tradition, but something new this year, and we all loved it! My Aunt Chrisy ended up not being able to make it, but my mother and her two other sisters got together at my Aunt Karolyn’s in Davis for a little holiday magic. My cousin Kelly and I decided to crash the party too! Because I am a planner, I got incredibly excited and started scrolling through Pinterest to see what kind of inspiration I could find. Crafting is basically my own personal Pinterest-Challenge. I fell in love with several ideas, but the one that truly captured my heart was this. It was just so colorful and happy! I knew instantly that it was perfect and I had to try to make it. Yes, it’s not very Christmas-y, but that was what I inherently loved about it! The garland is bright and exciting and could be used for absolutely any holiday or celebration. Multi-use decorations? Count me in!


First I headed to Joanne Fabrics to pick up some supplies. I debated which colors to use before settling on light blue, teal, yellow-gold, yellow, bright magenta, baby pink, maroon, lime green, forest green, white, and neutral beige. I tried to coordinate my colors so there was a darker and a lighter version of each hue. I added the neutrals in because I didn’t want the color to be too overwhelming. I got 1/4 yd of each of my colors, and a 1/2 yard of the white and neutral. In the end, I had way too much fabric, especially of the neutrals. I’d suggest getting only 5″ strips of fabric for anyone planning on trying this. That’s less cutting for you too! The fabric on the bolts was doubled over, so in the end I got 9″ wide and 96″ long strips of each color except the neutrals.


Colorful Felt | Land of Laurel


I decided to make my life easy and simply cut my fabric down the middle until I had two long strips of felt approximately 4.5″ wide. Then I cut my long strips into 3/4″ pieces. I ended up with a ginormous pile of colorful felt strips. So happy and bright!


Pile of Felt | Land of Laurel


I then took strong, white embroidery thread and a needle and got down to stringing my garland together. Because felt is so easy to puncture, I used a nice big blunt needle. I started with a big knot in my thread. Then I took a piece of felt from my pile and quickly found a good way to string them together.


Stringing Together a Garland | Land of Laurel


I took each piece of felt in my hand…


Felt in Hand | Land of Laurel


… and then pinched it in the center like so.


Pinched Felt | Land of Laurel


Then I took my needle with my other hand and stabbed it through the pinch fabric pulling it through both sides of the pinch.


Needle in Felt | Land of Laurel


I wanted my garland to be extra strong for years to come, so I then threaded that needle back through the pinched felt a bit higher than the original hole. Here you can see the two strings coming out the one side of the felt (one attached to the needle, the other to the rest of the garland) and the small white stitch on the pinched fabric.


Second Time Through Felt | Land of Laurel


I pulled the embroidery threat tight which pinched fabric together more and then pulled the felt strip to the rest of the garland. Once it the felt strip was tightly pushed against the garland, I threaded a third stitch, taking the needle and pushing it through the center of the pinch and up.

Third Stitch | Land of Laurel


This kept the fabric pinched, but left the thread and needle coming from the center of the strip, ready for the next piece of felt.

Ready for the Next Strip | Land of Laurel


You guys, I did this about ten million times over the course of two weeks.


Next Piece | Land of Laurel


Since I was using doubled over strings of embroidery thread about one yard long, I would periodically run out of thread. When I got to that point, I would thread my needle through the last three felt strips twice and tie a big knot. I would cut off any excess thread. Then, with my new length of thread, I’d go back through those three strips of felt again. Basically, my transition points between thread lengths are super, duper strong rather than being weak points! I’m hoping this will help the garland last for years to come!


Still Going | Land of Laurel


I planned to hang my garland across the front windows in the living room. The windows are huge and I wanted the garland to hang down each side as well! It took forever to get the length I needed for this, but it was totally worth it! The process of threading the strips of felt became oddly addicting and almost meditative. I sat at the island and worked on it. Then I sat in bed and threaded felt strips. I made my garland while watching TV, waiting for food to roast in the oven. I made my felt garland before bed, before breakfast, after dinner, first thing in the morning, and last thing at night. It was a HUGE time suck, but all the supplies for my garland cost less than $15.00 and it’s much stronger than anything you’d find for that price in stores!


In the end, I was able to stretch it across our big living room windows. It looked lovely. This is kind of a terrible iPhone picture, but it really shows how long this thing was when I finished!


Garland Across the Windows | Land of Laurel


The felt garland also looked great when I wrapped it around myself. Haha! It was like swimming in a sea of happy, bright, fun, and exciting color!


Finished Garland | Land of Laurel


I am so pumped for this garland! It’s perfect for the upcoming Valentine’s Day, for Easter, for Birthdays, for any and every occasion! I’m so glad I went with the colorful option rather than doing holiday colors. I have so much felt left over, I plan on making another similar garland in all neutral colors! Anyone else tried something like this?

Butternut Squash Soup with Sage

Butternut Squash Soup with Sage

It’s winter in California which means it’s 60 degrees and sunny, but for all of us Californians it’s freezing. We’re cold. Very cold. We talk about it a lot and dream of early March when temperatures will hit the 70s again. It’s truly miserable here on the west coast. Pity us. Sure the east coast may get blizzards and snow, but we have days in the 50s! It’s real extreme, y’all!


Anyways, this cold spell has me drinking tea like a fish drinks water (constantly) and dreaming of soup. Because tea and soup are the only things that can warm my frozen heart fingers. My friend Katharine came to visit for a few days in late January. We’ve known each other since my sophomore year of college, fenced together on a varsity team, and then I basically lived at her house my senior year. We’ve spent a bit time together, you could say. While she was here we thought about going out drinking and dancing, but it was raining sprinkling and that seemed like so much unnecessary effort. Instead we hit up Berkeley Bowl (my home away from home! ❤ ) Berkeley Bowl is an institution here in the East Bay. Did you know Michael Pollan shops there?! I have friends who’ve seen him. I’ve read all of his books. I agree with everything he says. He’s pretty much my religion. BRB I’ll just be camping out in the produce section for the next month. I’m totally not a stalker, I’m just completely obsessed with him. There’s a difference, okay?!


Anywho, Katharine and I decided to make some butternut squash soup. I’d been craving it lately and it seemed like the perfect season. When we arrived at Berkeley Bowl, right out front was a pile of the organic gourds all on sale. Score! We headed home, made our soup, and contentedly watched Netflix for the remainder of our evening. She’s my friend match-made-in-heaven I tell you. Anyone who wants to stay in on a weekend is my kind of gal!


Our soup came out wonderfully. It is incredibly butternut squash-y. That sounds silly, but somehow the soup made the butternut squash taste amazingly like itself and oh so good. The flavor is very pure and not disguised by any ingredient. It’s a very thick soup, perfect for an entree, though you could thin it a bit if you wanted to serve it as an appetizer.


Butternut Squash Soup | Land of Laurel


Thick Butternut Squash Soup with Sage

Serves four to six.

Vegan, Gluten Free


Ingredients:


3.5 lbs organic butternut squash (one medium and one small squash)

1 organic red onion

1 organic carrot

1/2 organic white onion

3 organic stalks celery

3 tablespoons olive oil

1 bunch organic fresh sage

1 quart organic vegetable broth

1/2 teaspoon organic thyme

salt

pepper

1/2 teaspoon paprika

1/4 teaspoon nutmeg

cooking oil as needed


Directions:


First pre-heat the oven to 425 degrees Fahrenheit. Then, start making a mirepoix. Chop the celery, white onion, and carrot finely into pieces no larger than 1/2 inch. Place into a hot cast iron pan or an enameled cast iron dutch oven with a tablespoon and a half of olive oil. Add thyme, nutmeg, 1/4 teaspoon paprika, and a few pinches each of salt and pepper. Cook, covered, over low to medium heat, stirring occasionally. You want the entire thing to sweat.


Mirepoix | Land of Laurel


While that starts to get flavorful, begin cutting your butternut squash and red onion into pieces about an inch wide. Place the squash and onions on two cookie sheets (careful not to crowd) and sprinkle with the remaining olive oil, a dash of salt, a liberal amount of pepper, and the remaining paprika. Place the the sheets in the oven for 20 to 25 mins or until a fork can be inserted into the squash without resistance. When they’re done they should look a little toasted. The squash should be a bright orange and the onions should be a faded purple-y brown.


Butternut Squash and Red Onion | Land of Laurel


When they squash and red onion is done, leave to rest and turn of the oven. Uncover the mirepoix (you should have been stirring every now and then this entire time). If you’ve been using a cast iron pan, it’s time to get out a large stock pot and add the liquid. You should be able to just add water to the mirepoix, but I had a container of vegetable broth that I wanted to use, so I added this instead. If you are adding plain water be sure you have liberally salted the mirepoix. Add the roasted butternut squash and red onion to your pot and stir. Everything should be cooked at this point, but bring everything to a boil to let the flavors intermingle. Once it’s boiled reduce to low heat.


I fried my sage to make it more exciting. Take a small pot or sauce pan and add about an inch of oil. Remove sage leaves from stems. When your oil is quite hot gently toss in sage leaves one at a time. They should fizzle in the oil, when the cease to fizzle, count to ten before removing them and placing the fried leaves on a clean towel. The leaves should brown in the oil. When you’ve fried each leaf, turn your attention back to the soup.


Fried Sage | Land of Laurel


Now for my favorite part! Your soup should be looking like this:


Butternut Squash Soup | Land of Laurel


It’s perfectly edible and delicious this way, but I am a huge fan of a much smoother texture. Which leads me to my favorite kitchen tool – the IMMERSION BLENDER! I love immersion blending things! It’s literally the most fun thing ever invented. You can blend a smoothie in it’s cup! You can blend soups in the pot! We’ll do the latter. Get out your immersion blender and go. to. town. It’s delightful! Once your soup is good and blended you’ll be able to truly tell how thick this soup really is. If it’s too think for your liking, now is a good point to add water or vegetable stock to the thin it down. Just simply stir it in. I didn’t feel this was necessary, because the soup was to be my entree and hey, I like a thick soup!


Now, crumble the majority of your sage into your soup and stir it in. Be sure to save a bit for garnish!


Thick Butternut Squash Soup with Sage | Land of Laurel


Serve and enjoy!


Delicious Butternut Squash Soup with Fried Sage | Land of Laurel


Have you made soup recently? Waiting out the cold weather with hot liquids? Live somewhere warm and want to let me crash on your couch for two months? Let me know!


Glitzing Things Up with Gold

My goodness, it has been a while. Sorry, my friends! I’ve been having a crazy January! Lots of things going on personally and professionally. I’ve been falling into bed totally exhausted all month long. I have lots of blog posts planned though! Yay! Now I just need to write them… but I will! I will! I promise!


So, do you remember approximately 50 thousand years ago when I made over a nightstand for my friend Hannah? And I showed you all the prep process and never showed the final thing? I promise that I will – I just need to get myself into San Francisco in the daylight to style it and take some pictures… any day now…  Anyways, you may recall, that when I found that nightstand I also found some ceramic lamps. They were a hideous brown-purple color, but they had an excellent curvy shape that I knew would look fantastic in a different color.


Thrift Store Lamps and Nightstand


You may also recall that I already have two perfectly good matching lamps in my room. They are a bright apple green color and are Robert Abbey. Basically, they’re great, but they don’t actually function. They need to be rewired and I just don’t love them enough to get on that. I also think they need to be a different color. But because they’re so nice in the factory finish, I’m having difficulty getting myself to re-do them. I think I will eventually, but right now, I’m happy to tuck them away in the attic. Maybe they’ll have a new life in navy blue in my parent’s family room. Or maybe they’ll live in attics for ten years, because I am a hoarder at heart. 🙂


West Elm Bedding | Land of Laurel


Once I banished them, it was really time to get a hop on the thrifted lamps though. I got the lamps from where they’d been living (the corner of my bedroom!) and brought them outside to our courtyard to take inventory.  They were in pretty awesome shape considering their misfortunate coloring. The finish was still shiny and in good shape, they even worked when I plugged them into the outlet! Working lamps from the thrift store for 10 bucks each?! What is this victorious feeling? Thrift store success! Let me tell you, it’s a real high. 😉


Inventory of the Lamps


Now that I new these lamps did not even require re-wiring, this make over got super easy. All they needed was a quick coat of paint! We all know how much I love to paint. But what color should they be? My first thought was a nice dark green, since that was my go-to color for my bedroom in the beginning. But then my new bedding incorporates so much of my true life long love: the color red! I was in a bit of a conundrum. I like design conundrums though. I get to sit back and think about things for a little while. So after letting this cook on the back burner of my head for a bit, things became clear. Around this time I was also redoing my bathroom plant stand and then a little while later I stumbled upon my gold sequined pillows; things suddenly became very clear. Am I obsessed? I’m still undecided, but as I’m sure you’ve guessed, I decided to go with the gold again! Time to get cooking! I got out my trusty canvas painter’s cloth and began my prep work.


First  I taped off the electrical where the light bulb sits and then the plug itself. Because these were fully functioning lamps, I did NOT want to mess with these bits! Every thing else though? Go for the gold! I even decided to try spraying the brown cord. I figured the worst that could happen is it would flake off and I’d be left with a brown cord again. Since I intended to fully hide the cord, I couldn’t think of a reason to not give it a try.


Once things were taped off, I wiped down the entire lamp with liquid deglosser. I know a lot of people skip this step, but since I already have the liquid deglosser, I figure it can’t hurt. Once I’d checked that off the list it was time for my favorite part: paint!


Prepping the Lamps | Land of Laurel


When I spray paint, I like to look like a deranged college student/clown. I wear my hair up, I wear eye goggles, I wear an intense mask/respirator rated for spray painting. Spray paints still have VOCs. VOCs are terrible for you. It’s important to take safety precautions. This is another reason I always spray paint outside. May the internet forever treasure this photo of me. Also NESCAC represent!


Spray Paint Precautions | Land of Laurel


Once I’d donned my safety equipment, I grabbed my favorite primer and went to town.


Rustoleum Primer | Land of Laurel


After the first coat things were looking pretty rough. I always like to show you these in priming progress shots, because spray painting is all about thin coats! It doesn’t happen magically all of a sudden! It definitely takes patience and many coats to get a nice spray paint finish. I could definitely use more patience in this arena!


Priming the Lamps | Land of Laurel


You can see that everything totally looks crazy town for a minute or two. But, don’t worry! Another coat of primer and they start to look quite dashing! Now, at this point I always start to doubt myself. Do I really want to paint them a different color? White looks so good!! I think white is classic, elegant, just lovely. You know what white isn’t though? Me. White isn’t me. I don’t handle white things well… In fact, I usually destroy white things. You should see the mud stains I have on my formerly white jeans. I just can’t be trusted with white! But I do have an appreciation for all that class! If you look closely though, you can see that the original color peeking out under the priming job. It doesn’t matter, because what comes next is even better.


White Primed Lamps | Land of Laurel


To no one’s surprise but my own, I grabbed my favorite gold spray paint and had a little fun. The first coat went on and things were back to crazy town, but this was Vegas-crazy-town! Glitz! Glamour! Gold! Okay, I freely admit to being obsessed now… 😀


First Coat of Gold | Land of Laurel


After two more coats, my lamps looked fantastic! Everything I imagined when I saw them at the thrift store after work that first evening. This is the kind of thing I get excited about people, seeing my projects come to fruition. Even if it does take a century and a half for me to get it done. It’s better than chocolate cake. And I love chocolate cake.


I let the freshly painted lamps air out in the little shed off our house for three or four weeks. Because they were going into my bedroom I wanted them to have plenty of time to off gas. No one wants to smell spray paint when they’re going to sleep at night. Nuh-uh, no way. I am particularly sensitive to smells too. Another reason they sat out there for so long is that I got busy and forgot about them. But shhhh! The off-gassing is a much better (and very real) reason!


Once I brought them indoors I stripped the white lamp shades from my old lamps and plopped them on my new gold ones. Cue the excited squealing! I become about five years old when I am happy. It’s glorious if you enjoy small children. Once I had my lampshades on I placed the new lamps in the center of my nightstands and boy had the view changed. Goodbye apple green.


Green Lamps | Land of Laurel


Heellloooo gold!


Gold Lamps | Land of Laurel


Okay, maybe it’s a minor change. But whatever. My lamps are gold, people! I think the curvy shape is much more pleasing to the eye and the gold pops against the white shade similar to the gold sequined throw pillows against the white standards. While repetition isn’t a design requirement, it’s usually a good thing. Just like that things were coming together. My nightstands were looking better too. Just in time for me to get new ones… still need to find those!


On the left side of the bed (the unused side of the bed), I keep a picture of my dear friend Hannah and my grandmothers comb, brush, and mirror set. I love having the latter, it’s something I remember seeing every time I walked into her bedroom. Now it’s in mine. I’ve said it before, but I’ll say it again, having little memories of my Oma scattered around my house makes me feel connected to her even though it’s been almost two years since she passed. That woman meant the world to me. And now I’m crying. Pheww. Deep breath and back to design. Since I never use this nightstand, it’s the perfect place to display things.


Left Nightstand | Land of Laurel


The other nightstand is a bit more functional. The rightstand usually has a glass of water, an empty tea mug, and receipts laying on it, but I decided to clean up a little for the internet. 🙂 I keep my journal either on top of the night stand or in one of the drawers. I like to write from bed, so it’s good to keep it handy. Writing in it calms me down and it’s a great de-stressor. Which makes this the perfect before bed activity. My plant addiction means I usually have a plant or two stuck somewhere on the nightstand as well. I have plans to go to IKEA later this week, I’ve already told my shopping companion to blindfold me past the garden section. I have literally no will power people! There’s usually a framed picture of my friend Claudia on here too… but it’s run off somewhere. I think it’s having a love affair with one of the pictures in the living room. Gosh, I wish Harry Potter was real.  🙂


You’ll see too that I have a small framed book above my lamp on this side. I’m experimenting with the idea of having these above the lamps… but I’m still not committed. What do you think? Good? Bad? Ugly? There’s so much wall space… matching mirrors would be great, but I don’t want plain ones or more IKEA. The idea of thrifting matching mirrors is a dream only, which leaves me with buying. Since mirrors get pricy quickly, I’d like to find another solution. I’ve been eyeing pinterest to see how others have managed this. No lightbulb moments yet! Unless – I go all out and hang plants from the ceiling in both corners… 😀 I like that idea!


Rightstand | Land of Laurel


Over all, I’m loving my new lamps. They actually work. Which is mind boggling. I can now get into bed after turning off the overhead lights without running into my trunk, tripping over piles of clothes, and falling on my face. It’s pretty life changing. I mean, I still usually stub my toe, but clumsy can’t be helped. Sometimes these little things make such a big difference though. Convenience is everything. Plus it’s much better reading light. And mood lighting. 😉


Now I still have quite a few things left to do in here, but I’m getting happier and happier about where it’s heading! You can see I finally hung some art in here too. Guess what? It’s more Oma memories. More on that soon! In other news, I want to buy a quilt. My new comforter is still too hot in this room. Dang insulation is doing it’s job too well!


Gold Bedroom Lamps | Land of Laurel


Can’t wait to tell you more about what’s going on in this space! Lots of exciting changes underfoot! Have you painted anything lately? Dealt with the empty space by your bedside table lamps? Give me your advice! How’s your January been? Can you believe it’s already February? How did this happen so quickly?

Scrappy Headboard

Hello everyone! Hope everyone has had a wonderful first couple weeks of January! I can’t believe how fast the month has been going. Please excuse my radio silence; I’ve been trying to re-find my footing post-holidays! It’s been a crazy few weeks. Crazy good for the most part. But now — on to the good stuff.


Because my bedroom is on the first floor of the house, people always place their coats and bags in there when we have a party or people over for dinner. I don’t mind at all – in fact, my inner show-off likes to have people parading through that room. Plus it means I really truly have to clean up in there on the reg. Which, for me, is a much needed incentive as I tend to let things (clothes) pile up. By far, what people comment on the most after going into my room is my headboard.


New Bedding | Land of Laurel


I built my headboard while I was home for the summer during college. I used entirely scrap wood my dad had piled up (maybe this piling is genetic?) in the garage. It was a great way to get rid of some of the left over wood in a fun and useful way. Plus, some of the scrap wood was high quality walnut or cherry. The kind of wood you don’t want to just lie around forever! While I’d seen others use scrap wood to make headboards, most people seemed to be trimming it in, laying it horizontally, or cutting it into the outline of a more traditional headboard. I hadn’t seen anyone really let the mismatched wood take the point of focus. I wanted the scrappiness of the wood to take center stage. I wanted it to be obvious that the wood was collected and different.


I started by going through the wood in my parents’ garage. I wanted pieces that not only differed from each other, but were also different lengths and widths. Most of all, I wanted wood boards that had character, that looked like they’d live an entire life as something else. I found what I could, but when I first started grabbing, I realized many were looking quite similar.  You can see here that several boards were about the same length and width. That wouldn’t do!

Pre-Cut Wood | Land of Laurel


Once I’d laid out all the planks I needed for my new headboard, I marched several to be cut. Some I wanted shorter, some I wanted to rip two or three inches off to make two boards and break up some of the monotony. The whole dream for this was variation, differences, a story. To do this, I enlisted the help of a table saw… And my father. At the time, he felt I wasn’t to be trusted alone with a table saw. Silly man, I may be ridiculously clumsy, but I’ve never seriously injured myself! At the time though, I appreciated the help. I marked exactly where I wanted each board width ripped and handed those off to him, while I used a chop saw to alter some of the lengths. You can see here, how uneven I wanted these cuts. The boards were not being ripped right down the middle!


Ripping Boards for a Headboard | Land of Laurel


Once we’d made all our cuts, the boards showed so much more variation! It was exactly like I’d pictured, everything different, each plank it’s own story. My clear favorite was – and is to this day – the wide grey board with a knot hole missing from it. That was the kind of character I was hoping for! Now it was just time to figure out what order they would rest in. Again, I wanted contrast, short next to long, wide next to skinny. There needed to be some flow as well and I made sure to pay some attention to symmetry. I wanted to make sure the headboard wasn’t tall on one end and short on the other!


Scrap Wood Headboard | Land of Laurel


Once my boards were all cut and an order had been decided upon, I numbered them all with a pencil and brought them inside. I lined them all up against a straight object (a window seat in this case), and began the process of fastening them all together. There are a variety of ways I could have done this, but the whole idea at the start of the project was to use only things left over from other projects. So I grabbed a two by four and cut it’s length to match the width of my headboard. I did this twice so I ended up with two matching two by fours.


Scrap Wood Lined Up | Land of Laurel


I wish I had more pictures, but I worked on this project so long ago, I didn’t take them with a blog in mind! These pictures were all taken with an old point and shoot camera too, so excuse the graininess! You’ll have to imagine this next part. I laid both of my two by fours horizontally, perpendicular to the planks of scrap wood. One board I placed close to the top and one closer to the bottom. Then I took a bunch of left over drywall screws, got out a drill, and drilled a screw through the two by fours and into the scrap wood over and over and over until each piece of scrap wood was held on by two screws. Once the whole thing was held together, I took my new (and heavy!) headboard back outside onto the sawhorses.


I wanted there to be variation and character in the planks, but this was, first and foremost, a headboard. Which meant it needed to be smooth, without splinters to catch on linens, hair, or my skin! I got out an electric sander and went to town! I evened out the wood board transitions and made sure nothing was left to catch on anything. After I finished this, I missed some of the natural scratches and lines on the boards though. What to do? How to fix this?


If you ever want to beat something up, this is the project for you, my friends. I took out a hammer and some nails and bolts and started going to town. I made little divots by laying the bolts and nails down on the boards and then hammering them. It was actually really fun! I’ve heard you can also use bicycle chains and pretty much anything else you have laying around to give wood some character.


Then, once my boards were nicely beaten up, it was time to stain! Still outside, I took out a can of dark mocha stain left over from another project (aka free!) and gave the entire thing two coats, waiting between coats as directed on the can. After I wiped down the second coat of stain I went back and dripped additional stain on a few places on the headboard. I was hoping to add a bit more personality to the wood in this way as well. The spots of extra stain became much darker and some combined to create organic shapes.


After the stain had dried, cured, and off-gassed outside for several days, I brought inside and leaned it up against my bed. My bed was a birthday gift when I was twelve. At the time, I was completely enamored, but several years later, I was over the cold, silver metal and modern look. It had come from IKEA and had held up well, but just wasn’t my style anymore. I tried to find a picture of it and I did manage to – the picture is just old and showcases my crazy high school bedroom in all it’s holiday finest! Bet you never thought you see something this exciting! Look at that plate holder turned CD rack, the headboard in the center of the room, the extreme mess… so glad I’ve grown up! Haha!

High School Bedroom | Land of Laurel


Anyways, the metal headboard? Out! The bed itself? Totally reuseable. In fact, I placed my new scrap wood headboard directly in front of the old metal one and held it in place with eye hooks and twist ties! Now, you can hardly tell the old metal bed lives underneath that gorgeous scrap wood headboard! Plus, my new West Elm bedspread hides all those metal bed legs. Bam! Whole new look! Cost? Absolutely free. Pretty good deal if you ask me!


Garden Trellis Bedding | Land of Laurel


Have you made a headboard before? Or repurposed scrap wood to make something new and unexpected? It was a fun challenge to make something like this for absolutely nothing!

Livin’ It Up In the Living Room

Happy Holidays everyone! Hope you all had a lovely end of December and are looking forward to Thursday’s New Year’s Eve! I had an absolutely lovely Christmas this year. I spent Christmas Eve with my mother’s side and Christmas Day with my father’s side of the family. I truly couldn’t have enjoyed the holidays more than I did. Everything went pretty much perfectly! Hope everyone else was as pleased as I am! And if not, just drown yourself in eggnog and cookies to destress! That’s what the holiday’s are for anyways right? In celebration of the upcoming New Year, I thought I’d share some pictures of the living areas! Today I’m focusing on the befores and the challenges of the living-dining area; I’ll share the kitchen soon I promise!


We have a home with an open floor plan so the living room, dining room, and kitchen are all integrated into one L-shaped space. The kitchen is tucked into the shorter part of the L which designates it’s zone as more independent than other open floor plans might. I really like that when I’m in the kitchen there aren’t a ton of people circulating through the space. There are definite challenges to an open floor plan, but the longer I live here, the more I really enjoy it. Yes, when I have a party everyone is everywhere and I can’t hide a single mess (unless it fits into my closet!), but this means if I’m cooking or coordinating with stuff in the oven, I’m not completely isolated from my friends! In fact, today so many more people tend to gather in kitchens. The kitchen is the parlor of today. Everyone hangs out in the kitchen. They’re the new multi-purpose room! If your kitchen is more closed off from the living and dining spaces you can make a complete mess and no one will notice, but you also tend to not be able to socialize while you cook. There are positives and negatives to both for sure.


In our house the whole living/dining/kitchen space is a nice white color that is pretty perfect. It’s definitely not a cool white, but it’s not a yellow-y cream either. Our landlords should probably be professional paint color pickers. They always pick the cream of the crop (so pun-y!)! I walked into our house for the first time and didn’t want to paint a single room, which is pretty crazy considering how much I LOVE to paint. Seriously not kidding either. I love painting. I put on some good music and rock out. I get my clothing pretty covered in paint, but I am an expert at painting without using a drop cloth or anything. It’s a handy talent I put to use by basically forcing good friends to let me paint their interiors for them in exchange for tea and pizza. It’s a pretty good trade if you ask me! But anyways, the main areas of our home are white! Now, let’s get to more details, shall we?


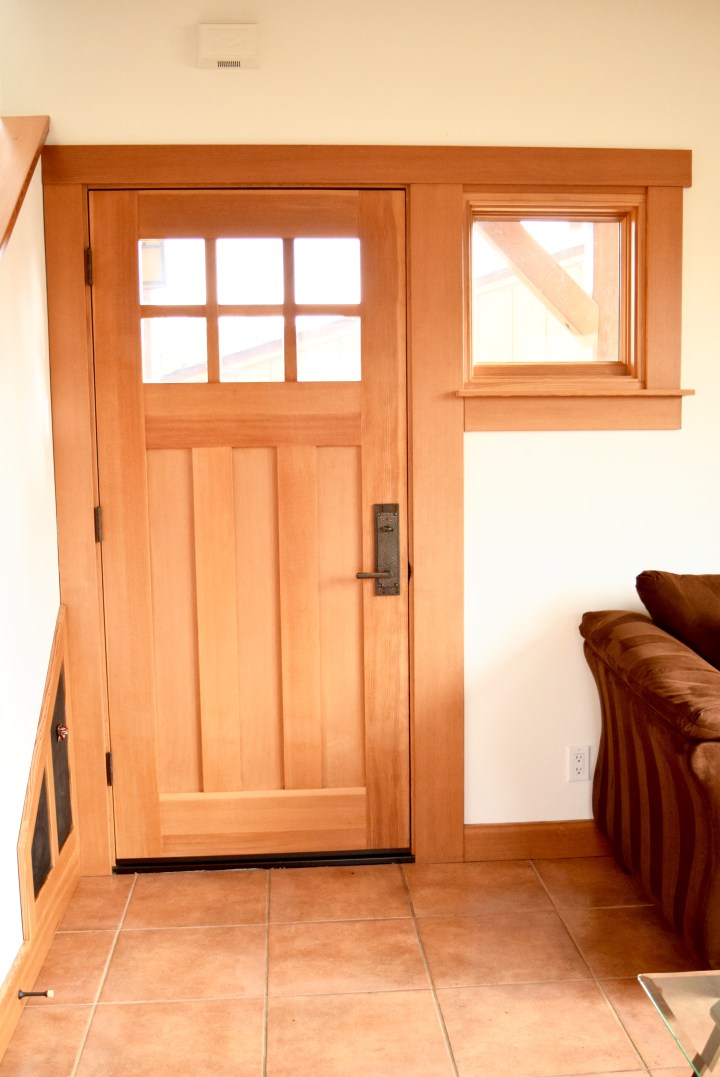
First, you enter our home through the front door. Look at that gorgeous door! I love that I can see who’s outside without opening the whole thing. It’s such a hunk of a door too. That’s the kind of door all the lady doors inside want to have door babies with. They’re all standing in the hall gossiping about our hottie front door like, “Hey, come in here often?” But the front door isn’t so open to a relationship with all these interior doors. They’re just a bit hard to lock down, you know? I mean literally, though, very few of our interior doors have locks… Maybe I should apologize for subjecting you all to my brain just there. My brain thinks the doors are hitting on each other. It makes total sense in my head, I swear!


Wow, I am distracted. Who cares about the scandalous and secret lives of the doors when there are windows?! Next to the front door is a little window. Why? I have no idea, but it does let in a little more light! I’d love to stick a little table for keys, mail, shoes, and purses underneath that window. Right now all that gets dumped on the island. Which means it’s hard to find somewhere to prep food and eat. Minor tasks! Because all of our furniture is ridiculously large, it would need to be the perfect size table, probably custom. Luckily, for Christmas, I got a nice chop saw! So maybe I’ll work on this in the new year. It would be a fun little project and I can already imagine what it would look like… #dreamer


Front Door | Land of Laurel


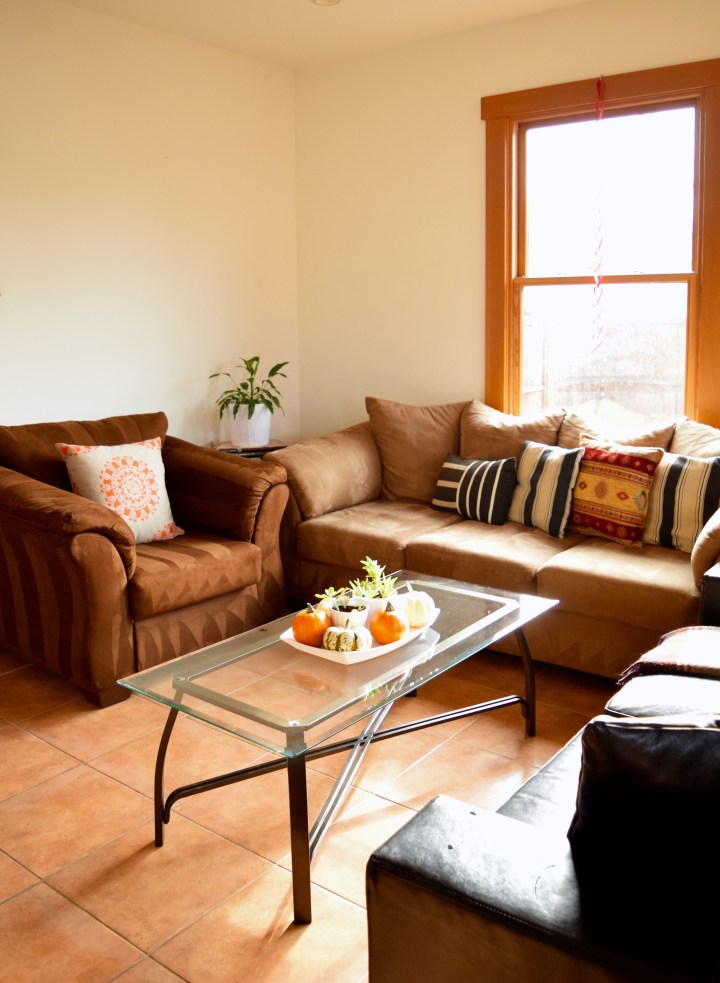
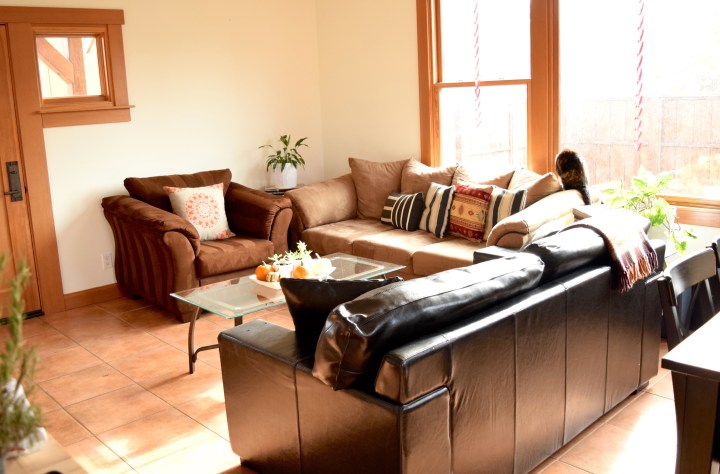
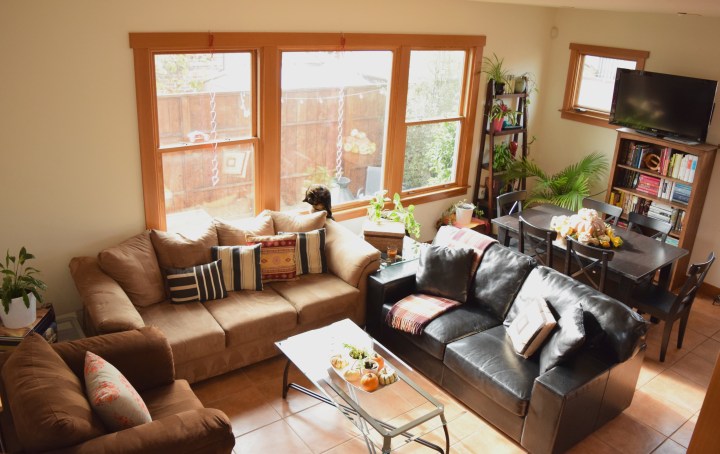
Next to the front door is the living area. We’ve squeezed an oversize couch, lounge chair, and love seat into the space. It’s crazy town, but it’s the furniture the three of us had! Most of it isn’t mine, but the large black loveseat does belong to me. It’s a hand-me-down from my Aunt Chrisy who used to keep it in her downstairs television room. Unfortunately the couch is a faux leather that is starting to disintegrate for some reason! Maybe the direct sunlight from these south facing windows is too much for it? Regardless, the loveseat needs some help.


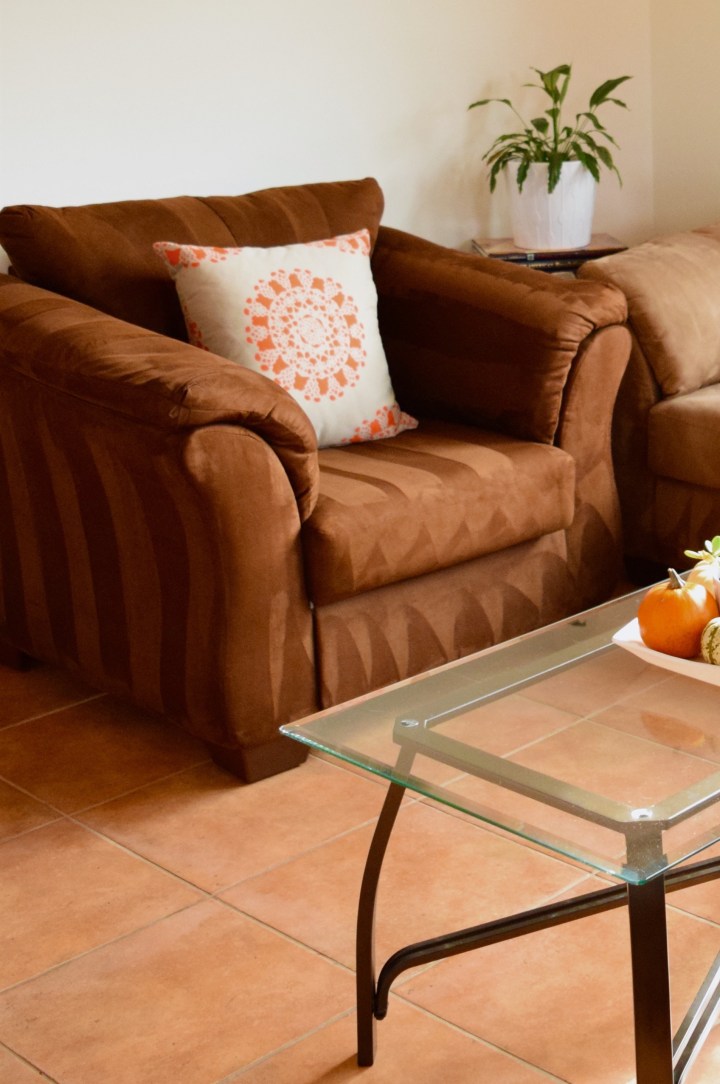
This corner of the room is also in desperate need of some art! I have a ton of things I want to frame and last time I was at IKEA I picked up a few of their Ribba frames on sale. So hopefully I’ll get on this soon! Other than that, this area is pretty dang bland looking. It needs some flair, some fun, some cute throw pillows! Right now the pillows are just a chaotic mess of what we three already had and it makes me want to karate chop something. Like a pillow.


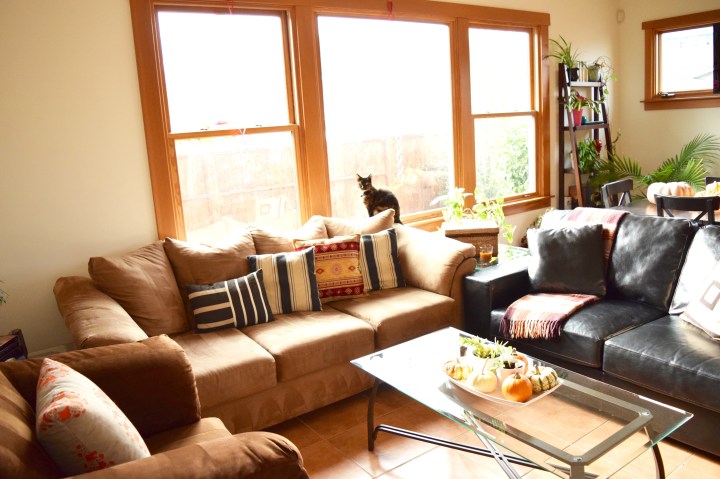
You can see Malary also has a favorite perch in this room too! She is there in the window literally every. single. time. I get home. It’s pretty adorable. I think it’s perfect for sunbathing during the day. This room gets a crazy amount of light! It’s so wonderful. During the morning the whole space glows and in the afternoon the light just pours in through the windows. It makes you want to curl up in the sun and take a nap. Or go outside and explore. It’s so lovely. Because we have a tall fence , the windows are very private too. You can’t see into the living room from the street or our neighbors’ houses. So, when the boys are gone,  I can dance around in my underwear as much as I want. Which is always. #priorities


Living Room Before | Land of Laurel


This particular pillow was a gift from one of the manufacturers I use frequently at work — HBF– after I interfaced with them about their new website design. It’s really cute, but the colors do not work for me and my home. Dreaming about how I can switch it up somehow. I wonder if using fabric dye would work…? The light gray color has to dye more quickly than the orange, right? Literally any other color would work. I think this would be the perfect winter project! It’s a contract fabric though, so it might dye weird. Still, worth a try, don’t you think?


HBF Pillow | Land of Laurel


On the sofa we have three black and white pillows that belong to my roommate. They are kind of old. I’m thinking about donating them back to his room. The black leatherette ones that came with the loveseat are always slipping down on it, so I think I may stick them here on the sofa and try to pair them with some other new ones with more pops of color. Green or rust would work well in the space! I also am totally obsessed with the fuzzy sheep skin ones at IKEA. The last pillow on the sofa is one I bought when I was traveling in Turkey in 2013. I actually bought it for and gifted it to my Oma and then inherited it when she passed away. I have a similar blue and white one somewhere, but it needs a fill. Also, I’m not sure it would work in the space… I may donate it to my parent’s newly renovated family room.


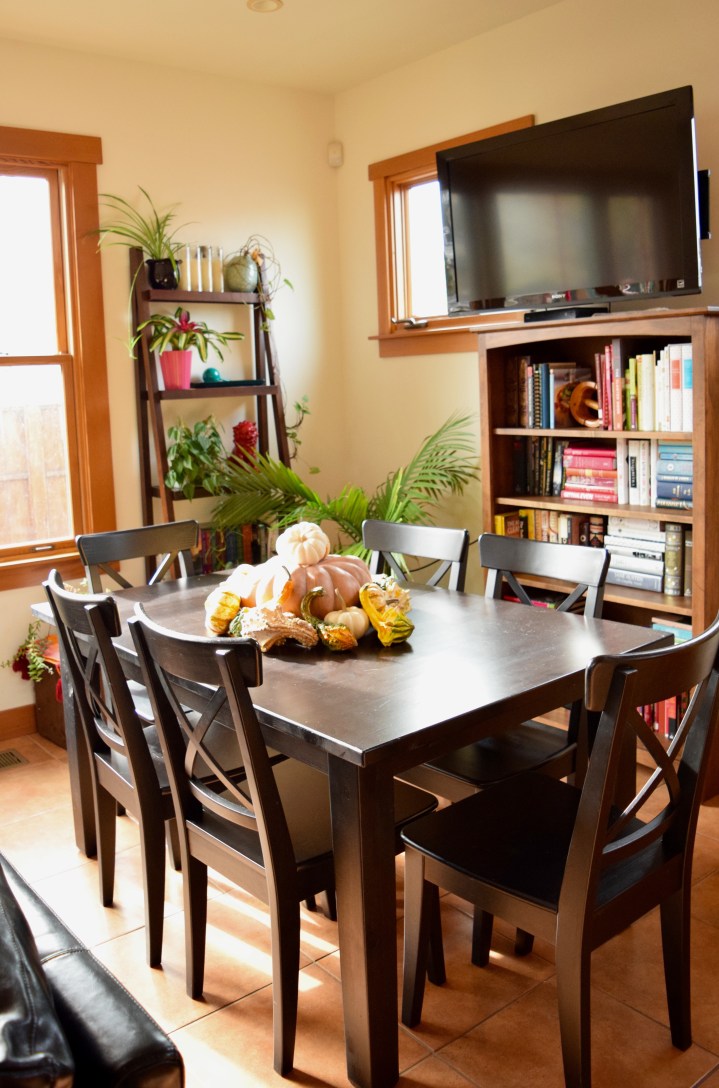
Here you can also see the dining area tucked ducked in the back of the room behind the loveseat. It barely fits. It’s kind of an awkward squeeze, but honestly, we almost never use the table! We all eat at the island. I use it to type at occasionally and for dinners when I have people over, but it’s definitely not used each day.


Living Room Pillows | Land of Laurel


The fact that all our furniture is oversized and we still managed to squeeze it into the room without it looking too ridiculous is a amazing feat. Where is Ripley’s Believe It or Not? They need to put this in their next book. Because I am astounded! We have two bookcases, one oversized sofa, one oversized loveseat, one oversized lounge chair, two 30″ square side tables, a 30″x 48″ coffee table, a full dining room table, and six dining room chairs. I mean, the arms of the living room furniture are all overlapping, but still! Isn’t that crazy?!


It definitely seems a tad stuffed in here, but it’s not too bad. There is plenty of room when we have lots of people over! On Christmas Eve my sister, Uncle Scott, and five out of six cousins on my mother’s side came over! It was easy to have us all in the living room around the coffee table. We played some board games, because we’re hella cool like that. And yes, I am from NorCal! And yes, I reserve the right to say hella!


Living Spaces | Land of Laurel


Our dining area functions as an extension of my library as well… Sorry boys! One of the bookcases is mine and is stuffed to the brim with my books. There is a huge assortment of genres, but I did reserve the top shelf for all of our cookbooks. The other bookcase is filled with my plants, but I actually don’t know which of the boys owns it. It was mostly empty when I moved in. The bookshelves could both use a little extra styling, but they’re not bad. The one on the left in the picture below needs to be tweaked a bit, but the one beneath the TV has color-blocked books which actually looks pretty nice. I want to switch the places of the bookcases, but I’d have to move the TV first. Not that that’s an issue. I really, really, really want to move that TV. It’s the first thing you see when you walk into the house and I hate that!! Who wants to walk into someone’s house and see a huge black box first thing? NO ONE. The TV really should go on the wall opposite. It makes zero sense to have it hovering over the dining room table. I am trying to a) convince the boys of this, b) summon the stamina to move the TV myself, and c) artfully patch and paint the holes it leaves behind. So much for something simple, right? Plus hanging TVs can be dreadfully annoying!


The Dining Area Before | Land of Laurel


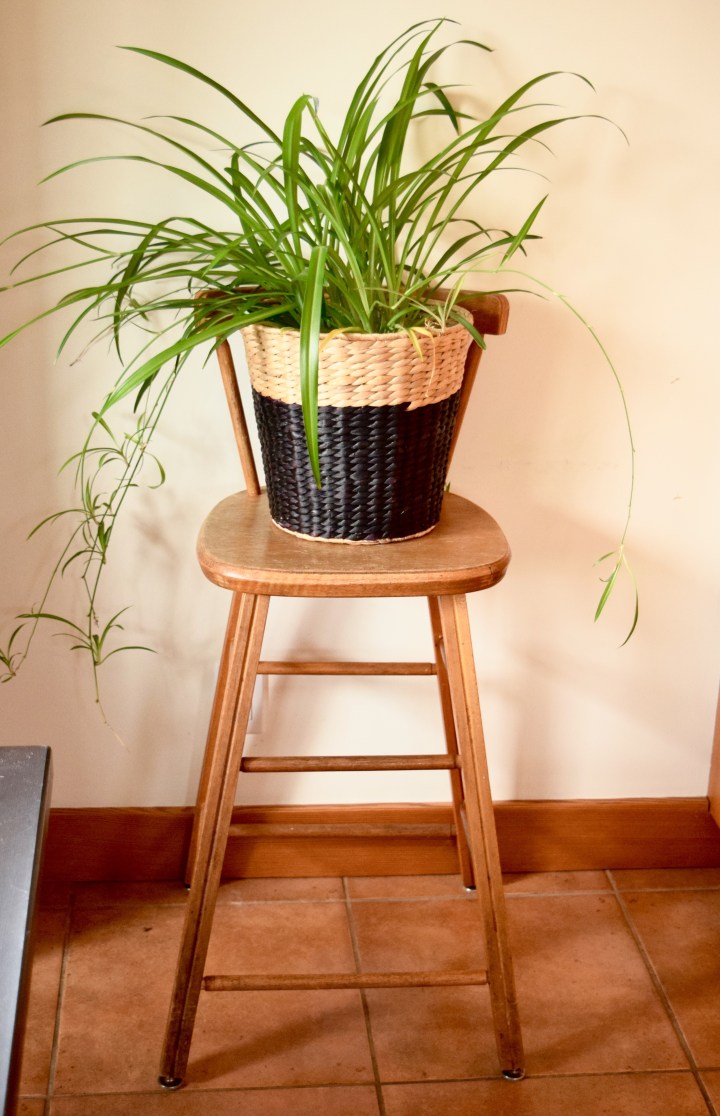
Just to the right of the dining room table, next to our full-height, kitchen pantry cabinet, I have a stool with a plant on it. I may have a plant problem, but shut up, who cares? I love them! This stool is very special to me though. For most of my life, it sat in my Oma’s kitchen just to the left of the double swing door that led into her dining room. I used to sit on this chair while she cooked dinner. Or perch on it to help her bake. I remember her sitting on the stool while teaching me how to beat spätzle batter. It’s a memory of her, this little stool. It’s not particularly nice looking or valuable. In fact, it’s kind of broken. I don’t care at all. I love this stool. It reminds me of my Oma and her kitchen and all the warmth and love she provided in my life.


On top of the stool I have a plant in a basket planter from IKEA. This spider plant is one happy girl. It loves having this much room. It’s growing like CrAzY! This plant is also something from my Oma’s house. It used to sit in a much smaller pot hanging in her kitchen window, above her sink. I became obsessed with spider plants when I was little because of this plant. I just love the idea that the regenerate themselves and make a bunch of other little spider plants. I love baby spider plants! They’re adorable. You can see this guy has a whole bunch of them, ready to be plucked off and planted!


Kitchen Chair | Land of Laurel


That’s the living spaces! Function has beat out form and style here, but hopefully with a few tweaks, we’ll get the space looking a bit better. And then with a few more furniture changes and TV moves this space will look pretty dang great! With bones like these, this house can’t really look bad anyways. It’s magical what some architectural details can do, right?


What do I have planned for this space? See below. 🙂


Living Room To Do List:

  • Get rid of all our furniture and buy all new adorable furnishings. Hahhaha, yeah, right! A girl can dream though…
  • Make/find a small mail/keys table for next to the front door.
  • Cover the black loveseat to hide disintegrating faux leather.
  • Get a handle on all the throws and blankets lying around.
  • Frame and hang art.
  • Dye HBF pillow a fun color? I did find some green fabric dye in my art supplies the other day…
  • Buy new, fun pillows!
  • Return black and white pillows to their owner’s bedroom.
  • Move TV to opposite wall. Will need to coordinate with the boys on this one… I’ll need another set of hands at least!
  • Switch places of bookshelves.
  • Style bookshelves.
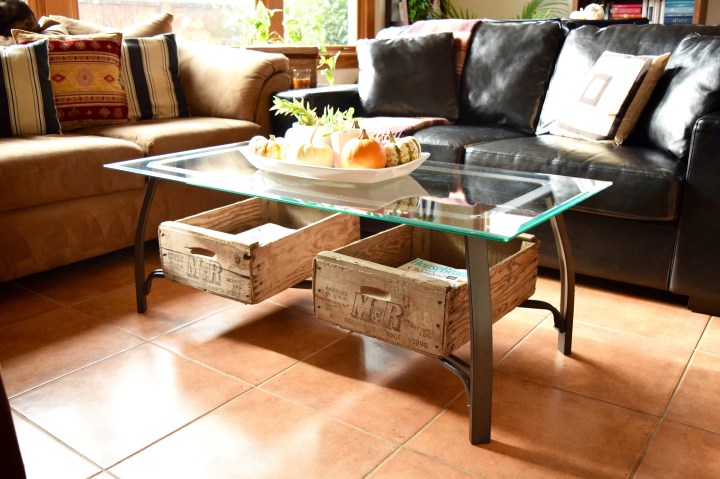
  • Do something with the glass coffee and side tables so they look like they belong in here and less like outdoor furniture. I have something cool I picked up on the side of the road for this!


So much to do, but I love a good list! What’s your living room like? Pristine and styled? In need of major work? Ready for a few tweaks, but really pretty good? Let me know if you have any ideas for my space!