Zucchini Crostini

I made Zucchini Crostini! Just kidding. They’re Butternut Squash, Pomegranate with Lemon Ricotta Crostini, but Zucchini Crostini rhymed so well!! 🙂 Hey, I tried ok?

Anyways, prepare your mouth for absolute deliciousness! I whipped these up real quick last Saturday when I had some friends over for dinner and OHMYGOD they were delicious! I served these as appetizers and then ate them for dinner. They were too good to have just five one! I hadn’t seen a recipe or anything to inspire me to whip this up, but I grabbed some things from my home away from home with the idea of crostini in mind.

Pomegranate, Butternut Squash, Lemon Ricotta Crostini | Land of Laurel

What you’ll need:

1/2 – Large Butternut Squash

2 tsp – Rosemary

2 Tbs – Olive Oil

16 oz – Fresh Ricotta Cheese

1 – Large Pomegranate

1 Lemon – Lemon Rind

1/2 Lemon – Lemon Juice

1 – Rustic Sweet Baguette

Salt and Pepper

Note: I bought all my ingredients organic. They taste better and are better for you and the environment, but this recipe would work with non-organics as well. This definitely makes use of Fall produce, so making these in season will result in better tongue tantalizing deliciousness. Say that five times fast!

Tongue tantalizing deliciousness.Tongue tantalizing deliciousness.Tongue tantalizing deliciousness.Tongue tantalizing deliciousness.Tongue tantalizing deliciousness. Dang I love copy/paste! 🙂

First, pre-heat your oven to 400 degrees. Then a little prep; I cut my pomegranate in half and removed all the seeds using my favorite method: banging the back with a wooden spoon.  Then I sliced my baguette on an angle, cutting long thin 1/4″ thick pieces. I placed the slices onto a cookie tray and sprinkled them with a little bit of olive oil.

I, then, turned to the butternut squash and peeled it before cutting it in half. I saved one half for another meal and cut the other into pieces a bit smaller than 1/2″ cubes, but just a tad bigger than 1/4″ cubes. You want a whole bunch of pieces to fit on a single baguette slice, so smaller is better! I promise cutting the butternut squash is the most time consuming part. Once the pieces were cut, I spread them out on a cookie sheet and sprinkled a couple of tablespoons of olive oil over them and tossed them with a wooden spatula.

When the butternut squash cubes were well oiled I took out my rosemary. I cut a bunch of rosemary from my parent’s garden whenever I visit them and dry it myself. Rosemary is my absolute favorite herb. My mother calls it my “Signature Herb!” I use it all the time! I scattered a couple teaspoons of rosemary, a bit of salt, and some pepper over my butternut squash and tossed it again, then popped the tray into the oven with the baguette slices. Watch your squash like a hawk! At 400 degrees Fahrenheit, tiny butternut squash cubes and then baguette slices cook through in just a couple of minutes! Mine took only about five minutes until the squash was hot and soft and the baguette slices were just starting to turn golden.

While the squash and bread is in the oven, take out your ricotta cheese and dump it out into a mixing bowl. I took my microplane and grated the lemon rind into the bowl. I used one lemon worth of zest, then cut the lemon in half and juiced half of it into the same bowl. I mixed the ricotta gently with a fork and added some salt and paper to taste. Once I’d finished the ricotta, the butternut squash was done cooking so I took it out of the oven and put it on top of the stove so I could begin assembling the crostini!

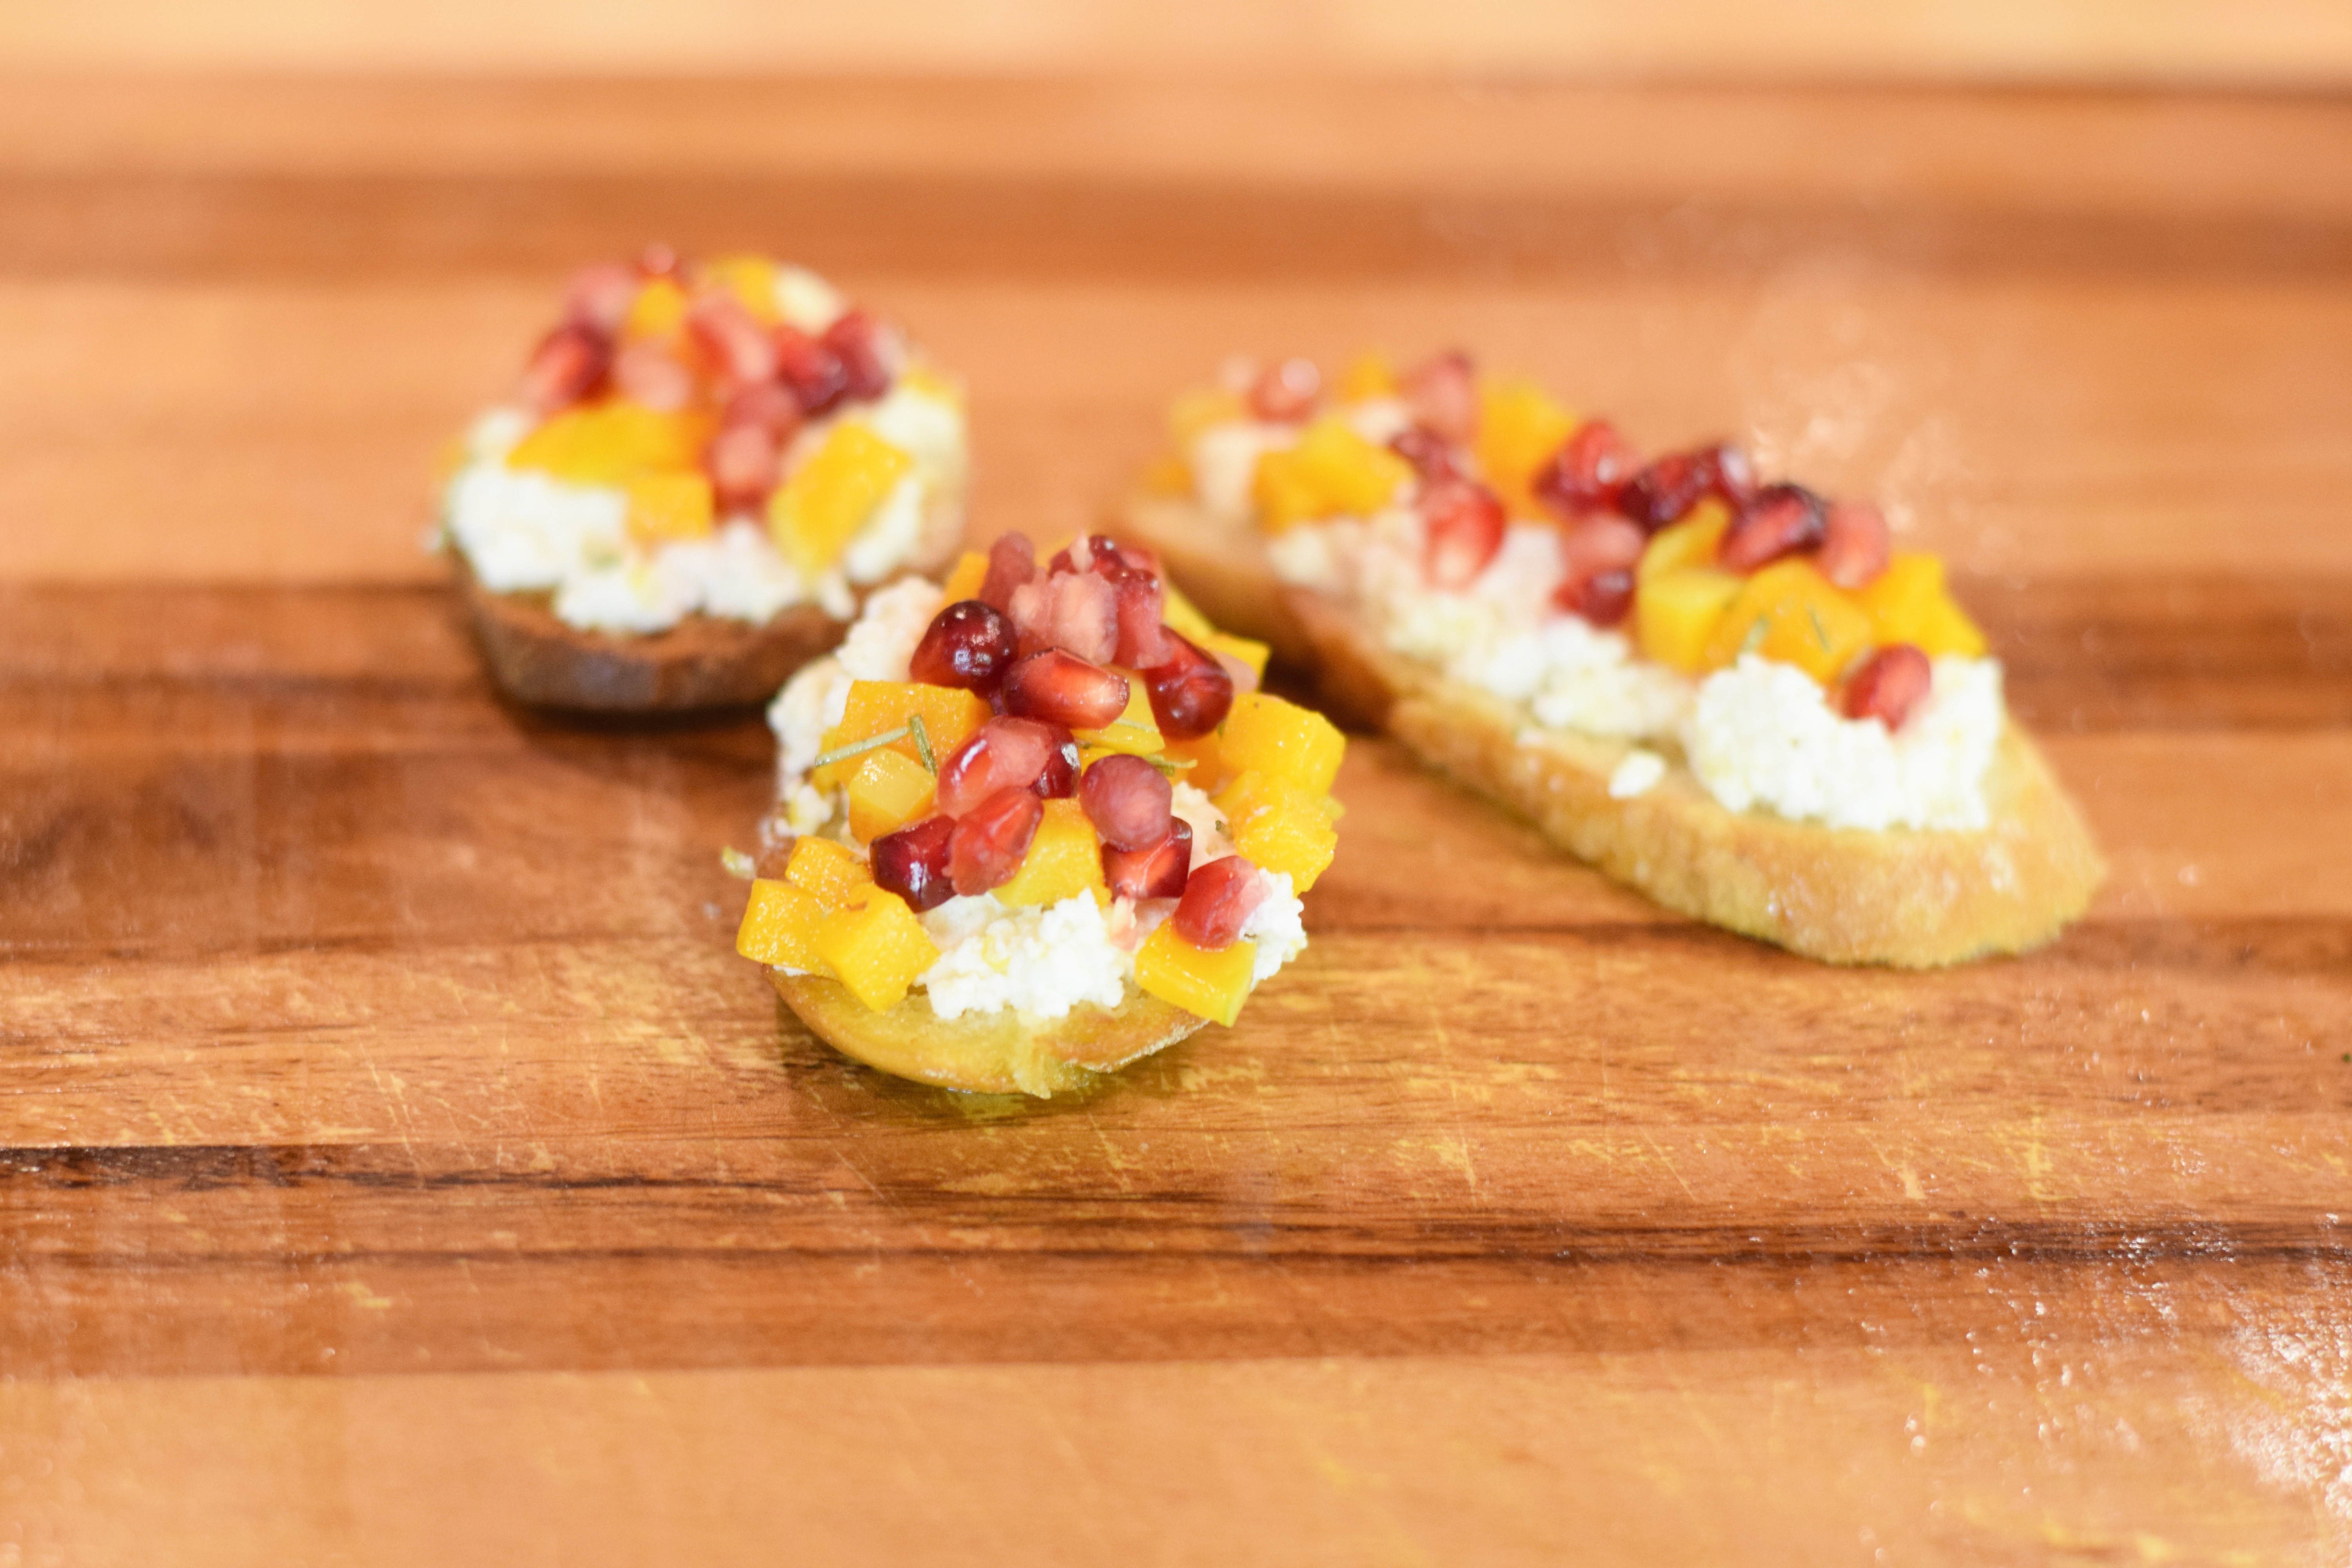
To assemble, I set up a little line with the bread slices first, then the ricotta, then the butternut squash, and ended with the pomegranate and a nice platter. I took a spoon and smeared a small amount onto one of the toasted baguette slices, then — using another spoon — gently layered butternut squash on top. I finished it off by sprinkling on the pomegranate seeds. I couldn’t make them fast enough! My guest were eating them off the platter before I could finish putting together the next one!

These crostini are simple, easy, and delicious! The tastes combine in a wonderful and unexpected manner. The crostini are decidedly very Autumn! Perfect for a cold blustery November evening! Who knows, I may even make them again for Thanksgiving dinner appetizers! This is the kind of hors d’oeuvres that seems fancy, but really takes very little skill!

Have you whipped up any quick appetizers lately? Tried making these crostini? Let me know!

Happy Halloween!

Happy Halloween everyone! Did y’all have a great time on Saturday? I had a low key night this year and it was perfect! I wanted to greet trick-or-treaters at the house, so I invited a few friends over and we ate lots of yummy food and greeted all the kids who came to the door! I thought I’d share a quick post today about how I decorated the exterior of the house and how I solved the quintessential Halloween house problem!

Like many, my home sits at the end of a long, dark driveway. In fact, unless you knew my house was there, you would hardly notice it! Our driveway is well lit, but the lights are all motion activated, so it stays dark unless you walk on down. This year, I wanted trick-or-treaters! LOTS of trick-or-treaters! I was super excited about this an determined to make it happen! I came up with the idea to solve the dark-long-driveway problem and encourage trick-or-treaters to give us a ring! Because, honestly, this works out in both our favors: I get to see all of the awesome costumes and the kids get a handful of the good stuff. None of the “eh” candy at this house! No way! I stocked up on Reese’s and KitKat bars. That delicious, chocolately, overly processed junk that is addicting in the very best way. Plus, if I didn’t get many trick-or-treaters, I’d end up eating all the leftover candy, so I needed to make this happen!

I don’t know what inspired me, but one day at work, I suddenly came up with the ultimate idea: lining the driveway with lights! But how to do this? Lights inside paper bags would put off a softer glow. But, candles are a fire hazard and definitely a no-no in drought-stricken California. What about LED fake tea lights? That is a yes, my friends! Before I could talk myself out of this idea, I hopped onto Amazon and bought these beauties! They are perfect! The amber color really does look like a flame and they flicker just like a real candle would!! I grabbed a ton of paper lunch bags from Smart & Final, cut a jagged top, and filled the bottoms with a small handful of gravel. I placed the bags all along the driveway and then, at dusk, stuck a tea light or two in each bag. They lined the driveway creating a little runway that screamed, “Hey you! Hey, over here! Come down this driveway and get some Halloween candy!” It was perfect! Many of the parents walking with their kids complemented me on the “runway.” It put our hidden-away house right on the map!

Halloween Driveway "Runway" | Land of Laurel

In this photo the lights look a bit yellow, but in real life they were much more orange-y amber. It was gorgeous! Other than the “runway” my decorations for Halloween were limited, I threw up a spiderweb with a big ol’ spider and carved pumpkins with my roommates!

Minimal Halloween Decorations

We actually got a fair number of compliments on our pumpkins too! One little, five or six year old astronaut told me we had great pumpkin carving skills! #blushing! That kid stole my heart! We did try our best, but we’re definitely not all that talented. You can see the kitty pumpkin I carved in honor of Malary in the picture above. They looked okay during the day…

Pumpkins Up the Stairs | Land of Laurel

…and they looked ever cooler at night!

Year One Pumpkins at Night | Land of Laurel

That last photo was taken with my iPhone, so don’t judge it too harshly! The pumpkins looked awesome though! I take so much pleasure in these little things. Carve a pumpkin, stick a tea light in it and I’m in heaven! I used the same LED tea lights in these pumpkins and then placed a few more around them as well to create more of an atmosphere! The tea lights were realistic enough that a few cautionary mothers warned their kids to be careful and not touch them! It was pretty adorable!

How was your Halloween? Did you go all out? Did you dress up? I went as superman at work on Friday, switched it up and went to a party as a little German boy in Lederhosen that night, but by Saturday, I was so busy cooking, I totally forgot to put on my sugar scull face paint! Oh, well! There’s always next year!

Color Pop, Pow!

You may have heard that Rust-Oluem is donating $10 to Bright Pink for every project with the tag #paintitpink for Breast Cancer awareness this month! Bright Pink is an organization that aims to save women from Breast and Ovarian cancer. Breast Cancer is close to my heart since one of my namesakes has battled it in the recent past.  Since I’m always up for a spray paint project I jumped on this challenge!

Print
– via –

Now, I wouldn’t say pink is one of my go-to colors. I wear it infrequently and don’t really want a lot of pink in my home. However, pink can be one of those awesome bright, happy colors that creates an awesome pop! when used well in a space. I decided I wanted just that kind of pop. During a recent IKEA trip I picked up some of their pots. (I seriously cannot leave IKEA without a few of these in one size or another, I have a problem! #addicted!) I wanted to put a few on top of my toilet to add some greenery to the bathroom and I wanted some for the kitchen windowsill above the sink for succulents. I love plants, they make me feel so happy an alive. When you add them to a room, it really brings a space together! Plus, they take in CO2, put off oxygen, and promote better indoor air quality! I grabbed this planter pot for the Paint it Pink challenge while I was at IKEA, I figured it would look good as a color pop! on a shelf.

Paint it Pink Pop

Because I am addicted though, I also bought eight of the smallest version of these pots too. For another project. That I decided to start simultaneously. Call me crazy and you’s be right! The next time I was at Home Depot (okay, okay, it was the same day, because I’m always there!), I picked up Rust-Oleum’s Berry Pink spray paint in Gloss.

Rustoluem Berry Pink

Then it was actually time to get painting!! I set out all my pots on my canvas tarp, put on my elaborate painting mask, and got to work!

Spray Painting All the Pots

Five minutes of work and two quick coats later and my pot was bright pink! Such a happy color!

Paint It Pink Pot

I popped in this bright pink plant, I thought the pink of the plant tied into the pink of the pot quite well! And look how the pinks brought out that awesome stripe-y green leaf! How amazing in nature? SO AMAZING!

Paint it Pink Plant

I love the way this looks! It is such a great pop! of color. It’s more than a pop! It’s like a straight POW! to the face!

Paint it Pink Plant Pot

And just like that the #paintitpink challenge was complete with my Paint it Pink Plant Pot! Sorry, I just couldn’t resist all the ‘p’s! Wait, now, I’m thinking of a different bad joke about ‘p’ with a few ‘e’s tacked on at the end… Okay, I’ll stop with the jokes while I’m ahead! (At least give me points for that? Oh you didn’t realize there were points?! Life’s a competition good sir!) Yup, okay, now I’ll remove the foot from my mouth. 🙂

Did you participate in the Paint it Pink Challenge?? What was your project? I thought Katie Bower’s growth chart for her niece was just too cute!!

A Bit More than Bathing in the Bathroom

I’m struggling to write at the moment, because I just watched the Walking Dead and now I am dead inside. One of my favorite characters died and I do not know how’ll I’ll keep watching without him. What will his wife do?And Rick (my least favorite character) isn’t in a great situation either!! The Walking Dead has never hesitated to kill off the most loved characters, which makes it a fantastic, heart breaking show. Bah! I can’t be the only one near tears, right?! Who else watches this??

Now the Walking Dead has absolutely nothing to do with today’s post. Literally nothing. Although, I do really want to go to Georgia. Wait no, that’s still sidetracking. What am I supposed to be writing about?! Oh yes… my bathroom.

So as much as I now love my roommates, their radiant personalities did not play a huge part in me choosing to live here over some of the other places I found on Craigslist. Why did I choose this place? The bathroom. Once I walked into the bathroom, I was sold on this place. It was really the bathtub. I have great memories of my Aunt Karolyn’s clawfoot bathtub at her house in Oakland near Glenview Elementary School. Her daughters– my cousins– were about the same age as my sister and I so we would go there all the time. Even as a kid, I loved houses and design, and I freakin’ loved that bathtub. My bathroom now? Clawfoot bathtub. Entire reason I signed that lease. I mean besides the fact that the house is near BART and my roommates are normal, clean people, and our home is beautiful. Whatever. That stuff does not compare to my bathtub! This is what my bathroom looked like when I first moved in.

Move in Bathroom

And the the bathroom fixtures are Kohler! I love Kohler! The bathroom is all from the Kohler’s Antique Line. It’s very much a 1930’s throwback. They’re beautiful. The chrome bits on the end after the ceramic knobs were loose on a few when I moved in. I tightened them up easily by wrapping plastic wrap around some pliers. I want some rubber nose pliers, but when I asked one of the employees at Home Depot about them he looked very confused. It’s possible I made the existence of them up. Regardless, the plastic wrap worked just fine. Once I tightened them, the have not come loose again. I just love the “hot” and “cold” labels! It’s details like this that make our house so interesting. It really is a contemporary craftsman, elegantly straddling old and new design!

Kohler Bathtub Fixture

I’m lucky that the house is really beautiful. The craftsmanship is really well done. There was a lot of care taken when it was built 10 years ago. Anything I do to the house isn’t really changing it, but rather accentuating it. For now this blog is about taking a home from 75% to 100% done. That last 25%? All the itty bitty details. This is the storage and organizing and decorating. The things that make this place functional and beautifull! This is the part that takes the most time and can even seem unnecessary, but it really does complete the space.

Now the bathroom vanity is gorgeous, but it doesn’t have any drawers. Just one huge open space within the cabinet isn’t all that functional and means a lot of my things needed to live on the counter. When I first moved in, things just landed where I needed them the most, without much thought into how it all looked.

Move in Bathroom Vanity

That means the soap went straight on the counter since I didn’t have a soap dish, necklaces went on the first rack-thing I saw at Target, and earrings stayed in the boxes I’d moved them in (in which they are tangled and impossible to find). My new Target towels looked good, but this one is dirty!

Movein Bathroom Counter

My bathroom looked pretty much like this — shower curtain-less, with things stuffed into the cabinet– for a few months before I could finally get around to tackling the first stage of the room. Some of this stage was new purchases to help with function, some of it was a matter of moving things around. I had gotten a dingy looking plant stand with a glass top from my last job. They were going to throw it away, but I liked the clean lines! A basic Target shower curtain helped helped hide the necessary plastic one behind it and pumped up the fun factor. After a few months, the room had much more personality.

DSC_0241

The plant I plopped on plant stand came from my Oma’s house, just like Fred the Fish. I repotted it in this IKEA basket. I wished I’d picked up another matching basket for toilet paper to sit on the floor beneath it! Alas, the no longer sell the baskets! Arg! I’m bummed. Instead I usually stick a watering can there that I fill up in the shower when the water is getting hot before I get in. The plant on top really brings some life to the space, it’s thriving on the humidity too! Plus I washed my hand towel. Who’s proud? Me! Such an adult.

Over on the vanity, things changed less dramatically. I still haven’t found a great solution for my jewelry, but I did get a soap dish! The little things, right? This looks one billion times better than leaving it on the counter. Plus the counter stays shiny longer this way after I clean it.

Bathroom vanity

The glass jars I bought at Cost Plus World Market. They were exactly what I hoped to find. How often does that happen?! I wanted something square with a thick, sturdy glass, and — most importantly– a rubber seal. I wanted the latter to prevent moisture and germs and what have you from getting into the jars. I don’t know how protective the rubber really is, but I wanted something that would theoretically seal the jars off.

Bathroom jars

The jars add so much functionality to the space! They store many of the big space stealers from my medicine cabinet. I use the jars for cotton pads which I use to remove eye make-up and put on toner; q-tips for the ears; and these little plastic flossers which I swear I’ll never buy again, because they add so much to the landfill and who actually flosses anyways? Just kidding I floss every monthonce a week, I mean, twice a day. Regardless, the jars fit into the previously unused corner of the wide vanity and allow me to fill the medicine cabinet with more important things, like Honest Beauty products. Ha!

Just for honesty sake, I do have to say, the kitty litter box lives in here too. It’s the only place for it in the house. I’m still brainstorming on a prettier way to hide it, but for now, it lives next to the toilet complete with the carpet sample I stole from work (spoiler: it doesn’t really work to prevent litter tracking…)

Bathroom Litter Box

The room is definitely getting there though! It’s amazing what a few tweaks will do. What else do I have on my bathroom to-do list??

  • Find the perfect glass storage jars
  • Add a piece of furniture to place a glass of water or a book on when I take a bath
  • New shower curtain
  • Necklace holder
  • Soap dish
  • Better jewelry storage, perhaps building an earring holder??
  • Add some plants in small pots on top of the toilet back
  • Paint the plant stand gold to go with the shower curtain
  • find a better way to hide the kitty litter box
  • Organize the vanity cabinet to better contain everything I hide away down there
  • Hang art
  • Even more plants?!
  • Take so many bubble baths!

It’s not quite there yet, but it’s close! For now, I’m loving this look!

Bathroom phase one

Have you been adding some functional touches to your home lately? Isn’t it great what that last little bit adds to the space? It’s like, “Wow, now that they’re not buried in the depths of the vanity cabinet, I can actually find my q-tips!” The little things in life!

P.S. If you’ve been watching the Walking Dead, tell me because I need to talk about it!!!

Little Guy for a Long-Time Friend

There is a thrift store pretty close to my house. It’s about a half-block out of my way when I’m walking home from BART after work. I won’t say what it’s called, because, to be perfectly honest, it’s not all that great of a thrift store. (Seriously where are the best furniture/accessory thrift stores in the Bay Area? Do you know??? TELL ME!!) Every now and then I’ll stop by though and see what’s there. I whole-heartedly agree with Katie from Bower Power that all thrift stores have a strength zone. This thrift store’s strength is clothes and toys. Neither of which I need much of. But, sometimes, walking home from work, a girl’s gotta see what’s what.

A few weeks ago, I’d strolled through the entire store and saw a pretty cool lamp. I liked its shape quite a lot– simple, rounded, contemporary– but I didn’t really have a place for a single lamp. I returned to browsing, and then, standing across the room, I noticed there was a second, matching lamp! The first lamp had a brother!  They were marked at $10 each and they were a hideous brown color. HIDEOUS. Now, $10 isn’t exactly pocket change for a lamp that probably doesn’t even work, but I thought, “Hey, why not?” I needed lamps for our living room which has some horrible (sorry roommates!) glass side tables, but nothing on them to give them more presence. So I hopped on those lamps like a tiger on a steak!

As I was walking to the check out — gripping my lamps by their necks like strangled chickens (is that simile graphic enough?!), I happened upon a small nightstand with fun curvy lines. What was this?? About a month before this, I’d actually spent the day thrifting (and donut snacking!) with my friend Hannah looking for a nightstand to make-over for her bedroom. Hannah wanted something with good lines, some fun turned elements that she could paint a fun color. We had gone to several places (remind me to write about how to spend an entire way thrifting and snacking through Berkeley and Oakland!), but hadn’t found anything that suited her needs. I set my lamps down on the nightstand, guarding these treasures like a dog, and pulled out my phone to text Hannah this picture.

Thrift Store Lamps and Nightstand

Hannah, of course, loved it, and for $10 dollars, she’d take it. I happily danced the rest of my way to the checkout and bought all three finds. At this point, I actually walked the rest of the way home carrying my new strangled chickens lamps. I then grabbed my car and headed back to the thrift store, because as much as I like to test my upper body strength, there was no way I was going to try carrying the nightstand home!

As I was loading the nightstand into the car, I cursed myself for my rookie mistake. I had not thoroughly looked at the nightstand before I bought it. The little guy wasn’t solid wood like I’d assumed. It was a mix of plywood, cheap pine, and MDF. Ugh. Plus, there was pretty bad moisture damage to the plywood back legs. Why hadn’t I taken a closer look?! Grrrr. I cursed myself. But, I had already bought it and the store didn’t take returns, so I decided to pretend to be an optimist and make the best out of the situation.

When I got a chance to work on the nightstand, I accessed the state of the piece, and concluded that I and the world of DIY could save this little guy. From the front, he actually looked pretty dang good!

Nightstand front view

From the side you could start to see some of the moisture damage…

Nightstand Side View

And from behind, you could completely access the damage. 😦 He definitely wasn’t a looker, this little guy!

La Chanelle

P.S. I tried to look up La Chenelle, but when it wasn’t immediately obvious, I gave up. I’m lazy like that. Let me know if you’ve heard of them?

When I zoom in, you can see that these back legs did NOT look good. I was worried…

Moisture Damage Legs

But back to the little guy’s DIY: first I wiped him completely down with an old wet projects sponge I keep around for this express purpose. Then I grabbed a pair of slip joint pliers and tightened the bolts that hold the pretty legs on. The front legs are by far my favorite piece of this dresser and I was happy they were so easily attached and not damaged like the back ones!

Tightening the legs

Oddly, once I turned him over the little guy had staples everywhere. I assume they once held something on, but at this point they were worthless and annoying.

Staples

I removed the staples in a quick minute with a pair of needle-nose pliers.

Needle Nose Pliers Staples

And yes, my pliers are pink. My father bought them for me. Apparently he thought I’d prefer that… Crazy old people! Just kidding. 😛

After that, I gave the little guy a decent sanding where needed. The sides were a bit bumpy towards the bottom from the moisture. A little sanding cleaned them up though. Once he was sanded, I got out my wood glue. Elmer’s = life long adhesive ❤

Wood Glue

Because I am not known for my poise and restraint, I just squeezed a ton of wood glue on the crappy looking parts.

Wood Glue on Leg

I’d picked up these small clamps the last time I was at Home Depot, so I decided to put them to use. Where the plywood had expanded and split from the moisture damage, I glued and clamped.

Wood Glue and Clamp

This held the plywood together in a position more similar to what it’d originally been. Since plywood is really just strips / pieces of wood glued together, I figured this really wasn’t any different. Plus, what did I have to lose? I left nightstand upside down and clamped like this overnight.

In the meantime, I turned my limited attention span to the drawers. That hardware was coming off! Hannah wanted to replace the pulls with some fun knobs from Anthropologie or World Market.

Nightstand Drawers

I placed the drawer fronts towards the ground and unscrewed the hardware. This is a really easy fix if you ever want to update a piece of furniture. New knobs add so much personality! Removing the hardware from these drawers took less than five minutes.

Unscrewing Nightstand Pulls

Once the hardware was unscrewed, the pulls popped right off. Super easy! There was some guck on the drawer fronts though, so I wiped that right off with a sponge. After that, except for the wholes, you couldn’t even tell there were once pulls on these drawers!

Guck under Hardware

I left everything and pretended I have a life outside of DIY for  a bit. The next day, I pulled the clamps off back legs of the little guy. They looked SO MUCH BETTER you guys! They looked almost totally normal and I knew with a coat of paint, you’d hardly notice at all. Except for the gaping holes! But whatever! I’d regenerated plywood! This was too exciting / such a freakin’ relief for me to worry about the gaping holes!

Reglued Plywood

Remember what they looked like before?!

Moisture Damage Legs

SO MUCH BETTER!!! Once I’d finished my twirling my happy dance around the courtyard, I decided to do something about those minor huge gaping holes in the little guy’s back legs. With that in mind, I tossed open my big canvas painter’s cloth and pinned it up to protect the courtyard area. I grabbed my wood filler and started filling in the scratches and gaps on the nightstand.

Wood Filler

I wear gloves and a mask when I do that because wood filler smells like cancer Seriously. it stinks stinks stinks!

Applying Wood Glue

While I was at it, I filled the holes from the drawer hardware as well.

Wood Filler on Hardware Holes

Make sure you lump a whole bunch of wood filler in holes like these. You want it to be bumpy now so you can sand it down to smooth later. Once I’d filled the biggest scratches and gaps I waited for the wood filler to dry, then sanded the entire dresser again, making sure the spots I’d wood filled were nice and smooth.

Sanding Wood Filler

Then I wiped the nightstand down again, but this time I used liquid deglosser. Since the little guy wasn’t solid wood I hadn’t wanted to sand him too hard and I thought this would be good in the nooks and crannies of the nightstand’s details that are always so hard to sand down!

Liquid Deglosser

After that, he was looking pretty good and I was ready to paint!!! I’m actually always ready to paint. I love painting! Before I could get anywhere near the little guy, I needed to tape off some areas. I didn’t want to paint the sides of the drawers, because this can mess with the opening and closing glide. I taped the edges of the drawers and used one of my roommates’s old issue of The Economist to cover the larger areas.

Prepping to Paint Nightstand

The little guy was looking pretty decent actually. I was so relieved that I’d managed to save the moisture damaged nightstand. Now, with a bit of primer and paint, I didn’t expect to notice the little guy’s humble beginnings at all!

Have you ever saved plywood from moisture damage? Did it work? Are you as excited as I am about saving this nightstand from a watery grave?!

An Honest Review

I have been following the Honest Company pretty much since it was founded a few years ago. I was absolutely ecstatic about a company that embraced the same eco-friendly practices I strive to live by. I read both Jessica Alba’s The Honest Life and Christopher Gavigan’s Healthy Child, Healthy World, which gave me answers to many of the questions that had been nagging me for much of my life. If you haven’t checked out either of those books yet, I highly recommend you do! They’re both incredible informative. Healthy Child, Healthy World is a particularly good guide on jumping head first into a healthy, sustainable life. I am constantly impressed by the Honest Company! I have a subscription to one of their bundles and get their products delivered to me every 6-8 weeks. As if that wasn’t enough information on my love for this company, I actually applied for jobs at their Santa Monica office after college. I was even was flown from Oakland to Los Angeles for an interview (spoiler alert: I did not get the job!) where I met Christopher Gavigan and Sean Kane as well as many of their other staff. It was during this interview in October of 2014 that I learned the Honest Company was making strides into the world of beauty products. I’ve basically waited an entire year in anticipation of Honest make-up!

When the Honest Company’s Honest Beauty branch went live last month, you know I signed up! I ordered their free skin trial (oily) and the Truly Kissable Lip Crayon, Demi-Matte in Honey Kiss. A week or two ago, my order was delivered to my house!! Yay! I was excited to dive into Honest Beauty!

Honest Beauty Box

The boxes came in all their glory. They’re about 12″ x 8″ roughly (I’ve already recycled mine). I love that the Honest Company makes their boxes more interesting than any old cardboard box. It definitely adds to their branding and makes each box seem special. The fact that the Honest Beauty Logo is so similar to the Honest Company’s butterfly logo, yet also encompasses two B’s and an H is just good graphic design. Whoever came up with that is one talented designer!

Honest Box from the Side

When you open it, it just gets better.

Honest Beauty Box Inside

It’s just cute right? It’s so much more interesting than a plain box. Can you tell I love design?? Seriously though, it’s little things like this that seem silly, like no big deal, that really pull a design from good to great. I love it! Enough about the box now, 400 words is probably just plenty! On to the actual products!

So my trial came in one box and my lip gloss came in a separate box which was the same size. This was a little silly and kind of a waste. I wished they’d been packaged together, but I’m assuming the free trials are all packed ahead of time. My Oily Skin Trial came with Refreshingly Clean Gel Cleanser, Dependably Clear Oil Free Moisturizer, and Beyond Protected Daily Beauty Fluid Oil Free SPF 30. I am particularly excited about that last one, because ever since I found out my favorite daily face sunscreen is rated a 4 on the Environmental Working Group’s Skin Deep Cosmetics Database (say that five times fast!), I’ve been experimenting with replacements. Ideally  everything I use would be a two or below on their scale; this is the one product that I’m finding difficult to replace.

The first thing I tried? The lip crayon! It is definitely a nude. I like the way it looks a lot. Perfect with a smokey eye or heavy liner (my favorite looks). I think it would look even better layered with an Honest Beauty Lip Gloss like they recommend… but they’re so expensive, I’m a little hesitant to buy anything else quite yet. Dang though is thing thing long lasting! When I wear it to work it will last me all the way through lunch no matter how many cups of tea or scones I snack on in the morning! It’s awesome! And I just love the texture. All of the Honest Beauty products I tried had such a smooth, light texture. It’s not cakey at all! It feels like my lips and face could breathe through the make-up, moisturizer, and sunscreen! It’s kind of indescribable and oh so amazing!

Honest Beauty Products

That night I got to try the rest of my samples! The cleanser smells really great! Very perfume-y and feminine though, so probably not for you guys. I was actually surprised by the scent. Most of the Honest products have more mild scents. I am particularly sensitive to smells, so although this threw me off for a second, as soon as I got over my surprise I found the scent to be floral-y, but mature.  The cleanser works really well guys! It easily stripped off make-up without leaving my face feeling dry.

Next up? The moisturizer. Now, I don’t normally use moisturizer. My skin is plenty moist unless I’m bombarding it with benzoyl peroxide in a war over lurkers. I once had a dermatologist tell me that my skin really didn’t need moisturizer, so I don’t keep any on hand. Because this was part of the trial, I decided to try it anyways. The moisturizer was really lovely! It’s a great consistency that blends really easily and left my skin feeling incredibly refreshed and somehow smoother. I might just get some for those days when I need it!

Finally, the product I was most excited about: sun protection! I wear sunscreen on my face every single day you guys. EVERY. SINGLE. DAY. I have seen too many people get skin cancer. I had pretty bad acne in my teens and went to several estheticians and dermatologists. I’ve gotten tons of advice on my skin and keeping it clean, clear, and wrinkle-free– a lot of it conflicting– but one thing stands out. Every single professional I’ve ever consulted has insisted on the benefits of wearing sunscreen on your face every single day. So I do. Dermatologists I’ve seen have taken this a step further and let me in on a little industry secret: sunscreen only works if it contains zinc oxide or titanium dioxide. Do you know how many products out there claim to be sunscreens, but don’t contain either ingredient? SO MANY you guys! SO MANY! Now, I totally understand not loving these ingredients, because they have heavy white pigments that make them difficult to rub into your skin, but they are the only thing that actually protects you! Think life guards and the white zinc nose, guys. That is who you want to be!

The Honest Beyond Protected Daily Beauty Fluid Oil Free SPF 30 rubs in so well though. It’s really light! I’ve been experimenting with a lot of daily facial sunscreens lately and have been so disappointed in so many products. This is a feasible alternative to what I’d previously used! This guy is a little bit shinier than the Eucerin, but it seems to sink in to your skin after a few minutes. Some products I’ve tried have left my face so oily that I had to wash my make-up brushes after using them just once! That means my skin was so oily from the product that even after waiting a few minutes and applying liquid foundation, the oil clogged my brushes when I applied powder! THIS IS INSANE. And if it’s doing that to my brushes what’s it doing to my pores?! The Honest Beauty Oil Free SPF 30 didn’t do this at all! My face was totally matte after I applied my make up. Thank god. My natural oils provide plenty of shine, thankyouverymuch. The Oil Free SPF 30 does have a bit of the whitening affect that all suncreens with zinc dioxide have, but not nearly as bad as so much of what is out there. This is good stuff guys! I’m pretty committed. Once my trial is all used up, I’ll bite the $28 per 1.5 fl.oz. bullet and finally be happy with my daily facial sunscreen!

That brings me to my one and only complaint about the new Honest Beauty products: the price. Having always been a drug-store make-up kind of girl, some of these prices are difficult for me to wrap my head around. I have to pay how much for how many fluid ounces?! It’s too much for my current budget. As much as I’d love to replace everything I currently use with the clearly far superior Honest Beauty products– I can’t. I don’t have the free income to spend for these products at these prices. 😦 I’m totally disappointed, but I knew this before I ordered my trial and I knew they’d be so amazing it would suck to have to give them up! Don’t get me wrong, I plan on planning my finances so I can get what I can in the future, but I certainly don’t expect or plan to be able to convert my entire beauty routine to Honest. 😦 I’m totally bummed, but I hope that so many people love them, the prices go down, and they become even more readily available! Until then, I’ll be stalking the EWG’s Skin Deep Cosmetics Database waiting to see how the Honest Beauty products score! I’m guessing low.

What about you? What do you spend on the beauty products you use every single day? Do you think paying more is worth it or do you too rock the drug-store brands? I know everything I use from the drugstore still rates 2 or less on the Cosmetics Database, so you don’t have to pay too much for a healthy product. Have you tried the Honest Beauty line? Did you love it too?

Planting Fred the Fish

I planted succulents in Fred the Fish!! He looks amazing!! I am so excited to share this with you today. Fred has finally become his true self. His awesome self. Oh, Fred, how I love thee!!! I might be a little too excited about this!

As you might remember I got Fred from a pile of my grandmother’s belongings after she passed away in April of 2014. He was a dirty brown fish complete with chips in his cheeks and an ivy plant that had outgrown his capacity. Once I’d repotted the ivy and cleaned him up he was looking like this. Brown, ugly, chipped, dirty, sad. It was time to let his true potential shine through!

FredCleanedUp

I turned to Rust-oleum’s Sage Green Gloss spray paint to help me turn him around. Now the ivy is gone, the chips are disguised, and he glistens with a glossy coat of sage green paint. Beautiful!

PaintedFred

He was by no means done though. Months ago, I mean, seriously, months ago, I was wondering through IKEA and saw their succulents which we only a couple of dollars each. I bought four with Fred in mind. Then I left them in my bathroom and ignored them completely except for the occasional watering. Now that Fred was looking all spiffy, it was time to plant them!!

PrePlantedSucculents

I took Fred to the five foot wide stretch of space between our house and our fence and set up my make-shift potting area. First, I stole the little round side table from our courtyard and plopped Fred down on that. Then I got out my gardening gloves and spade.

FredtobePotted

Before I could break out the succulents, I needed to add good drainage. I grabbed a handful of course gravel and dropped it into Fred’s basin.

DSC_0463

Because succulents hate standing water (as do most plants…) I made sure to layer in quite a bit of gravel. This way if I accidentally overwater, I won’t kill them. Hopefully! 🙂 You can see here, I certainly wasn’t shy with the gravel. He’s about 3/8 full of gravel. Not a ton of room for soil, but succulents do o.k. in shallow areas.

FredFilledWithGravel

I then layered in the dirt! Which makes me happy, because suddenly Fred went from sad and empty to full of promise! Dirt means growth! Growth means plants! Hopefully plants would survive! You can see there was about 2 inches of dirt over the gravel. Enough to poke into a bit for the succulents, but still enough room for me to add more after placing them.

DirtyFred

Also sidenote — I LOVE these pink and green gardening gloves I got at Home Depot. So happy! So bright!

Now that it was finally time to plant (can you tell I am pretty much the least patient person in the world?!), I decided to start with the largest succulent first. I took the succulent and gently squeezed it out of it’s container. Then I crumbled off the dirt into my potting soil bag until I could see the roots. This one I can actually name. It’s Aloe Vera, friend to all who burn easily. Don’t you dare try breaking off some of this guy for your sunburn though!!

FirstSucculent

I was actually surprised that the root balls of these succulents were so small. It explained why they weren’t looking particularly fantastic. This taller one had been pretty flimsy in the plastic temporary pot. I’m assuming it wasn’t very healthy. Anyone know why succulents would do this?

Rootball

I placed the succulent into Fred’s basin, carefully spooning more dirt in around him, and gently pressing it down around the succulent with two fingers.

Planting Aloe Vera

At this point, there was too much soil in between the arms of the aloe vera. I later scooped most of it it out with a finger. Fred was pretty cool with the Aloe sticky out of his lower back. This is totally a new look. I’m going to make something similar out of cardboard for myself and copy that trendsetter!

DSC_0490

The next guy was also spiky like the aloe plant, but shorter. I decided this prickly little lady needed to stand opposite her taller friend.

PricklyLittleLady

Two plants in, Fred the Fish was looking good!! Gah! It makes me so joyous! I’m such a plant nerd.

two in Fred

The next plant — another succulent about whose name I have not clue– started out really short, but several months in my bathroom later, had grown into a long skinny thing. I’m assuming this was due to the lack of natural light in my bathroom? Maybe they are supposed to look this way… Who is good with plants out there??

SuccyTwo

Its rootball looked a bit bigger though! Thank goodness.

SuccyTwoRoots

Still not great though right? This is the one that looks the worst these days. I mean, it certainly doesn’t look bad, but when I get my Sherlock Holmes on and look a little closer, I notice some not so nice spots. Survive little succulent! Survive!!! I can only hope and pray…

Finally, the last succulent was one I’d actually saved from the driveway. We have hens & chicks (the plants not the animals) lining our driveway and every now and then they get a little beat up. This one I saw sitting out there on the concrete all by his lonesome self. He must have come off the larger plant when it got brushed with a car wheel or something. I planted him, with the help of my good friend Hannah, into this salsa jar someone brought to our housewarming party.

DSC_0510

He sat in my kitchen window for the next couple of months, getting lots of sun. This guy was the smallest by far, but definitely healthier than the IKEA ones. He epitomized small but mighty!

smallbutmighty

And look at that root ball!! Such a baller! Hahahaha. At least I make myself laugh. 🙂

Baller

After I planted this fourth guy, Fred was pretty full. I topped the Mr. Fish off with more potting soil, again pressing gently, but firmly down around each succulents. Fred was looking good, guys! A little dirty due to the planting, but getting there!

Fredwith4Succulents

You can totally tell how super bright it was the day I planted everybody in Fred. I think it was about 90 degrees that weekend. Yay September in California! To clean things up, I gave Fred a good dowsing with water lovingly admired him glistening in the sun like a new mother looking at her tiny babe before bringing him inside.

Wet Fred

I brought Fred the Fish inside and let him sit in the kitchen for a couple weeks before I took the rest of these pictures. I wanted the succulents to get a chance to root and root they did! They look so good! Fred the Fish looks fantastic! I am so not biased at all. I just love how he looks in the kitchen!

FredFinished

Remember what he looked like before?!

FredCleanedUp

And look at him now! The green is such a nice color. It’s really the perfect sage-y grey-green. It looks fantastic with the butcher block on our island. Such a nice change from the brown!

FredFromtheSide

From above the succulents are just shining! They have rooted more firmly and no longer give when I tug on them gently. I hope they grow out a bit. I’d love to have time pooling over the side just a little bit more. Luckily the shapes of the succulents and their varying sizes gives a lot of texture. They aren’t falling over the edges, but the definitely stick out over them from above!

DSC_0270

Oh my god, you guys, have I mentioned that I LOVE HIM? Just look at that glossy face! Look at the glint in his eye! He’s so beautiful!!

GlintinHisEye

I get to walk into my house every day and look that beautiful face! I am so happy with how he turned out. It’s wonderful to have this piece of my grandmother in my life every single day. It’s the first thing I see when I walk into my house. I couldn’t be more pleased. It’s so bright and happy. I love that the succulents show off the shape of the fish more. It looks so inviting! You can actually tell he’s a fish. I envisioned him pretty much exactly like this and he turned out so well. This is definitely an accomplishment for me, because everything I design in my brain is so perfect, reality can sometimes be a little disappointing. Frequently when I’m crafting or cooking. Hahaha. 🙂 Not with Fred though! Fred the Fish, I could marry that guy. Maybe I’ll just give him a smooch and see if he turns into my prince. Oh wait — that was a frog wasn’t it? Oops!

Do you have something of your grandparent’s that you’ve revitalized and use everyday? Do you have Fred the Fish’s twin? Let me know what you think.

Fred the Fish

This is it. This is the first real blog project post at Land of Laurel. Are you excited? I am excited! Maybe a little too excited. It might be the pint of Three Twins Organic ice cream I just finished, but I’d like to think these butterflies in my stomach are from blogging excitement! Let’s just keep our fingers crossed I don’t have food poisoning. Again… 🙂

Before I dive in and talk about Fred the Fish, let’s put him in a little context. Fred is not just any Fish. Fred is a very special Fish. To me, at least. And here at Land of Laurel that’s what matters. 🙂 When I was growing up, I lived on the eastern side of the Caldecott Tunnel, but my grandmother– who we called Oma– lived in Berkeley, CA, the same town I live in now. I have many dear memories of Oma; she had a huge presence in my life. Oma was born in Germany in the 1928. She survived the war and its aftermath, eventually immigrating to the United States in the mid-1950s. She lived with distant relatives in Indiana and soon met the man who would become my Opa! She settled down, had four daughters in quick succession, moved her family to Long Island, put four kids through college, then followed those four kids to California. The Oma I remember growing up was an impeccably dressed and mannered woman who read the New Yorker, New York Times, and toy catalogs with no discernment of difference in quality. Oma would babysit my sister and I after school on Wednesdays; she would host sleepover weekends; she taught me how to make Käsespätzle. It is from her I inherited my skills in organization & punctuality, appreciation for a great view & a good park, and drive for perfection. My Oma passed away in April of 2014 after suffering from Parkinson’s Disease for several years. Although it was hard on me and my family, it was the right time.

LaurelsOma

Now, this post is not supposed to be a sad story! My Oma lived an amazing, exciting life and enjoyed every minute of it. She loved her family, her daughters and eight grandchildren especially. She meant so much to us and everything in her life and home was full of meaning. After she died, her things were passed on to my mother and her sisters, but after they’d gone through everything, I got the chance to pick a few things for myself before everything was donated. One of those things was Fred the Fish.

FredinOmasTime

Continue reading “Fred the Fish”